Pages

Saturday, 30 April 2016

April Challenge Winners

Look at me, getting the winners post done before the end of the month - don't worry this being organised lark won't last lol!

We had a record number of entries this month so I guess you all like to make blue cards!  There were some really stunning entries as always and it was really hard just to pick our top 3.

Our winner however received a vote from every single one of us so it was a unanimous decision this month - congratulations to Wendy from Pink and Dotty whose clean and simple shades of blue florals really stood out in the gallery.   We loved the colouring and the layout.   You win the £15 Wendy so drop me a line to the store for your prize code ;-)


Our two runners up this month both used the same colour scheme - that pop of yellow really did make these cards sing!


We loved the cool technique Mac used to get colour behind her Concord and 9th dies and the flowers following the die cut border in Mirella's card are really elegant.

Here is your winners badge for your blogs ladies!


Do come back tomorrow afternoon as we'll be announcing our brand new challenge for May and we think you are going to like this one too!

High Contrast Card with Concord & 9th

Hi crafty friends! What to do with leftovers? Of course I didn't want to throw them out after all the work I had put into creating them – mainly cutting them out!


Since my first project with them was a very airy, bright card I decided to go the opposite direction now and use a black card base and work with contrast. I arranged the flowers and then used glue and some foam tape to adhere them along the edge. They were originally overhanging to the side, but I cut off whatever was off of the card base and used some of those snippets and added them to the card in another place. Talk about re-purposing :)


I heat embossed the sentiment from Being Classy with gold embossing powder and then used the Being Classy dies to cut the word and adhered it to the card base. I added some confetti, but also lots of white dots and some crosses with my Stardust gel pen, which makes it look like sparkle.


I really like how this card turned out, especially compared to the first project I did with those flowers. It just shows how the same stamps can be used in very different ways to create cards that look wildly different.

Thank you for stopping by today! I hope you got inspired!

Friday, 29 April 2016

Going For Gold!

Hi everybody,

Jill here, and this week, I am going ga-ga for gold!


Using the incredibly beautiful new Gansai Tambi Starry Colours Watercolour pan set.


And oh my goodness are they beautiful?  They are so shimmery and easy to use!


So me being me, the first thing I wanted to with them was, of course, a background wash.  I wanted to see how they would react with my Distress Inks and to see if the pretty shimmer would remain when mixed with another medium, and boy oh boy, it definitely did.
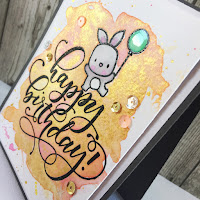
I started with a piece of watercolour card and stamped out this huge 'Happy Birthday' sentiment from Mama Elephant's Birthday Wishes set, in black Versafine, and clear heat embossed.  I then stamped out this cute little bunny from Mama Elephant's Lunar Animals, and the little balloon from Mama Elephant's Woodland Gifts, and again, clear heat embossed.  I then masked  off my little bunny with 'drawing gum', (if you haven't already got some - get some - it makes masking soooo much easier, especially with watercolour).  Then for the fun part...  So the Gansia Tambi Starry Colours set includes 6 different pans of different golds, all absolutely beautiful, and in varying degrees of intensity.  I had already tested out my colours on a piece of scrap card, and chose which golds I wanted to use.  I went for the more intense colours as I knew I wanted to us it along some Distress Inks, and wanted the gold to stand out.  I used them in exactly the same way I would any other watercolour, and just went in to create a wash over my sentiment, sploshing and swooshing the colours around wherever I saw fit.  I then introduced my Distress Ink, a variety of pinks as I thought the gold and pink would look so pretty, and again, swooshed them over by background, then set aside to dry.


I was not let down with the shimmer once dried, it is gorgeous, although blumming hard to photograph!  I removed the drawing gum from my bunny and balloon, and coloured them both using my Zig Clean Colour Real Brush Pens, another incredible product new to the store!
I matted my panel onto a piece of paper from My Favourite Things Off The Grid paper pad, (which I LOVE and am going to re-purchase so I NEVER run of of haha), mounted onto a dark grey card base, added a coat of Glossy accents to the balloon, a scattering of sequins to embellish, and there you have it.

I really hope you like it.  
As always, everything I have used is linked below, so be sure to take a look.

See you next week.

Jillx

Gansai Tambi Starry Colours Watercolour Pan Set (6) Zig Clean Color Real Brush Pen (24 piece set) Off The Grid Paper Pack

Birthday Wishes Image 1 Lunar Animals Image 1 Woodland Gifts Image 1

Thursday, 28 April 2016

White Organic Blooms On Navy


Hi there, happy Thursday! Lydia here with you and I'm so glad you stopped by.

Today I have been playing again with one of my favourite new floral stamp sets, Mama Elephant 'Organic Blooms'. I wanted to show that you don't have to have every colour under the sun to colour these beauties, so if it have minial supplies you can still create with this.


I have used very miniumal supplies on this- a navy card base, white ink, white embossing powder, a white coloured pencil and a couple of splashes of white spray.


I stamped the Mama Elephant 'Organic Blooms' in white ink, all the way around the outside edge to create a frame for my sentiment to fit inside. Once this was dry I took my white pencil and traced over the white ink and then added some extra shadows and details with it.

I then stamped my sentiment from Concord & 9th 'Shine Brighter' in the space that was left in the same white ink and added white embossing powder and heat set it. To finish I added some splatters with some white spray and my card was complete.


Thank you so much for stopping by, I do hope you like my card and give this technique a go yourself.

Hugs, Lydia x


Wednesday, 27 April 2016

For you


Hello.
My card today uses the beautiful Flutter and floral dies and Sophisticated script stamps from Concorde and 9th.


I have seen in blog land people using brushes with distress inks  so I bought some cheap make up brushes just to see how or if it would work, and it did work :)
I knew I wanted an inky background for my card and I think by using the brushes with distress inks gives a good coverage and can go on lighter than when using a blending tool so perfect for those not wanting heavily saturated colour.
Of course you can add as  much or as little as you want.
Once I had added the ink to my water colour card, and flicked some water and gold glimmer mists for some extra detail. 
I then stamped the sentiment in black archival ink.
I die cut two of the butterflies and made sure to keep them whole.
Next I die cut another four butterflies from thick white card and adhered two to each other.
I placed them back in to the empty space on my panel and went about assembling the die cuts back into place.
The coloured butterflies  wee given a dusting of perfect pearls and added on to the white die cuts and then covered with glossy accents.
To finish I added some sequins and dots of gold stickles.


Flutter & Floral Die sophisticated script stamp

Thanks for looking.

Tuesday, 26 April 2016

Wot? No Stamping!

Hey! How are you?
Shockingly I'm using nothing but paper. Not a stamp nor embellishment in sight! I've mainly used one paper pad with a couple of others and whipped up a whole collection of pretty quick and slightly different cards!
Here's the simple set of cards- apart from a little extra fussy-cutting, most of the elements are done for you!This dog looked like he might be a sucker for doughnuts!

This next card involved cutting up one of the quote cards and adding it to another printed panel.
This one was super simple- only adding in a lightbulb and mounting on paper from My Favorite Things 
I thought I'd do a little paper pleating on the next one
really simple, just adding a panel to some background paper, adding pleats and then trimming out a mini dog!
There are so many little elements in this paper pad, and they're gorgeous double sided papers too. Do check out the paper pad section. It can make creating cards much quicker and simpler. 
I love making more complex projects normally, but found going simpler much more freeing and I ended up with 5 cards in the space I'd normally create one!

Hope you are inspired to create quick and simple projects too!!

See you next week 

Keren xx


Monday, 25 April 2016

Top Dog


Hi there and happy Monday :)

I have a simple card to share with you today and it's going back to my love of retro colours and illustration again...


These adorable little dogs are from MFT's Top Dog stamp set, the style of the images is perfect to recreate that retro look. I have stamped each dog onto a square of white card and then chose three colours of copic marker to colour them in...making sure not to colour all the way to the edge.  For the white areas I used a light grey to add some shadow


For a subtle background on the card base I masked the two edges and then used Avery Elle Silver Fox pigment ink with the Myriad Dot background stamp.... I love how it adds a soft detail and mimics the grey marker pen too :)


I chose that little doggie with a hat on to sit under the sentiment.... he looks suitably smug enough to be top dog :)

Thanks for stopping by :)
Jenny x

Sunday, 24 April 2016

Golden hues

There was only one product I could play with today as I've been waiting to get my grubby little mits on the Starry Colors Gansai Tambi watercolour paint set from Kuretake ever since I saw them at the Trade Show in February!   These paints are the dogs do-dahs!   Six shades of gold from blue, red and yellow gold through champagne, light and white gold all highly pigmented with micas so they coverage is just superb.   Here's a photo of my set open so you can see the lovely colours more closely.


I wanted something to show off all the colours on one project so decided to have a go at a golden bouquet of flowers.  Now I am not very good at watercolour - I've taken classes but I am never going to be like Dawn from Wplus9, but the one thing I can do is fake it with embossing!   So here is my project (excuse the bits of me in the mirri card - so hard to photograph metallic projects!)


After embossing the Organic Blooms from Mama Elephant onto black card with a cream embossing powder I just "filled in" the areas with the paint.  I used red and yellow gold on the flowers with a tiny bit of light gold for extra highlights. I started with the yellow gold at the top of the petals and then when that was dry added red gold at the bottom and feathered it over the yellow without too much water so the paint is nice and thick.  The small leaves are white gold all over with a little champagne for contrast.  The large leaves in the middle are blue gold, light gold with white gold highlights.   Sentiments is from the same stamp set.

I want to have a go at a golden sunset on watercolour paper next using them with my other gansai paints and with more water so they are more translucent - the possibilities are endless!   We will have the other gansai paint sets soon but are waiting for more stock to arrive in the UK from Japan.


NEWS FROM THE STORE

  • As well as the paints from Kuretake we also have alcohol markers, clean color brush pens, wink of stella, wink of luna, sketching pens and a variety of glue pens  https://sevenhillscrafts.co.uk/brands/kuretake.html
  • Whilst we're on golden stuff - we have foils back in stock including two new shades - black and irridescent https://sevenhillscrafts.co.uk/brands/thermoweb.html
  • The products that were missing from our last Altenew order have now reached the UK so we should have them in the next day or so.
  • We have a restock order in for our felt sample packs but they take a while to be cut and packaged - we will get them back asap.
  • We will have some Art Impressions restocks and a few new items this week too. 

We have discovered that there is an issue with our newsletter and that if you signed up on the main website page on the new site then you may not be getting the newsletter.  We are working on it but it may take a while to find a solution.  If you aren't getting it - try using the sign up form on our Facebook page instead as we know that form is working!  https://www.facebook.com/SevenHillsCrafts/app/100265896690345/