Pages

Monday, 31 October 2016

October Challenge Winner

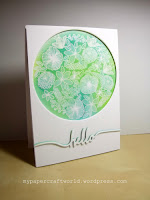
It was quite hard to judge this month's entries as a lot of them didn't follow the tone-on-tone theme of the challenge we set, so despite having some fabulous entries, many had colour schemes we didn't recognise.   We still had some fabulous entries to choose from though and our winner this month followed the theme to perfection with her teal floral and bold sentiment.  Congrats Sabine!  Drop me a line and I'll fix you up with your prize voucher.


Our runners up this month were

Anita with her delicate floral circle


Janey with her pretty bird cages surrounded by flowers


 and Al Handmade with more teal flowers


Congrats everyone!  Do take your winners badges for your blogs!  


We'll be back tomorrow with the start of our final challenge for 2016 - it's a fun Christmas theme so do make sure you stop by and play along!

Christmas Kitsch

Hello there and happy Monday :)

I know it's Halloween but I have a Christmas card for you today... one with a retro feel to it....


I was so happy to see the Kitsch Christmas set from Avery Elle.. I love the leggy deer images, in fact, I'm sure I had a similar on the solid end of my cot when I was young according to photographs I have!!
I decided to use a very pale ink to stamp the smallest deer and have another go at no-line colouring with my Copics.... I'm quite happy with the result :)
For the background I masked around the edges of the card to leave a rectangle and sponged with a teal colour, leaving the centre to be a fainter shade.
I then used the branches in the set and a larger one from Winnie & Walters Elsa's Floral's, to stamp around the edge in three shades of green ink. Looking at it now, I'm thinking an oval would have been better and more fitting for the retro feel!!

Of course, I had to add glitter for that extra kitsch touch and also to mimic snow on the branches :)


As I was making my own card base I decided to use the Card Easel die by Avery Elle which makes it easier for the recipient to display this piece of retro Christmas on their mantelpiece all season long ;)


The photo above shows how much I shorten the front of the card by when I use the easel die :)


Thanks for stopping by :)
Jenny x

Sunday, 30 October 2016

All about the baubles

Hello, my name is Tara and I have a bauble addiction.

It's true - I have a real thing about baubles - I still have some vintage 70s ones from our tree as a kid and buy a few new ones each year, even though we have the tiniest of trees and not many fit!   So I find it pretty hard to resist a bauble stamp and today I have a few examples of the ones from this year that I had to ink up.

First up, I have 3 cards using the amazing Vintage Ornaments stamp and die set from Reverse Confetti.  This set really reminds me of my old 70s baubles so I inked them up first in the colours from those - silver, pink and teal.   I added a subtle background using the new MFT Moroccan Lattice stamp, sponging off ink in places to add to the vintage feel.


I also wanted a more traditional look with reds and greens and think these mini versions would be great to mass produce in a hurry.  I created frames using the MFT Stitched Rectangle Scallop Edge Frames filling the centres with some plaid paper. (you'll get plaid frames to add solid centres if you swap all the cuts around so more mass production options)  I love how the sentiment is in the die so it makes it really easy to make a quick card with impact.


As this one combines baubles and cats, it was a serious must-have for me!  Here I simply coloured Newton in shades of grey clinging onto a teal bauble and cut him with the matching die.  I used the MFT circle spinner set to cut a small channel and added a spinner disc so that he can swing across the card (make sure you leave your twine loose to allow the movement!)


Finally we have a classy little number from Hero Arts, simple embossed in gold and water coloured in two shades of teal from the Gansai Tambi paint set.  A simple debossed frame and a greeting from the same Stamp and Cut Ornaments set and we're done.  I actually cut these by hand as I didn't want the extra frame on the layered one but you could speed it up with the dies in the set.


NEWS FROM THE STORE

This week we will have the following deliveries:
  • The latest release from Altenew (Monday hopefully)
  • The latest from MFT (Wednesday)
  • I hope to get time to add our new range from Tonic to the site too but as we have a family funeral on Friday our working week is going to be cut short and as always I prioritise getting your orders out asap.  Orders from Friday may not ship until Monday due to the funeral.
Catch you later

Tara
 

Saturday, 29 October 2016

It's Looking a lot like Christmas

Hello crafters! Today, I want to show you how to work around not having a cardstock of a particular color.


I was set on using brown card stock for my project and discovered to my dismay that I didn’t have any. My options were to change my design (too stubborn), throw a fit (I did, it didn’t help), or get my thinking hat on (looked silly, worked though). In the end, I decided to use my regular dye ink pads to quickly color my paper in the desired color. You can also use your Distress Inks, but I discovered an advantage of dye inks over distress inks: the latter don’t blend smoothly on every card stock I use, but dye inks usually smooth out very cleanly once dry so you can’t even really tell that you colored it in yourself.


In addition, after owning the Silver Bells stamp set for several years now, it only now occurred to me that I can use some of the solid stamps to color up the outlined arrangement. You’d think I’d have realized that sooner, but here you go. Of course, you don’t need a Misti for that, you can just do that with an acrylic block, so don’t be put off if you don’t have the same tools!


I also like to put a nice stitched border on everything right now, and the largest frame die from Lil Inkers gives me a wonderful stitched edge without cutting, so that’s perfect to spice up my card bases.

Thank you for stopping by today! I hope you got inspired!

Friday, 28 October 2016

Bold but pretty, Vellum Hennah Elements

Hi everybody,

Jill here, and this week, I've got some vellum florals for you...


...using Altenew's Hennah elements.


Hennah Elements was my first ever Altenew set, and I still absolutely love it.  It's so bold whilst still being pretty, and has so much open space; great for practising different colouring techniques.
I decided to go along the pretty route this week, and what's prettier then vellum?


I started by stamping out my floral elements in Versamark ink onto vellum, and heat embossing with white powder.  I've never had a problem heat embossing on vellum, I think you just have to be quick and purposeful!  I then fussy-cut them all out and set them aside.
I cut two panels from kraft card using Lawn Fawn's Stitched Rectangles.  I covered the back piece in some of the smaller elements from the set, stamped out in a brown ink to create a gentle tone on tone effect, cut my front panel into two pieces, again using the Stitched Rectangles (You can create all different size squares and rectangles with a little careful lining up of the larger rectangles!), and inked all the edges.  
I stamped out my sentiment, which is from Altenew's Painted Inspiration, onto the bottom panel and, again, heat embossed in white.


I then lay-out my floral elements how I wanted them to look, peaking from behind my panels and, once I was happy, adhered them down.  I then added foam tape between my panels, and set everything in place.
I finished with a scattering of pearls, matted my piece onto cream card, and mounted the whole thing to a kraft card panel.


I really hope you like it, and as always, everything I have used is linked below.

See you next week.

Jillx


Hennah Elements Image 1Painted InspirationSmall Stitched Rectangle Lawn Cuts Image 1

Thursday, 27 October 2016

Coffee & Flowers


Hello there and happy Thursday, Lydia here with you today.

I have gone for a monochromic look, I thought the browns would go with the coffee theme.


For the floral images I have used Vintage Roses and Vintage Flowers. I stamped three of the large leaf stem from Vintage Roses onto the card base with Caramel Toffee, Paper Bag and Dark Chocolate Crisp Ink for the three layers.


I then stamped the coffee pot from Coffee Love onto white card and cut with the coordinating dies. I then stamped the same coffee pot onto some patterned paper. I stamped some leaves onto the bottom of the pot using the same colours before adding a light mica powder over the top- this helps the leaves blend a little more into the 'pattern' on the pot. I then cut this patterned piece out and stuck it on top of the image on the die-cut piece.


I stamped a rose (Vintage Roses) and some leaves (Vintage Flowers) using the same inks and then die cut these with the matching dies. I then assembled the pieces on the card base with foam pads. To finish I added a sentiment from Coffee Talk.

Thanks so much for stopping by and I hope you like the mix of flowers and coffee!

Hugs, Lydia x