Pages

Monday, 30 April 2018

Typed Thanks

Hello there, Jenny here popping by for my regular Monday spot on this rather cold and windy day!!!

Retro style typewriters seem to be the thing at the moment, I had a toy one when I was a kid.... bright red plastic and made by a company called Petite. I'm not sure what happened to it but I'd love a proper retro grown up version now. Anyhow I couldn't resist the Typewriter die from Flora and Fauna and I've had this design in my mind ever since I saw it...


I die cut the typewriters in dark green and coral coloured card.... couldn't resist adding a touch of gold with the third which is unusual for me!! I trimmed a strip of copy paper so it would fit the feed slot and then added the wording from various Flora and Fauna sets and secured the paper behind the typewriters with glue.


I made a tall narrow card... a bit different and quite fun to change up the card shape :) I used a lined background stamp from Texture 4 to add some pattern behind the typewriters which helped the paper to stand out from the cream card base. Before adding the die cuts with foam dimensionals, I splattered on some metallic paint which gives a subtle shine to compliment the gold typewriter.


What do you think? I'm quite happy with how it turned out and you can easily
change up the text for any other occasion too :)


Thanks for stopping by :)
Jenny x

Saturday, 28 April 2018

Flowers on Kraft

Hey stampers, Anni here!

My favourite thing to put on a card are cute critters. But I also love flowers on a card and for most of the recipients flowers are more fitting than cute little bears or ducks and so on.


So I decided to go for flowers for today's card again. And the set I chose is Concord & 9th's Wildflower.
I stamped the flowers with a very light ink on kraft cardstock overlapping. There was no need for masking the flowers because I used such a light ink and the lines would be covered later.

For the colouring I used pencils. I used shades of pink and coral but also white to make the colours pop. I knew I wanted to die cut the frame from dark brown cardstock so I added this colour to the centres of the flowers.


For the frame I used Concord & 9th's Happy Card Frame Die. This is a really genius die: The frame doesn't cut all the frame but leaves a space where you can die cut then the word happy or a rose.
I went through my stash to find a "birthday" that would match the happy and found one in Lawn Fawn's Simply Sentiments.

What is your favourite subject to put on a card? Let me know.
Thanks for stopping by and have a crafty weekend!

Anni


Friday, 27 April 2018

Aqua Florals

Hi there, Jenny back again and I've been playing with some sketchy florals 
for today's project with this fresh palette of blues and greens...


Sometimes it's just good to play and watch a design evolve, so I started by taping down a panel of watercolour card stock and stamped out the outline images from Sketched Blooms 2 in a grey waterproof ink. Whilst the tape was still in place, I did a light blue watercolour wash using the wet on wet technique and then dabbed up colour from the flower heads to make them paler for over stamping.


When the piece was completely dry I used Distress Oxides to over stamp with the solid stamps and added doodling with black pen and a white gelly roll pen. The sentiment label is from Altenew's Label Love which is popped up over a piece of twine and a bow added...... I'm quite pleased with how it's turned out :)

Distress Oxide colours used: Twisted Citron, Peacock Feathers Evergreen Bough, 
Broken China, Iced Spruce and Fossilized Amber


Thanks for stopping by :)
Jenny x

Thursday, 26 April 2018

Courage Dear Heart Ginko Leaves Card

Hi everyone, Taheerah here wishing you a happy Thursday!

We all need a little encouragement every now and then, particularly when falling on tougher times.  Sending encouragement wishes in card form can really help brighten someone's day too/!

One of the best encouragement sets out there is the recent Have Courage stamp set from Neat & Tangled. From the elegant ginko leave images to the quirky-cum-inspiring phrases, this set will find its uses for many different occasions. I couldn't wait to ink it up:


Pretty right? I love how this turned out!


I started by stamping the leaf clusters using a dark brown ink. I wanted to add some finer detail veins to the outline images so I rubbed the tip of a toothpick into my inkpad and used it to draw the fine lines! It worked a treat to add a touch of detail in a colour that exactly matched the stamped image!


I splattered on some watered down green ink and also some white mist for some added interest.


I love the mix and match sentiments in this set! I opted for this pairing as it sounded rather British to me!

I'd love to hear what you think of this card. Is there someone you know who'd love to receive it? Thanks for stopping by!


Wednesday, 25 April 2018

Cute Critter Gift Card Holders

Hello, Tallie here. I've been waiting to share these with you for a while as I have only just passed them onto the recipient, but the good news is that these Lawn Fawn dies are back in stock! Teamed together, the Woodland Critter Huggers and the Stitched Gift Card Pocket dies make the perfect gift card holders. When I gave them to my friend I made sure to use a Post-It note to add the greeting so that she could pass on the love to another recipient.


I love my alcohol markers so of course I had to colour these in instead of cutting them from coloured card. I began by cutting all the pieces from both dies from smooth white blending cardstock, cutting doubles of the background pieces so that I could hide where the alcohol markers bled through the paper. This also gave me a place to sandwich the tail so I got clean edges on the front and back.

Of course, I had to make a fox, sticking to earthy red/brown and skin colours and a raccoon, using some warm greys and black.


I then attached the gift card pockets to the back of the critter panels and some googly eyes made the finishing touches to these cute little gift card holders!

I've only made two of the possible critters today but I know I will be making some more in the future.

Thanks for reading, catch you next week.

Tallie


Tuesday, 24 April 2018

Triangle Patterns


I have a fun geometric card to share today. I love geometric patterns and I think they are perfect for masculine cards. 


I'm really enjoying using stencils more at the moment, so I reached for the MFT Triangles stencil and my favourite distress oxide inks

To add some interest, I also used some patterns from the Flora and Fauna Texture Two set, stamping them through the stencil to create patterned triangles. As well as being easy to blend, the distress oxides stamp very well.


I created three rows of triangles, increasing them in size for each row. I then added a birthday sentiment in black ink above to finish this one layer card.


Thanks for joining me today,
Gemma 


Monday, 23 April 2018

Bring on the Big Gifts

Hello and happy Monday to you, Jenny here, and this week I have two birthday 
cards to share with you...


These two ladies come bearing large birthday gifts and they are from a Newtons Nook set called Holding Happiness
What a fun set!! and great for simple birthday cards.

I stamped out two of the images on smooth Bristol cardstock and used Distress inks to watercolour them. 
Matching dies are available but I used scissors to trim around them..


I've used the Stitched Rectangle Scallop Edge frames on both cards, making a simple 
inlaid central frame for this lady with a cake... nice that she has colour coordinated her outfit with her gift :)
The stamp set comes with some great sentiments but, as usual, I like to rummage through my stash to see what other phrases I could use.... I thought this was a good one from MFT's Piece of Cake.


For the second colour coordinated party guest I used the Big Hugs die from Neat and Tangled and just trimmed away the unwanted letters. The rest of the sentiment is from MFT's Gift Card Greetings stamp set..... sometimes just swapping out words in a phrase for die cut letters or a different font, can jazz up a simple sentiment and bring it into the overall design ;)


Thanks for stopping by, hope you have a good week :)
Jenny x

Sunday, 22 April 2018

Party Decorations

I love to do "non card" projects with my paper crafting supplies - and making your own party decorations is a really good way to get more out of your stash.  I had my girlfriends round for the first time since we moved on Friday for a girly dinner and cocktail party so I got busy with my stash to get the room looking pretty.

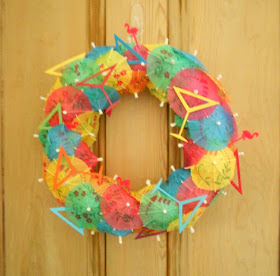
Firstly I made a fun wreath inspired by cocktails for the door to the dinning room to set the mood for the evening (we did get through quite a lot of cocktails!)


It's a really quick and easy make - take one polystyrene wreath base, one pack of paper cocktail umbrellas - chop the sticks a bit shorter and shove them in all over til you cover the whole wreath.  I then got my Martini Fancy Die from Hero Arts and die cut a load of glasses in shades of card to co-ordinate with the umbrellas and tucked a few in under the umbrellas and glued a few on top.  I added a few flamingo cocktail stirrers to up the kitsch factor to 11 ;-)

We have a big wooden fire surround in the dinning room that was ripe for decoration so I wanted to make a banner using the simply gorgeous Monogram Alphabet stamp and die set from Concord and 9th.


I spelt out "girls night" for my banner and stamped all the letters with versamark ink and embossed them all with Hero Arts Gold Embossing Powder.   I die cut them all with the co-ordinating die and then set about stamping all the floral elements using the same colours throughout.


I used coral bliss, aqualicious, parrot and evergreen from the AlteNew cube inks and then used a couple of markers in yellow and lilac to add some more detail to the smaller elements that have no stamps (they are designed to be left white but are easy to colour by hand too for a different look).  To turn it into a hanging banner I die cut the hanging tab (the bit that looks like an I in the die set) from co-ordinating shades of card, glued them back and front just where they touch the card so you can thread cord through the top.  I used Lawn Fawn's Gold Glitter twine to match the gold embossing and add extra sparkle.

As you have the whole alphabet plus and heart and an ampersand to play with you can make endless banners - names, Mr & Mrs for weddings or engagement parties, spell out number for big birthdays etc  and they are surprisingly quick to come together.


NEWS FROM THE STORE

  • Tomorrow there is a fabulous new release from Lil' Inker Designs which should be in store mid- to late-afternoon.
  • We have received 6 HUGE boxes of restocks from Lawn Fawn, so will get those online asap.
  • We also have some new items from Hero Arts and Echo Park so will get those processed as quickly as we can too.
  • We're still waiting for the remaining items from Art Impressions to ship from the new distributor.  We've been waiting over 8 weeks so are already working on another "new" way to get them more efficiently.

Catch you next week

Tara

Saturday, 21 April 2018

White on White

Hey stampers, Anni here!

Today's card is a bit shy in front of the camera - too much white on white - which is hard to take a photo off as we all know.

A friend of mine ask me to make a card for her son's thirtieth birthday. She told me he likes to ride a bike.


I started by making the background. Using Avery Elle's Postage Stamp Die I die cut a rectangle with a frame. Newton's Nook's Cloudy Sky stencil is one of my favourite for backgrounds. I used it with white embossing paste on the inner piece of my die cut.

While that one dried I die cut a few bikes with My Favorite Things' Bicycle and stacked them up. I also die cut My Favorite Things' Heart-Shaped Ballon from several pieces of scraps of cardstock.

On the balloons I stamped "30" using Lawn Fawn's to make the card more special. I tied the balloons with black thread to the bike to make it look like as they were dragged by the bike.


All that was left to do was to heat emboss the Happy Birthday (I chose one of the sentiments of Winnie & Walter's Sentimental Birthday) onto a stripe of black cardstock and assemble the card.

Do you make cards for friends if they ask you to? Do you like to have free hand or do you try to incooporate something about the person?

Thanks for stopping by and have a crafty weekend.
Anni