Pages

Friday, 30 November 2018

Coffee Lovers Fall/Winter Blog Hop 2018

We're one of the sponsors in the Fall/Winter Coffee Lovers Blog Hop which starts today so I'm joining in the fun with my card today - hence the late blog post.  The hop starts at 6am Pacific Time.


For my card I created a fun Christmas tree shaped stack of mugs full of cream topped cocoa.  The mug is one of the accessories in the Lawn Fawn Woodland Critter Huggers Add-on Dies and I just die cut it lots of times from red card to create my tree.   I trimmed the handle off a few so I could even out the design and get some right handed handles too.


I decorated the mugs with some glossy accents on the heart and used some brown flocking to add a dusting of cocoa over the cream.


I added a blended glow behind with some Scattered Straw Distress Oxide to the base card and then finished with a glittery star and a sentiment from Wplus 9's Cookies & Cocoa.

Hopefully you're inspired to join the hop - there are lots of prizes to be won so do make sure you visit the website and join in.  http://coffeelovingcardmakers.com/    Use #fallwinter2018clh on social media to follow the hop.

So grab a cuppa and get hopping!

Tara


Thursday, 29 November 2018

Rose Gold Merry Christmas Bauble Card

Hi everyone, Taheerah here wishing you a happy Thursday!

I'm continuing on my Christmas kick and this week's stop: ornaments! I love using bauble designs, particularly when they're large enough to take centre stage on the card front! So the hand drawn, vintage-yet-whimsical look of the Lil' Inker Designs Merry Ornaments stamp set ticks all my boxes!

I couldn't wait to put it to work:


Gorgeous, right?! I love how this turned out!


I heat embossed the entirety of this card! Rose gold for the bauble, then white and black for the scrolls and details! I even extended the length of the string by drawing it with a black pen then heat embossed that as well!


Having a shimmery cream card base really makes for a glitzy yet understated feel! This design would be so easy to mass produce and do assembly line as well!


I'd love to hear what you think of this card. Is there someone you know who'd love to receive it? Thanks for stopping by!


Wednesday, 28 November 2018

Oh Kitty Tree

Hello, Tallie here. I have a cute little Kitty Tree to share with you today featuring the Mama Elephant Oh Kitty Tree stamp. This set makes it really easy to create stunning cards!


I stamped out the big cat tree with some MFT Extreme Black Hybrid Ink onto an A6 white blending card panel. I then coloured them in with my alcohol markers, sticking to warm grey markers for the cats and three other festive colours (red, green, yellow). I used a blue-green marker to block shade the background and added some white dots with a gel pen to simulate falling snow.


I white heat embossed the sentiment from the set and die cut it with a Lawn Fawn Everyday Sentiment Banners die. I popped this up with some foam tape and adhered it just below the kitty tree.


I used the paw prints to stamp a few prints in the snow in some light grey ink and added some Glossy Accents to the stars, baubles and presents.

A cute little Christmas card any cat lover would appreciate!

Thanks for reading, catch you next week.

Tallie


Tuesday, 27 November 2018

Starry Circle Christmas

Today I have a starry Christmas scene card to share, using some lovely products from MFT.


I thought the MFT Starry Circle would be perfect for creating a wintry sky, so began by die cutting the circle from a piece of white cardstock.

I blended distress oxide ink in Seedless Preserves and Faded Jeans on to the circle, flicked it with water for droplet details, then adhered both the panel and starry circle onto white a card base.

To add a snow bank, I found a circle die, from the Hero Arts Circle Infinity die set, that was the same size as the starry circle, and die cut it from white card. You could use the circle included in the Starry Circle die set, as they can be snipped apart, but I prefer to keep these connected.


I then used a die from the MFT Ocean Waves die set to cut the circle down to create my snow bank. Even though this is a die set for creating waves, there is a die included that I think works perfectly for snow. I added the snow on top of the starry circle.

Next, I die cut some MFT Winter Trees from green glitter paper, and adhered them just under the edge of the snow bank.


Finally, I white heat embossed a sentiment from the MFT Hand Lettered Holiday stamp set, before cutting out with a MFT Stitched Sentiment strip and adhering on to the card.

This card is another that could easily be mass produced, if you work on each stage at a time. I’ve also kept the dimension down so it’s easy to post.


Thanks for joining me today,
Gemma


MFT Winter Trees
MFT Starry Circle
MFT Handwritten Holiday


MFT Ocean Waves
MFT Stitched Sentiment Strips

Monday, 26 November 2018

Christmas Card Set

Hello and happy Monday to you :)

I'm still on Christmas card making at the moment and have a card set to share with you today using Hero Arts Holiday Cheer stamp set. This stamp set has a good range of images which made it easy to come up with four different designs that had a similar style..


I roughly planned out each design to see what masking would be required and then worked my way through each design on a quarter sheet of card..


This was the first and easiest to do.. I added the blue background first using Broken China distress ink and a Distress Blending Brush. I then stamped the holly leaves in a circular pattern and added colour with Alcohol markers and white highlights with a Gel Pen. To lift the design I used a light grey marker to add a faux shadow to the leaves and berries.


This was the design that took the most masking which I had to do before adding the blended blue sky.
The brushes give a lovely soft edge and make it quite easy to add a circular area of background colour.... like the sponges, they give a smoother effect the more you use them and get them inky.


It was fun to add details to the presents on this design and the tree has some sparkly gold tinsel thanks to a steady hand and stickles glitter glue.


I was wondering how to use the snowflakes in the set so I changed up the central design and went for this inked strip of sky with the trees at the bottom. I white heat embossed the snowflakes first before adding the blue sky with the blending brush.

The panels of card are cut down using a stitched rectangle die and mounted flat onto a neutral card base, this makes it easier to use Alcohol markers for colour as they bleed through the cardstock and mounting them flat means they are easier to post... the last design is mounted straight onto a base card though as it suited the design better.
I made two of each design to make a set of eight cards but you could easily increase this to make more... once you have the supplies out and masks cut you can get a nice little production line going.


Thanks for stopping by :)
Jenny x


Sunday, 25 November 2018

Winter Silhoutte Scene

I'm channelling my inner Bob Ross today with a little mountain scene with "a big ol' tree" or two. 


I created the background scene on the background stamp I used which is the new "you matter" stamp from Concord and 9th.  This is a great little stamp for just creating plain backgrounds as it has a nice edge and the sketchy styles leaves a few missing bits so its easy to create an interesting background for a stamped image or as I've done here for some die cuts.

All I did to create my mountain scene was to use 3 oxide ink pads.  I started with iced spruce on the bottom and tumbled glass at the top.  Filling the middle with weathered wood and then turning it so the corner of the ink pad added a mountain shape into the blue.   I used a tissue to gently dab the ink a bit to smooth the joins of the colours and to  soften it then hey presto - one stamp and you get a pretty little mountain scene (you can get a second lighter impression too if you want to make more than one card)   I used a detail ink blending tool to stamp a little moon using white ink.

My die cut part of the scene is courtesy of the Forest Scene Builder Die from Newtons Nook and I just die cut the shorter tree and the squirrel from grey card and dabbed on a little white to give it a snowy feel.

The sentiment comes from WPlus 9's All The Cheer sentiment set, which is great for mixing and matching sentiments.  I stamped the "warm wishes" in black and then deliberately stamped the wishes so it overlapped using tumbled glass oxide so it ties the sentiment to the scene.


NEWS FROM THE STORE

Illness took us down last week so whilst we managed just about to keep on top of orders, we didn't add much stock.   This week we will therefore get the Hero Arts and Ranger products in store. 

There is also another Altenew release (not stamps or dies) on Tuesday so will we get that in store as soon as we can after they've released it.

Other than that, it's the quiet week of the month for stock so nothing else new is due and we should be able to catch up on other admin like the challenge winner for October.

There will be less new stock in store in December as not all brands release in the run up to Christmas and we don't tend to restock older items as we wind down to year end.   The store will be closing for Christmas but we have not yet confirmed the dates.

In the meantime, if you have friends and family looking for something to get you for and they don't know what you want, then point them at our gift cards!


https://sevenhillscrafts.co.uk/products/gift-cards.html


If you'd rather have something to unwrap then you can also direct them to your wishlist.  Log into your account and access your wishlist, and click the share wishlist button at the bottom.


This will open a new screen and you just enter the email of anyone you want to send your list to along with an optional message and then hit share wishlist again to send your list to them.


Saturday, 24 November 2018

One Layer Bunny Card

Hey stampers, Anni here!

One Layer cards are very rare on my craft desk. I often struggle to make them. But these sets by Mama Elephant with crowds of animals (there is one set with dogs, one with cats, one with snowmen and this one with bunnies) make it easy because they fill up a lot of space of the card.


I started by stamping the bunnies from Mama Elephant's The Bunny's Hop on alcohol marker friendly card stock - directly on the cardbase. The stamp is wide enough to fit on a landscape card but I went with a portrait cardbecause of less colouring. I masked of a stripe on the bottom of the card for the sentiment.

Then I coloured the bunnies with alcohol markers. Because I did know I wanted to make an one layer card I tried to emphasize the shadows to achieve a higher contrast. I also coloured the background or the sky. Whenever I colour a bigger area and it doesn't get as even as I like to, I add dots with a colourless blender. It is a nice effect, I think.


To finish up my card I chose a sentiment from Lawn Fawn's Simlpy Sentiments and stamped it in black on the bottom of my card.

Thanks for stopping by and have a great weekend.
Anni


Friday, 23 November 2018

Christmas Stencils

I'm late to the blog today as I wanted to get the new Newton's Nook release loaded first as I've used it for my blog today as I fell in love with their new layered stencils which are just super easy to use thanks to their clever marking system!


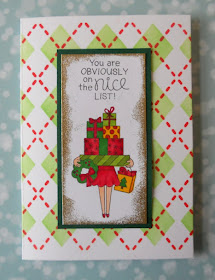
I started with plaid - as I said these new stencils are layered so you get two stencils per pack to create layered patterns.  Here I used one once to create the background squares in firefly green ink from the new Altenew Green Valley set.  I then used the "lined" layer twice.  The stencils are very clever as they have "scored" them so you can line them up perfectly every time - with the lines one there are little cubes so you line those up over the green cubes and the stencil is placed perfectly straight - that's what I did with the red lines (using oxide ink).  You can however then turn the stencil and ignore the squares to get extra lines to give a different plaid pattern - which is what I did with the gold which is embossed.  So all inks work perfectly with the stencils

To finish the card I used the Season's Greetings Die from Lil' Inker Designs cut once from green and once from gold for a double layered shadow sentiment.

For the second card I switched to the argyle stencil which again has similar score lines so is super easy to line up.  I went with a simple two layer design using the same green and red inks as before, but you can double up both stencils to fill the page.


To finish the card this time I went with the new Christmas Haul stamp and used just shades of red, green and gold to colour the present-laden lady.  I edge the panel with gold embossing and a dark green matt to match the first card.


Catch you on Sunday!

Tara

Thursday, 22 November 2018

Modern peace, Love, & Holiday Card

Hi everyone, Taheerah here wishing you a happy Thursday!

I absolutely love traditional colours for Christmas, as you will have seen from last week's card! This week I wanted to play with one of my favourite non-traditional colour schemes instead!

Non-traditional colours also seemed like the perfect time to opt for a modern style as well. Why not go all in, right?

There's no company that epitomises modern designs better than Flora And Fauna. So of course I pulled out some of my favourite Christmas sets and got to work:


Gorgeous, right?! I love how this turned out!


I used trees from the Holidays Watercolor stamp set and the Cozy Cuddles Penguin stamp set, reaching for a gorgeous colour scheme of aquas, pinks and kraft. I even threw in a black tree too!


I wanted to add some accents to my centre tree, so I heat embossed one of the snowflakes and added the garland from the Driving To The Holidays stamp set. The sentiment is from that set too!


Nothing like some splashes of hot pink to liven things up! The little clusters of stars and snow added such a great pop of colour and work as the perfect accent! Some splatters of glimmer mist complete the look!


I'd love to hear what you think of this card. Is there someone you know who'd love to receive it? Thanks for stopping by!