Monday, 31 July 2017

Playing with Plaid

Hello there, it's a Monday morning so it's Jenny here again :)

Do you like Plaid?? I think the word brings the Scottish Tartans to mind in the traditional reds and greens but when you type the word into Pinterest you can see any colour goes!! I bought the Waffleflower Plaid Play from the recent release and set about trying my hand at making a pattern.....


I found a lovely plaid on Pinterest and decided to loosely copy the colours and pattern using the different widths stamps in the set.  To prep my piece of card I used the MFT Scattered Surface background with Versamark ink and stamped it twice, turning it 90° between impressions, to give the panel a look of material.... the Versamark shows through the dye ink like little flecks :)
(Unfortunately that background is currently out of stock but you could try the Denim background for a similar effect)


As you can see from the photo I used a gridded paper pad to do my stamping on, I find it easier and less hassle than a stamping tool for this sort of pattern stamping.... the long Lawn Fawn Acrylic block helps too :) 

A top tip for these solid type of stamps is to use them on scrap paper and wipe them clean a few times to get them conditioned before putting them near your cardstock, it's well worth the extra time ;)

When I'd finished the pattern I used one of the dashed line stamps from the set and white pigment ink on top of the green stripes to add texture and then added white gel pen lines alongside the yellow stripes. The sentiment is from a Neat & Tangled set called Across the Card which does exactly that.... go across the card. I then stamped it again on white card so I could cut out the rectangulart label part and pop it up on foam tape...


I'm pretty pleased with it and perfect for a guys card which is exactly what I need for a birthday this week :)


Thanks for stopping by :)
Jenny x

Sunday, 30 July 2017

Thelma and Louise

Now the new Stamping Bella release is on our store I couldn't wait to ink up my favourite stamp from the entire release - Thelma and Louise is one of my favourite films and I have all the uptown girls so this set was screaming me, me, me!


This may look like a complex card but it really wasn't difficult to do.  It is all coloured just with pencils and blending solution.   I stamped the image first onto white card, coloured it whilst watching TV (took about 20 minutes) and then fussy cut it out (there is a matching die if you aren't a fan of scissors but for the "look" of my card I didn't want the white border).

For the scene (yes I know they can't be driving the car like that, it's the bit where they pick up Brad Pitt so they're doing a quick photo before he drives them on!) I just googled an image of a "US highway sunset" and adapted it to fit the perspective of the car.  Its just a case of drawing a light horizon line and then two straight lines wide enough to fit the car at the bottom left, getting closer together at top right.  A wobbly line for the mountains with a gap for the sun and away you go.  I used shades of blue pink and purple for the sunset sky, ochres for the sand and browns for the mountains. Blending stumps dipped in blending solution break down the pencils so you get a nice smooth finish - I find them easier to create backgrounds with than alcohol markers personally but you could use those or ink and blending pads too or even cut scraps of card to build up your scene - whatever floats your boat.   I scribbled a few cacti shapes in the foreground as they were on my inspiration photo.  Glue on the car and add the sentiment to finish.

If you want to have a go at creating a scene but aren't confident of sketching your own, then stamping bella have brought out a few background scene designs in this release - you can find the whole release here 
 

NEWS FROM THE STORE

Lil' Inker Designs have a brand new release on 1st August which we have just received so will have it in store for release day.

We've had lots of enquiries about Lawn Fawn's new release - although they have shown images of it all, it will not be released until 24th August so cannot be purchased yet.  WE DO NOT DO PRE-ORDERS - we only ever sell stock we have physically available to ship immediately.   We ordered as soon as it was released to stores a couple of weeks ago so we will have it for release day (barring customs clearance issues)

Altenew - we have two orders pending with Altenew.  We ordered restocks a month ago but sadly they shipped using the wrong method and without completing any customs paperwork.  As a result it has been sitting in customs for almost 3 weeks and we are having to jump through a ridiculous number of hoops to prove it is a legitimate import.  I still have NO IDEA when (or if) it will be cleared - there is a slim chance it could be returned to the USA if they don't accept our paperwork now.

Our order for their new release has now shipped, using the correct method, so hopefully we will get that by the end of the week.

We will also have our BRAND NEW TO THE UK  brand in store this week so I can finally reveal that is is FLORA AND FAUNA which I know will please a lot of you!  For those of you who haven't heard of them - take a peak at their instagram feed to see all the goodness coming your way - here's a little peek at some of it.....


Catch you next week

Tara

Saturday, 29 July 2017

Welcome Little Baby

Hey stampers, Anni here!

A crafty friend got a baby boy this summer! So I wanted to create a baby card for her.


I had this set called Nursery Deco by Mama Elephant for a long time but I haven't used it before - can you believe it! It is so cute!

I started by stamping the big giraffe once and the small one three times and coloured them with alcohol markers.
For the background I stamped the really fantasic Halftone Circles by AlteNew in Aqua tones. By the way: I think this set is a must have - it is so versatile and makes it so easy to create subtle backgrounds.


For a baby card I like to add the name of the baby. That is easy if you have a Alphabet die cut set in your stash. You see me often use My Favorite Things' Bottlecap Alpha for these occassions because it has just the right size for a card. I cut the letters I needed from scraps of cardstock and stacked them up to get some dimension.
I added a stamped Welcome to the sentiment from the Nursery Deco set.
When I looked at my card I had the feeling it needed a little more yellow. So I die cut some stars with the Confetti die by Mama Elephant and arranged them in a triangle.

Thanks for stopping by and have a crafty weekend.
Anni


Friday, 28 July 2017

Sky High Birthday Wishes

Hi everybody,

Jill here, and this week I'm flying high to send some birthday wishes.


Using the adorable Across The Miles from Waffle Flower.


I absolutely adore this set.  For me, it's just one of those perfect sets that fall so into 'your alley' it's like they were designed just for you :). The font, the style, the cute little critter poking up from the basket, the banner, the choice of sentiments.  Yup, this is an amazing stand-out set for me.


I started my card by cutting a Stitched Circle Scalloped Frame from My Favourite Things from the front of my card to create an aperture, and in-laying the frame back in.  I stamped out the clouds, from the same set, onto my back panel & watercolour-washed a sky around them.  I then stamped out all of the elements I chose to use to make up my scene, clear heat embossed everything and coloured using my Zig Real Brush markers (yes again, but what else is a gal supposed to do - they are simply the perfect colouring medium!).  I always like to clear heat emboss my stamped outlines if I am colouring using water as the raised edges help so much with keeping all your colour pooled in the place you want it and not flood out into other sections.  I then fussy-cut all my pieces.  I wanted to be able to see through the part of my hot air balloon where the balloon meets the basket, so snipped off that part, stamped it out again onto acetate, and added that behind instead - I really love how it turned out and it really didn't take up much extra time.
I wanted to keep my card CAS with plenty white space and and a spotlight scene, so built up all of my elements in and around my aperture, adhering in place with foam
tape and wet glue.


I really liked how my scene looked like at this point so decided to leave it there.  I find when a set is as well designed as this, there really isn't much need to mess too much, it kind if just creates itself!


Waffle Flower have knocked the ball out of the park with their releases this year in my opinion, and this is no exception.  I just know I'm going to enjoy this set for a long long time!

Thanks so much for your time, I really hope you like it.

As always, everything I used is linked below so be sure to have a peep.

See you next week.

Jillx

Across the Miles  Stitched Circle Scallop Edge Frames Dienamics  Zig Clean Color Real Brush Pen (12 piece set)

Thursday, 27 July 2017

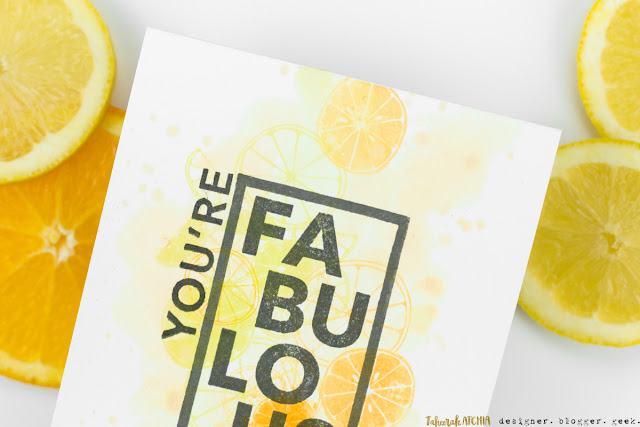
You're Fabulous Citrus Fruits Card

Hi everyone, Taheerah here wishing you a happy Thursday!

You may or may not have noticed, but fruit is a seriously big trend in papercrafting right now. You can't help but seeing fruit popping up all over the place - particularly Summer and citrus fruits! One of my favourite recent stamp sets in this theme is the WPlus9 Citrus Background Builders stamp set. I love that it's taken the hard work out for you when putting together a background!

I paired it with another recent favourite, the Aloha Friend stamp set by Concord & 9th, and came up with this baby:


I am seriously crazy about this card!


I stamped the large citrus cluster twice, once with a mix of yellows/oranges and once with a pale green. I used the same colours to add a light watercolour wash and some chunky splatters!


The sentiment building with the Concord & 9th set is so bold and striking! I stamped it with grey instead of black for a less stark look, and stamped a couple of yellow slices to frame it a little!


I thought I'd leave you with an aerial shot of the entire set-up. Kinda crushing hard on the photography of this one too!

I'd love to hear what you think of this card. Is there someone you know who'd love to receive it? Thanks for stopping by!

Wednesday, 26 July 2017

Beautiful Butterflies card with My Favorite Things


Hi everyone, I've got a card for you today that uses the Beautiful Butterflies set from My Favorite Things.


I cut a long panel of heavyweight white card stock, and stamped three overlapping butterfly base layers in Limestone from Altenew Rock Collection Mini Ink Cubes. The next layers were done in Silver Stone and Industrial Diamond from the same set.

The fourth butterfly was stamped in brightly coloured water based dye inks and I added the same colours as splatters, along with some purple.

The sentiment strip is from My Favorite Things Magical Unicorns... it seemed to fit the theme of the card well :)

Thanks for stopping by!


Tuesday, 25 July 2017

Duh Nuh Circle Scene Card

Hello and happy Tuesday!

I wanted to create a layered card but keep the dimension to a minimum, so it's easy to mail.


I've used circles to create scenes within layers. This is a small card, so I only have 3 layers (two plus the card base). The bigger the card, the more layers you can use, but obviously this will bulk out the card more.

I first cut two squares from white card - one stitched squared and one zig zag edge square. The zig zag square is the top layer so I die cut the largest circle from this. On the stitched square that layers below this, I die cut a smaller circle. I used the Hero Arts infinity circle dies set, which has a great selection of different sizes. 


On the square card base, I blended on some light blue ink for the sky. Then I added the square die cuts on top.

The positive die cut circle pieces will help create the scene. From the smaller circle, I die cut a stitched hillside, then an ocean wave. I used distress inks to add colour to each piece and water droplets on the sea for interest. I stuck these down on the card, back in place in the circle like a puzzle. The space at the top shows the sky from the card base.

On the larger circle, I die cut another ocean wave, colouring the same as the other one. Before adding this to the card, I heat embossed the 'duh nuh' sentiment on the bottom. 


The shark is from the Lawn Fawn Duh Nuh stamp set, and the palm trees from Ahoy Matey. I used alcohol markers to colour them in, and fussy cut them out.


I hope you like my no-bulk layered card. 

See you next week,
Gemma

Lawn Fawn Duh-Nuh
Lawn Fawn Zig Zag Squares
Lawn Fawn Ahoy Matey
Lawn Fawn Small Stitched Squares


Hero Arts Circle Infinity Dies

MFT Ocean Waves


Monday, 24 July 2017

Smarty Pants!!

Hi there :)  Jenny here and I'm just back from my holidays so it's a quick and simple card from me this week using the appropriately named I'll Be Brief set from Lil Inkers :)

I've took the liberty of changing up the name of the garment this smug little bear is wearing to fit my punny sentiment ... yes they're known as pants in this house!


To spell out part of the sentiment I've used Mama Elephants Iconic Letters set which has two alphabets that can be layered or used separately... I do like a bit of double duty in a stamp set ;) I have only used the solid alpha and inked it using two shades of blue for an ombre effect to match the bears pants.


I've used a circle stencil from my stash to help me make the simple dot background pattern, the circles act as a guide for placing a pen dot, I then popped up the different elements on foam adhesive pads and added a smattering of gold stars to match his starry pants..... very smart pants indeed :)


Thanks for stopping by, catch you next week :)

Jenny x