Showing posts with label MFT Wine Service. Show all posts

Monday, 27 August 2018

Uncork and Unwind, Pop up Card!

Hello, Jenny here wishing you all a lovely Bank Holiday Monday :)

I am sharing a little 'vino love' on the blog today, although it looks like the bottle is empty now!!
I was inspired by Jennifer McGuires video on how to make a sliding Pop-up card.  I thought I could get the same look using the large die in Blueprints 28  and I'm all for stretching those supplies ;) 


When you pull up the slider you uncover the hidden message....


I started by covering a piece of card with patterned paper before using the die to cut the panel with opening flap. I then added two score lines as shown in the photo below and used a small circle die to make a thumb notch in the top....


Because this die has a thumb notch at the door opening, you have to trim that semi-circle away on the outer frame.

From now on I pretty much follow the instructions in the video by adding a strip of card stock across the base of the slider which not only strengthens the edge of the flap, but covers up the notch in the case of this die cut. I also added a piece of card that's slightly wider and longer than the opening to become the pull tab for the mechanism...


The rest is down to decoration and assembly.... I used MFT's Wine Service Dienamics and Uncorked stamp set to decorate the panel for the front and the sentiment under the flap which is basically the front of the card base you adhere the whole mechanism too. The wine ring is from an Altenew set called Coffee Ring...... Coffee, Wine.... same 'need' just different times of the day 😉


I'm really pleased with how this came out and chuffed I can use my dies
 for a fun interactive design too.



Thanks for stopping by :)
Jenny x

Monday, 13 November 2017

Cheers Dad!!

Hello hello :) 
It's been a busy birthday week with cards I needed to make and send, one of which was this one for my lovely Dad who celebrated a BIG birthday this week :)

I was so infatuated with the wonderfully coloured wine bottle and glass on this card by the very talented Francine so I had to have a go at shading one in the same style...


Whilst working out the sentiment, I started to play around with the layout and decided to try a block of typography around the images. I used a scrap of paper and drew around the bottle and glass die cut so I could then try out different fonts and words to see which would fit best. The Cheers is from an Avery Elle set of the same name and the numbers are Avery Elle dies, which have been shaded with alcohol markers to match the wine. It was just a case of going through alphabets stamps and dies to find a good mix of shapes and sizes...


The bottle, numbers and word 'Years' are popped up on foam tape to add a bit of dimension but the word 'TO' gave me the most trouble of all!! It looked lost in the space until I had a lightbulb moment...... I know, I'll accent it with a circle die from this Waffleflower die set... and that's just what it needed :)
 My craft desk looked an absolute mess with alphabets strewn everywhere but I was very happy with the result...... I hope you give it a try too with whatever alphas you have in your stash!!

I've linked to the products I've used below, unfortunately the Waffleflower set is currently out of stock but the die set of the same name are in stock here.


Thanks for stopping by :)
Jenny x

Tuesday, 27 June 2017

Say It With Wine

Happy Tuesday!

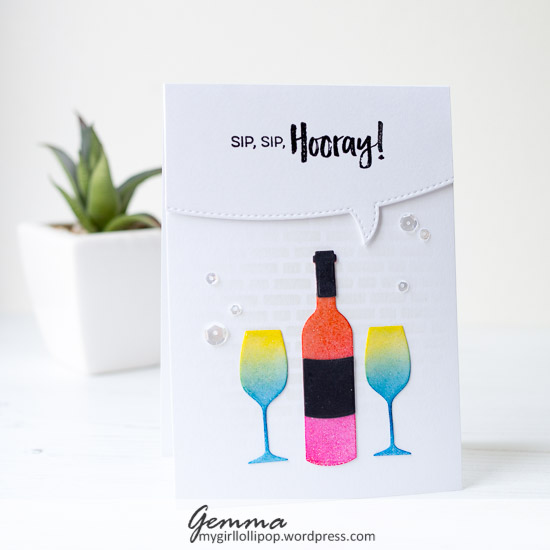
I'm having fun with glitter embossing on my card today. By adding clear glitter embossing layers to stamped images or die cuts, you can really add some sparkle and shine to your projects.


To start, I used the MFT English Brick Wall stencil and MFT grout grey ink to add some detail to a white card base. I used light blending to keep the background fairly subtle. Once that was done, I set the card base aside to work on the other elements of the card.

I die cut a wine bottle and glasses from the MFT Wine Service die-namics, then blended on some inks. I went for bright vivid colours as the rest of the card is more plain, and a black bottle label and top.


The die cuts need some glitter, and clear sparkle embossing powder is perfect for the job. As these are small die cuts, I adhered them to some low tack painters tape. By using tape, you have something to hold whilst heat embossing and keep your fingers from burning.


After adding to the tape, I used a Versamark ink pad to add the sticky ink to all the die cuts. I covered them with clear sparkle embossing powder, then heat embossed them. I repeated the process to add a second layer of embossing, which adds even more sparkle and dimension to the die cuts.

I left space at the top of the card for a speech bubble containing a sentiment, which I stamped with black Versafine ink and heat embossed in the same clear sparkle embossing powder. I used foam tape to attach the speech bubble to the card base.


Finally, I added some sequins around the card for extra sparkle. I also made a second card with a different sentiment.


Thanks for joining me.
Gemma

MFT Stitched Speech Bubble Edges

MFT Uncorked

MFT Wine Service

Versamark

Hero Arts Sparkle Embossing Powder
MFT English Brick Wall Stencil


Sunday, 19 February 2017

Wine A Little

I've gone full-on wino this week lol!  I may be a gin girl but all my mates are wine drinkers so all the new wine themed products we've had in store recently will be getting a lot of use!

Firstly I did a simple card using the MFT dies Wine Service and Cheers


I die cut a frame using the peek-a-boo window (sorry it just sold out again but we will get it back as soon as we can) so I had somewhere to sit my bottle.   I die cut the bottle and glass and did some quick colouring with alcohol markers before covering both with a thick layer of clear embossing.  I added a gold die cut cap and a wine label - the stamping of which came from one of the sentiments in MFT's Uncorked using the selective inking technique using a momento pen to ink up each word one at a time.  I finished with a gold matt and a matching gold Cheers sentiment.

For my second card I wanted to make a shaped card so I switched dies to the larger wine bottle from Avery Elle and used it in a slightly different way than they intended!


The die cuts the bottle in 4 pieces which you then align on your card.  However as I wanted a stand alone bottle, I just drew around the die twice on some green card and cut them out with scissors.  It's an easy shape to cut so it's no great hardship. I then die cut the label part from kraft and did some scruffy embossing to the edges to give the label a distressed feel and stamped one of the larger sentiments from Uncorked onto it again.  Another gold top finished the top bottle off - to make it into a card I just scored under the gold top to create a crease to lift the front up with and then used a little strong tape behind it to glue the two bottles together.  You could make fun bottle gift tags if you just did single ones too. 


NEWS FROM THE STORE

It will be a busy week in store again this week:
  • Lil' Inker Designs have a new release tomorrow which will be live in store after they release it in the USA
  • This month's Concord and 9th release was delayed in customs in the USA (we are finding they are tightening up on  regulations and parcels are being held up for the smallest of reasons so we are facing many unhelpful delays) but should be here in a couple of days.
  • The much anticipated Lawn Fawn release will finally be released by Lawn Fawn in the USA on the 23rd February.  We will have ours tomorrow but retailers are not allowed to sell it until they have released it in the USA so we won't be releasing ours until they do.
  • The SugarPea release from last Friday will hopefully ship to us early this week so we should have it in around a week to 10 days.
  • We are still waiting for the Hero Arts release but it reached the UK distributor on Friday so hopefully it won't take them too long to sort out everyone's orders and get it out to us.


Tuesday, 14 February 2017

Champagne Shaker

Happy Valentines Day!

Today I'm sharing a card that I think would work for many different occasions - valentines, engagement, wedding, anniversary, even a special birthday.


I'm using the new Wine Service and Cheers die-namics from MFT. I love all the wine related items from the February MFT release. They work so well together with the wine bottle tag, but also look great on cards.

I die cut two of the largest Stitched Traditional tags, set one aside and from the other I die cut the two wine glasses.

I added acetate behind the tag and a double layer of foam tape around the die cut windows and over the back of the tag. Before adding my gold sequins, I dusted on some talc around the edges of the foam tape. This removes some of the adhesive, meaning your sequins are less likely to stick and can move more freely. I used some sequins I found in my stash, but I've linked below to a pretty store option that I like.

Once I'd added the sequins, I stuck down the other die cut tag at the back to create a shaker tag. If you wanted to make just a tag to use on a present, don't forget to add a punched hole to both tags before putting it together. That way you can add some twine or ribbon.

To add some detail to the card base, I used the Basic Stitch Lines die-namics across the middle. I then added my shaker tag at a slight angle on the card.


On the positive die cuts of the wine glasses, I added some pink ink before trimming them down to just the stems. I added these stems back on the card, then added some gold glitter bows to the glasses.

I die cut a gold glitter 'Cheers' - the font is so pretty! I used stick-it adhesive at the back so it was very easy to attach to the card.

To finish, I added some gold glitter and pink sequin hearts above the wine glasses.

Have a wonderful day,
Gemma


MFT Wine Service
MFT Cheers

MFT Stitched Traditional Tags
MFT Basic Stitch Lines
Stick-It Adhesive

Pixie Dust Sequins

Avery Elle Bunting