Thursday 31 January 2019

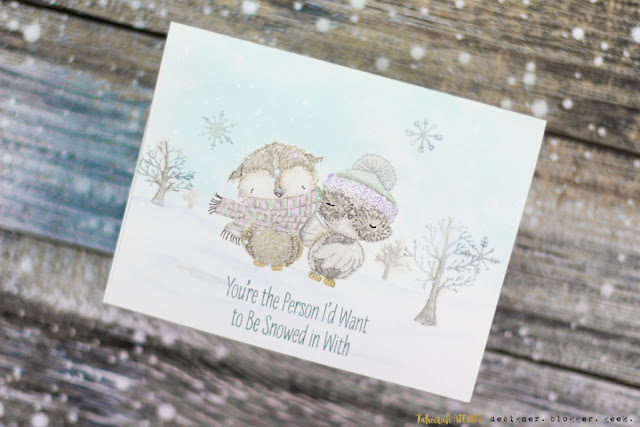
Cute Snow Day Owls Card

Hi everyone, Taheerah here wishing you a happy Thursday!

I can't say I'm a fan of Winter. The bitter cold and long nights really don't appeal. But one thing does make everything pretty and better.

Snow.

Good thing too seeing as most of the UK seems to have ground to a halt because of it.

Seeing as we grown-ups can't actually have a Snow Day off work to play in the snow, I opted for the next best thing - a stamped version that lets me stay warm at the same time!


Isn't that the most adorable scene?! I love how this turned out!


I broke out the My Favorite Things Warm & Feathered Hugs stamp set for this beauty. I love everything Stacey Yakula designs. I used a mirror stamping technique to get one of my owls to put his wing around the other - awwww!


It's been so long since I coloured, but these little cuties just demanded the coloured pencils treatment! I mostly went with a no-line look for my owls, drawing in some finer details afterwards. My ground was created with colour pencils and I used a watercolour wash from inkpads, Glimmer Mist and water to paint my sky. Some splattered mist/paint snow was the perfect finishing touch!


I'd love to hear what you think of this card. Is there someone you know who'd love to receive it? Thanks for stopping by!


Wednesday 30 January 2019

Birthday Pals

Hello, Tallie here. Whilst the weather turns chilly here in the UK I needed a bright and colourful birthday card to cheer up my Nan. The Avery Elle Party Pals stamp set has some purrrrfectly cute little cats!


I started by smooshing some Broken China and Mowed Lawn Distress Inks onto some watercolour paper. I built up the layers until I was happy with the texture and die cut using an MFT Inside & Out Circle STAX Dynamics die. I used a Lawn Fawn Stitched Hillside Border Die on the green circle to layer over the blue sky background.


I stamped out the two kitties, the 'HAPPY' banner, a star and a heart from the Avery Elle Party Pals stamp set and the party hats from the Avery Elle Peek-a-Boo Pals set, in some MFT Extreme Black Ink onto some blending cardstock and coloured them in with my alcohol markers. I stuck to bright, happy colours in rainbow order.


I fussy cut the items out and stamped the two sentiments so I could arrange them on my card base.

Thanks for reading, stay warm and catch you next week!

Tallie


Tuesday 29 January 2019

Happy Birthday Circle Shaker


Today I have a quick shaker card to share. The words 'quick' and shaker card’ don’t usually appear in the same sentence, but the fabulous shaker pouches from MFT make it possible!


I began by die cutting the MFT Happy Birthday Circle Frame die from purple glitter card. The circle shaker pouches fit this die perfectly.


On my card base, I adhered a wide strip of patterned paper. I then placed some sequins, from the Hero Arts Ombré Purple sequins mix, in a little pile on my card. This is a really lovely sequin mix and you get loads of sequins for a great price. I covered the sequins with the circle shaker pouch and sealed it down with some double sided tape.


I added the Happy Birthday Circle Frame die around the shaker pouch, using some liquid glue. To finish, I adhered a few sequins around the card.


Thanks for joining me today,
Gemma


Monday 28 January 2019

Die Cut Pattern Play

Hi I'm here on a Monday just to confuse you as I swapped with Jenny this week and today I'm playing with die cut patterns.   Anyone who knows me knows that I love symmetry so I always find it easier to create a symmetrical card design than an asymmetric one.  I've tried to do die cut repeat patterns before but haven't always been that successful getting them to line up, until the genius that is Tim Holtz created the perfect system with his "repeat" dies.   The first in this line "Retro Repeat" has just been released and we have it in stock along with all Tim's other new Sizzix products (as well as a few other bits from other designers we thought stood out).    I've made a couple of cards using these new dies for you today.


For the first card I simply created a full background pattern to pop behind my stamped image strip.  The die cuts two rows of the chevrons, but the clever part of the die is that there is a 3rd row of chevrons that doesn't cut but just embosses so it makes it super easy to line up your next row of cuts against them.


I just repeated the pattern the full length of my card stock and stuck it to my white base card.  I then created a partially die cut strip of white with one of the new "hey baby" stamps from Stamping Bella, they're all super cute babies in pots but I love a cactus so went with Cactus Baby for my design. 


I didn't feel it stood out enough when I popped it on so I stuck it to black card and trimmed around it for an extra layer and some more definition.

For my second card I wanted to play around more with pattern and make that the focal point of the card so I used another one of the dies from Retro Repeat and added a few bits from Atomic Elements over the top.


I die cut the repeat pattern from teal card stock and then trimmed it to be a square on my card.  I selected two different diamond shapes from the Atomic set and cut them from lime and popped those in rows to emphasise the similar shapes in the base pattern.   To add some drama I added a few spiky black elements and some of the "waste" pieces from the other die cuts layered on top.  It's such fun to cut lots of pieces and then layer them on to see what sort of pattern you can build up.


NEWS FROM THE STORE

We have a lot of orders to get through from the weekend so it may be Tuesday before we catch up on shipping.   After we're caught up we'll get loading new stock.

This week we expect:
  • Concord and 9th restocks (yes including kits)
  • Lil' Inker Designs new release
  • AlteNew's latest releases and restocks

Catch you later

Tara


Sunday 27 January 2019

Shining Super Heroes

Hello hello... Jenny here, yep I'm not normally here on a Sunday but we've had a swap 
of days this week so Tara will be here tomorrow with her crafty project and weekly store round up.

Today I have a Super Hero card which could be used for a few different occasions...


I decided to use the  Hello Sunshine turnabout as a starburst style backdrop for these two 
little super heroes.... it's really quite a versatile backdrop for making images centre stage.
For this card I heat embossed it in white on blue textured cardstock

I stamped and coloured the characters from Mama Elephants Tiny Heroes then cut them
 out using the matching dies. One of the stamps in this set looks like two shooting stars (but I think they're a set of star deely-boppers), so I cut it into two and added them around the edge of the pattern.


The banner is from the same turnabout set which I heat embossed onto black card. I've made the sentiment up from the two different stamp sets.... I tried yellow pigment ink and yellow embossing powder from my stash and I quite like the texture it's produced on the words Super Hero.


Thanks for stopping by :)
Jenny x

Saturday 26 January 2019

The Big 80

Hey stampers, Anni here!

My mom is turning 80! Wow! Well, when your mom has a big birthday you have to make a special birthday card for her, don't you!
Hope you can see the card well. The white on white effect is difficult to catch on a photo.


I just recently treated myself to Altenew's Mega Number Bundle - a Christmas present from me to me. With my mom's birthday coming up and my nephews (twins) turning 18 this year I had just the right excuse to order them - after eyeing them for a long them. You can buy them seperatly, too (Mega Number 8 and Mega Number 0).

I combined the big numbers with some flowers from Altenew's Layered Floral Elements. I die cut several flowers and leaves from scraps of cardstock and layered them up if needed. Then I embossed the sentiment - one of the many Happy Birthdays from Altenew's Birthday Builder - in white on a stripe of black cardstock. I added some dimensional adhesive to the back and arranged the flowers and the leaves to the stripe.


After I finished it all there was left to do was to adhere the stripe to the 80.

Thanks for stopping by and have a crafty weekend.
Anni


Friday 25 January 2019

Turning with Stencils

I know a lot crafters don't have a stamping platform so find using Concord and 9th turnabout stamps a little tricky (whilst they were designed to be used with a platform they can be used with a large block but it is trickier without a platform tool to mange the turns smoothly)  This doesn't apply however to the turnabout stencils - they are super easy - all you need it a bit of tape and a sharpie!   So today I've taken their new Faceted Turnabout Stencil for a spin and made a couple of fun cards from one 6x6 square.


To start, I took the all over pattern stencil from the set of 2 and labelled each edge A, B, C, D with a sharpie.  This just makes it easier to remember which "turn" you are on when you ink it up.

I used a little washi tape to hold it in place and then inked it up with distress oxides in Peeled Paint, Peacock Feathers and Evergreen Bough.  I then left it to dry fully and for the 4th turned inked it up with versamark so I could add gold embossing powder as my final colour in the pattern.

I then cut the 6x6 inch piece into two so I could make 2 6x4 cards from it.   For the first I used it to create a frame to "hang" my planter die cut from which comes from our new range of dies from Sizzix.  I die cut an oval and then added a black matt to the edges.  For the Hanging Planter I die cut it from white and then used the same oxide inks to colour the plant and die cut the plant pot again from a scrap of patterned paper.


I had a small strip left plus the oval from the die cut so I used those to create card number two - as my colours reminded me of camouflage I went for something with a more masculine feel so just opted for a bold sentiment as my focal using the Neat and Tangled Awesome die cut from the oval waste and with the matching die used to cut a black matt.


I cut the remaining strip of pattern in half to make a strip at the top and bottom of the card along with a thin black strip to tie it all together.  The remaining (wonky!) sentiment was stamped using Elle's Alphas which is really useful miniature font for stamping in tight spots.

Hope that shows you how much you can get out of the stencils!

As we're out of the office for a couple of days, I'll be back on Monday with another project and Jenny will be filling in for me on Sunday.

Catch you later

Tara


Thursday 24 January 2019

You're Awesome Cow Hide Letterboard Card

Hi everyone, Taheerah here wishing you a happy Thursday!

It seems that I'm on a bit of a masculine card kick lately, given this week and last week's creations! With Valentine's Day just a few weeks away I guess I'm rebelling against all the hearts and frills, lol!

Letterboards have been all the rage recently, after making a comeback a couple of years ago. Definitely a trend now! A few manufacturers have come out with dies to create letterboard cards, but I am pretty sure that the SugarPea Designs Letter Message Board Die was the first. I leapt to buy this the moment it was released and have been itching to use it ever since!

Almost all designs I've seen seem to use a plain letterboard design - how unoriginal! *wink* So I decided I wanted to create a bold, masculine, different design with mine:


Awesome, right?! I love how this turned out!


I used a technique I learned a few years ago to make a leather effect look out of my white cardstock. Not only does this look the part, but also feels pretty similar to leather too! After I had dried my card panel I used a few different Distress Inks to paint and stipple my cow hide design on. Stippling created a more realistic hair look to it. Once that was all done I die cut my letterboard from it.


I die cut the letters from both black and white cardstock to create my sentiment. I decided not to overcomplicate or fill my board so opted for a simple 'You're Awesome.' sentiment!


I created a frame by die cutting the letterboard again, then measuring a quarter inch from the edges of the hole and trimmed. I used an old woodgrain stamp to heat emboss my frame but you could use woodgrain textured cardstock or an impression plate for a similar effect! I adhered the frame with dimensional glue gel to give it a bit of lift from the base and adhered all the letters with Multi Matte Medium and I was all done!


I'd love to hear what you think of this card. Is there someone you know who'd love to receive it? Thanks for stopping by!


Wednesday 23 January 2019

Wiser Birthday Wishes

Hello! Tallie here with some owlishly wiser birthday wishes inspiration! I'm a sucker for owl stamps and the MFT Forever and Owlways was no exception.


I started out by masking a circle onto a white background panel. I used Distress Oxide Inks in Faded Jeans, Mermaid Lagoon and Broken China to create a radiating sky, splattering on some drops of water to represent stars in the night sky. Once dry, I cut this out with a Stitched Rectangle die.

I stamped out the images onto some blending cardstock with some MFT Extreme Black Ink and coloured them in with my alcohol markers. I used my Scan N Cut to cut them out, but there are coordinating dies available.


The sentiments are a mixture of the coordinating sentiments from the MFT Forever and Owlways set and an MFT Cause for Celebration die. I used some kraft card for the die cut, stacked three times to give some dimension.


A few finishing touches with some Glossy Accents. I had a few spare die cuts so I made another matching card.


Thanks for reading, catch you next week!

Tallie