Thursday 30 November 2017

Joy to the World with Alpha Dies


Hello everyone! This is Julia and I’m popping back into the SHC blog to fill in for Taheera today. Hope you guys don’t mind.

I want to show you which wonderful and clean designs you can create with simply alphabet dies. I especially love these Journaling Alphas from Neat and Tangled: the letters are nice and big, but at the same time they are very narrow so you can fit entire words or sayings on a card front. And what better to say "Joy to the World" now that the holidays are just around the corner?


You can see that I also added dimension to these letters. You can do that via a few different methods:

  1. Put some double-sided adhesive on the back of your card stock and die cut the letters a few times each, then layer them up. That’s a bit fiddly, but I find this to be the quickest way, still.
  2. Skip the double-sided adhesive and use some form of liquid glue. I tend to make a mess, so I abstain from that method.
  3. Use some craft foam (ideally, maybe add the double-sided adhesive to the back before you die-cut?). You’ll have to give this a test run with your dies/die-cutting machine. With very thin and intricate shapes, foam can be a bit tricky.


For the color, there are many options once more: I used red glimmer paste from Nuvo/Tonic. To make it easier for me, I die cut the letters first, but left them in their card stock piece for the moment. Then I applied the glimmer paste on top, trying to spread it so it would cover about 2/3 of each letter. I let it settle (not dry completely) and then carefully grabbed each letter where it didn’t have the paste and adhered on top of its stack (the stack was already glued to the card base). This way, I could ensure to only get the paste on the very top, and not smeared on the sides. If this is too messy for you, or if you don’t have this paste, you can also:

  • use Copics, watercolor, or pencils to color in the letters.
  • use Nuvo’s Drops to cover the letters partially and add a nice raised effect to them.
  • add shimmer with a Shimmer pen to your colored letter, and then cover it with Glossy Accents for more effect.
I’ve added a few mediums that would work well instead of the paste in the supply list below.


I hope you got inspired! Thanks for stopping by today, and happy holidays to all!
Wednesday 29 November 2017

Christmas Colour Challenge Week 3

It's your final reminder to enter our prize challenge this month for your final chance to win £20 to spend in store in our Christmas colour challenge.  It's our last challenge of the year and due to our move and need for time to settle in to our new house we won't be starting a new challenge until February so it's your last chance to play for a good few weeks!


Here are Gemma and Tallie with their takes on the challenge to give you a boost to your creativity.

Gemma
I chose the middle colour palette for my card, using Lawn Fawn Winter Alpaca and Knit Picky Papers


Tallie
I chose the traditional metallics combo, teaming the Lawn Fawn Winter Owl and MFT Snow Globe Sentiments with some silver embossing powder and Gansai Tambi Starry watercolours.


The challenge  will close at 10pm on Sunday 3rd December.


Season's Greetings with Winter Owl

Hello and happy Wednesday!

I promised myself this year that I would take out some of the older stamps in my stash so I could revive and get the most use out of them. I hate to think that some of the cutest stamps stay hidden away, never to see the front of a card again! This week I chose the Lawn Fawn Winter Owl.


I started out with an A6 card base of Bristol Smooth card, treating it with a powder tool before stamping the Lawn Fawn Winter Owl repeatedly in some Versamark Ink until the panel was covered. I then sprinkled on some gold embossing powder and heat set.


I took out my Zig Clean Colour Real Brush Markers in festive shades of green, red and brown, colouring in the owls and pulling out the colour with my water brush. I used two markers for each colour to give some depth to the colouring.


For the greeting, I used a sentiment from the MFT Snow Globe Sentiments set, white heat embossing onto some kraft card stock and trimming the edge into a banner. I needed some matching card strips to mount the sentiment so I coloured some scraps with the red and green markers, adhering these to the panel beneath the foam mounted sentiment strip.

A bright and festive card that revived one of my older-but-never-forgotten sets! Check out this month's DT inspiration post for the Monthly Challenge to see an alternative colour combination using metallics.

Thanks for reading!

Tallie


Tuesday 28 November 2017

The Night Before Christmas

I’ve had a lot of fun making cards for Christmas these last couple of months. I really love the Little Agenda Santa and reindeer as they are so playful. The small size makes them quick to colour, which is definitely a bonus when making lots of cards.


I wanted to create a scene card, with Santa and his reindeer flying over the city. I chose to die cut a cover up frame from white card, then I coloured in the panels with distress oxides. 

I die cut an additional frame, then layered both onto a card base. This adds a little depth but not too much.

I added the top panel within the frame, along with the Santa in his sleigh and three reindeer, popped up with foam tape. I used a black fine-liner to draw in the reins.


For the panel at the bottom, I added some die cut buildings from the Mama Elephant City Sidewalks stamp set. I love the scripty sentiment stamps that are included in the set, which look like smoke rising from the chimneys. I heat embossed these in white on the panel, then added it to the card to finish.


I think this design would work well with a single stitched rectangle panel or frame too. 

Thanks for joining me today,
Gemma

Mama Elephant City Sidewalks
Mama Elephant Little Reindeer Agenda


Mama Elephant Little Santa Agenda

MFT Essential Cover Up Vertical


Monday 27 November 2017

Birds of a Feather...

..... stick together, and they certainly are on my card today!! Brrrrr

Good Morning, Jenny here and I have pulled out a couple of small Lawn Fawn stamp sets for today's project. I figured that on a cold winters night these little birds and cozy owl would snuggle up for some warmth.....


I started by stamping the branch in 'marker friendly' brown ink and then used simple masking to add the birds and owls along the branch. I just had to colour the little birds as robins and I kept their wintry accessories to two different colours. To give the branch some extra dimension I used a alcohol marker in a dark brown for shading underneath.


I then tried something I haven't done before..... I coloured the sky with markers too! Scary stuff as it does look a bit of a mess when you start but if you stick with it it works out and creating an ombre style helps you to blend out any patchiness 😉 I used a white gel pen to add snow dots and settled snow ..Brrrr!!

I cut the image with a stitched tag and added black twine, which I treated with some Multi Matte Medium so I could stiffen it up and make a neat bow, and then mounted it over a couple of card strips. 
The sentiment is from a lovely set by Winnie and Walter called Sentimental Winter. I love the mix of fonts and the way you can mix and match phrases within the set :)


I always think it's handy to have cards like this in your stash for those friends and family members that, due to personal circumstances, you don't necessarily want to send a 'Happy' or 'Merry' Christmas card too.


Thanks for stopping by :)
Jenny x

Sunday 26 November 2017

A Forest of Christmas Trees

If you've seen my Christmas posts in years gone by then you will know that my weakness when it comes to Christmas products is Christmas Trees - I think I have pretty much every tree ever released by anyone!   So I really didn't NEED anymore this year but............  (Yes, I have a problem - I need Christmas Trees Anonymous)

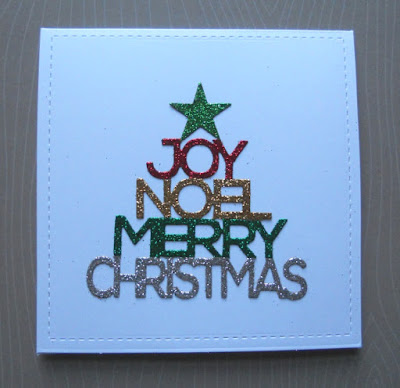
For this first one I used the fabulous Christmas Words Tree Die from Lil' Inkers - not an outright tree so I'm justified in adding this one to my stash!   I love this die - it's such a statement piece so I just wanted it to be the focus of the card so I just had a simple border on a square white card and then went full on glitter mode (well it is Christmas)


To add extra impact though I wanted different coloured glitter for each word so I just die cut the die 5 times from two shades of green glitter card, red, gold and silver and then simply trimmed them apart with scissors (its really very easy) and the bonus is you then get 5 cards at once.


I should have put stick-it on the back before die cutting but I forgot so just used a glue pen but stick-it would make this quick enough to knock out a batch of 20 in about an hour in a production line so a really good last minute bulk make  if you need one.

Next I think is my favourite tree from this year - the fabulous Trim The Tree die from Concord and 9th.


As with all Concord and 9th products - there is just the hint of "clever engineering" about it so what looks like a simple die can actually do so much.  You get the large tree shape which here I have used to make a tree shaped card by die cutting with the top of the tree over the fold line and then I've cut another full tree from a single sheet of green to lay over the top so the tree is complete at the top from the front.  This will stand up so as well as being a mini card I thought these would make brilliant place cards for the Christmas table.   The clever part of this die is the 5 dotted lines they've provided as you can place them however you like to make some interesting swag lines to decorate your tree - you could then add bows die cut from the die as I have here or use enamel dots.  I've topped it with a gold star using the star die in the same set.

My final card today is a little more left field!   I saw this cover on a magazine we get at home and really loved the "drawn in flour" tree and wanted to try and replicated it on a card.


So I decided to have a play with the new green embossing powder from Altenew and see if I could make a card version.   I just sprinkled it onto a dark green card base without any versamark ink and then used a rubber on the end of a pencil to draw my tree shape and then embossed it from UNDERNEATH the card (well I did on my second attempt after the heat gun blew all the powder away on the first attempt lol!) and got a similar effect (although not quite the mag shot!)


I added a few glittery enamel dots, a star from the trim the tree die, and then embossed a sentiment and a pot using the new razzleberry pink embossing powder.  It would be quite a fun technique to try with any "little fingers" around the house - if you do the embossing they could do the drawing.


NEWS FROM THE STORE
  • We are still waiting for our delivery of the November Hero Arts kit add-ons - we don't have an eta (we never get one from Hero Arts) but hopefully it will be soon.
  • We hope that a restock from Concord and 9th will ship early this week so fingers crossed we'll have the dahlias back by the end of the week.
  • We have a lot of "move planning" to do this week so other than that, it will be a quieter week for releases - there are a few smaller releases we've missed but we will get them after our move - something just had to give as I really do need a tiny bit of sleep each day!

Catch you next week

Tara


Saturday 25 November 2017

Merry Christmas Twice

Hey stampers, Anni here!

Don't you love the Little Agenda series by Mama Elephant? So cute!
For the two Christmas cards I want to show you today I used the sets Little Reindeer Agenda and Little Santa Agenda.


I die cut two Stitched Mini Scallop Rectangles by My Favorite Things from alcohol marker friendly paper. Then I draw a fine line with a pencil and stamped the santas and the reindeers in a row.
For the colouring I used alcohol marker.
I used the alcohol marker for the sky, too, and let it fade into white. The ground I created by inkblending grey ink.


For the sentiment I die cut the word Christmas (it's a part of Lawn Fawns Merry Christmas Border)  from gold paper. The same paper I used to die cut the stars for the background with the star dies from Lawn Fawns Stitched Journaling Card and Mama Elephant's Confetti  Creative Cuts.


Thanks for stopping by and have a great weekend.


Friday 24 November 2017

Super cute sticky note.

Hi everybody,

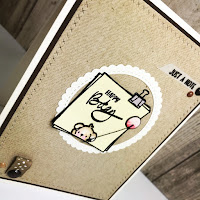
Jill here, and this week, I’m making a cute birthday memo...


...using the cute as a button ‘Sticky Note’ from Mama Elephant.


I love any set that contains ‘peek-a-boo’ critters, there’s just something so uber cute about their little noses peeking over a page edge or similar. It makes my heart melt and that’s all it takes for me to snap up a set! I’ve also had a massive stationary obsession since I was tiny so this set was ticking all my boxes!

I started by stamping out and colouring my wee sneaky peeky critter and fussy cutting. I really wanted my sticky note to look like a, well, a sticky note and didn’t have the exact colour so used, yup you’ve guessed it...sticky note paper! It’s obviously very thin and I wanted it to look like a stack with the cute memo on top so stamped it out a few times, only adhering at the top so the pages could curl up along the bottom.


I stamped my greeting onto my sticky note and cut a Scalloped Circle from My Favourite Things to act as a frame.
I added a balloon attached to string and a further sentiment to some vellum and adhered my elements in place.
I embellished with a tab of ribbon and a scattering of enamel dots and there you have it.


I really hope you like it.
As always, everything I used is linked below.

See you next week.
Jillx

Sticky Note  Stitched Circle Scallop Edge Frames Dienamics