Sunday 31 March 2019

Complimentary Colours

Good morning and Happy Mother's Day to all the UK mums out there patiently waiting for their breakfast in bed to arrive......

Today I wanted to show that with a bit of imagination and a craft knife, you take Lawn Fawn's reveal wheel and use it with pretty much any stamp in your stash.  I had a fun idea of how to use it with Neat & Tangled's Complementary Colors set.


Firstly I die cut the reveal wheel from white card and then placed a template from the essentials set in place on top and laid my stamps on top using the template to ensure that the areas I wanted to become windows were in the correct place.  I popped a large acrylic block on top so that I picked my stamps up in their exact position, removed the template, inked up the stamps and stamped them in place. 

I then created the windows by popping the template back over and lightly drawing around the window with a pencil and used a kraft knife to cut away the window areas that fell inside the paint tubes.  I did this before colouring so I could make sure it all worked without wasting time and ink.

I divided the wheel itself into 4 quarters using a ruler and the markers I'd selected (pencil will show) from a real colour wheel that were opposite each other (red and green, blue and orange) and then coloured the inside of the whole wheel to just inside the scored line for the scalloped edge.  I popped that temporarily in place to make sure I'd cut the correct areas and that the colours showed correctly.


Then if was just a case of colouring the images on the front, adding the sentiment and popping it onto a base card which I covered with a piece of rainbow paper to emphasise the colour theme.

I hope this has given you ideas of how to make more of your reveal wheel - the possibilities are endless so shop  your stash and see what else might work!


NEWS FROM THE STORE

It's a quieter for deliveries, but being the first week of the month, it tends to be the time when all the monthly-releasing brands make their new releases available to order so I'll be busy sorting that.

Tomorrow sees the release of Chapter 2 for Sizzix though and we have some of that - particularly the Tim Holtz stuff which is fabulous as usual.  It should be live mid-to-late afternoon.

There is also a new Stamping Bella release later this week but it hasn't shipped yet so we are unlikely to have it this week.   We'll get it live as soon as we can after arrival.  We don't do it before as we cannot guarantee our orders are correct so only add stock once its been checked off to avoid your disappointing in buying something that didn't turn up.

Watch this space!

Tara

Saturday 30 March 2019

Happy Easter

Hey stampers, Anni here!

Are you making easter cards? And actually sending them?
Well, I haven't in the last years! But this year I purchased so many easter stamp sets (thanks to Lawn Fawn's super cute latest release). So I HAVE to make (poor me, I know) some this year and send them to my friends and family!


For this card I combined stamps from two sets by Lawn Fawn called Eggstra Amazing Easter and Butterfly Kisses. Most of the images are from the first set but the butterflies, the grass and the clouds I used from the second.

I started by laying out all the stamps on my cardbase. This way it is easier to see which images I want to use and how to arrange them. Then I stamped the images, coloured them with coloured pencils and fussy cutting them because I didn't want a white border around the images. But there are coordintaing dies available for both sets, here and here.

For the background I masked of the negative part of a die cut circle. I also added a stripe of masking paper on the bottom of the circle to create a ground. Over his mask I ink blended inks in shades of turquoise.


Under this ink blended area I stamped the sentiment in white directly onto the panel.
Then I arranged all the images and adhered them flat to the cardstock but also using dimensional adhesive.
That finished up my card.

Thanks for stopping by and have a crafty weekend.
Anni


Friday 29 March 2019

Found on Friday

As I covered Taheerah yesterday I thought I'd better give you a break from my cards today so I'm bringing you another edition of "Found on Friday" where I share some of the recent projects that caught my eye in our customer only group on Facebook - SHC VIP's


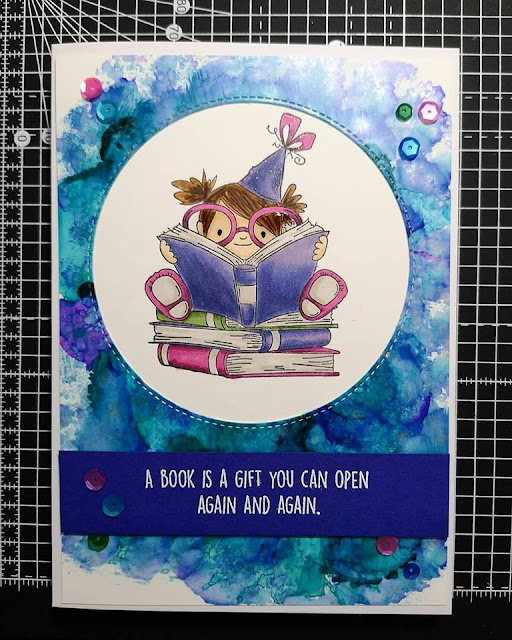
Firstly Jodie shared this super fun card featuring a cute little squidgy book worm from Stamping Bella and her first play with alcohol inks for the background - looks like you've found a medium that suits you Jodie - awesome job!


How awesome do Anna's Magnolia from Waffle Flower crafts look?  She used watercolour markers to shade them and the effect is beautiful.


More flowers from Ann-Marie this time using Mama Elephant's Wild Meadow Border.  I really love how she flipped it below the sentiment too so it looks like one lovely large image.  Beautiful soft colouring too.


I love how Claudia incorporated a reveal wheel into this DL card - shows you can extend the versatility of products and not always use them the way the manufacturer intended.  This is such a bright and cheerful card - you couldn't fail to have a magical birthday party with this one!


Finally for this week we more florals, this time from Felix - I think her gold embossing of the Wonderland Flowers from Altenew onto pastel card stock and piecing the die cuts of it into her embossed cards is a really classy idea!  Gives such a soft feminine finish and a great way to use your stamps if colouring is a bit daunting.


I hope you found lots of inspiration here.  We'll have another Found on Friday in a couple of weeks  as there were so many cards to choose from this month, so if you're a VIP and weren't featured this week - check back then ;-)

If you are a customer but aren't in our VIP group - head over to Facebook but make sure you look out an order number from one of your SHC orders first as you can't get in the group without one - it is strictly a customer only group I'm afraid ;-)


Thursday 28 March 2019

Take one die cut...

 I'm a huge fan of geometric patterned dies - especially when you can see ways to carve them up and stretch their use and so I couldn't wait to get my sticky mitts on the new Mod Circles Cover Up Die from Lil' Inker Designs.   It's very versatile - you can use it as a full background, do some faux layering techniques with it - or as I have here, die cut it once, cut it apart and make two cards from one die cut!

I cut the die from Adriatic card from Hero Arts which is probably my favourite shade.

For my first card I needed a get well soon card for a friend, so simply used a trimmed panel from the die as a background strip to sit my character on.  I could have used the whole die cut to cover the base of the card, but I wanted "space" to sit the character in and to stamp the sentiment directly to the card.  To frame it, I used one of the strips I cut off the die for my second card to edge the right hand side of the card.

The fabulous characters is from Stamping Bella and is called Edna to the Rescue - I love her huge plaster!  She was coloured mostly with Altenew Set D Markers, except for the flesh tones and plaster which I used copics for.  I added a little glitter to her wings.  I die cut her using the co-ordinating die and then took my craft knife to the space under the plaster between her arm as there was too much white and it bugged me but you could happily skip that step if you're not a pedant like me.  The sentiment is from the same stamp set.


For the second card I wanted to go masculine so decided to just let the pattern do the talking.  I trimmed a row of circles so there were no straight edges and glued it to the bottom of my card.  I then took all the pieces I'd poked out and pressed them directly onto my versamark pad before dipping them with tweezers into my copper embossing powder.  I think the copper pairs so well with the dark teal card.  I gave each piece a double coat so it was nice and thick and shiny and then glued each into place once cool.


To give it an extra manly feel I added black diamonds - I just coloured the teal pieces with a black marker rather than doing another die cut and then added glossy accents and 3 round enamel dots inbetween.

For the sentiment I stamped several birthday messages from Mama Elephant across some black card and embossed them in copper to bring it all together. I think it gives quite a simple and elegant "can be sent to anyone" card that is always handy to have in your stash for those requests we all get for a cards from time to time.

Tara


Wednesday 27 March 2019

A Family of Dragons

Hello, Tallie here.

My card today is inspired by those fun-loving dragons from a rocky town called Berk! I love these cute little dragons from the Mama Elephant sets Me and My Dragon and Dragon Wishes.


I stamped this family of dragons out with some MFT Extreme Black Ink onto some blending cardstock. I actually only used 8 markers from the cool greys - probably the least amount of markers I have used in a while! Some dot detail helped to add some texture details for scales.  There are coordinating dies available.


For the background scene, I coloured three panels with Distress Inks. I used Mowed Lawn and Twisted Citron for the grass, Rusty Hinge and Walnut Stain for the hills and Broken China and Mermaid Lagoon for the sky. I wasn't too smooth with my blending as it helps to give texture to the scene. I used two different dies to cut out the panels - Lawn Fawn Grassy Border and Mama Elephant Kingdom Trio. I stacked these onto a white top-folding A6 card panel.


I stamped out the 'Happy Birthday' sentiment from the MFT Essential Sentiments onto the front grassy panel before popping up the dragons on some foam tape. I arranged the scene so Mum and Dad are in the air with the kiddies scattered around.

A few sequins in the sky and some gel pen detail to the dragons finished off this card!

Thanks for reading, catch you next week.

Tallie


Tuesday 26 March 2019

You're the Sweetest


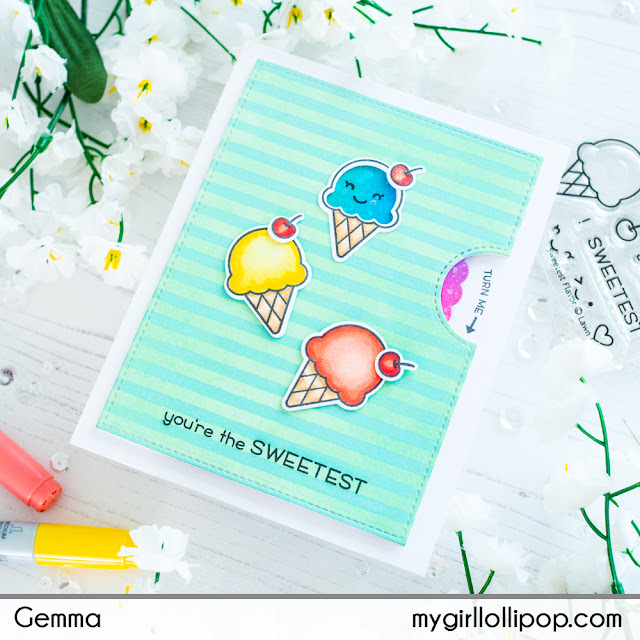
Today I have a sweet reveal wheel card to share. This is still my favourite of the Lawn Fawn interactive die sets.


For my background, I added some colour to a white card panel, using distress oxide inks and the Altenew Classy Stripes stencil. Once dry, I die cut it with the Reveal Wheel panel and the Sweetest Flavor add on


On the wheel mechanism, I inked it with more distress oxide inks and flicked with water for droplet detail. I stamped some faces from Lawn Fawn Sweetest Flavor stamp set, to show through the ice cream window when the wheel turns. One of the faces is from the Lawn Fawn Out of this World stamp set.


Before putting the card together, I stamped a greeting on the panel from the Lawn Fawn Sweetest Flavour stamp set

I coloured three ice creams to go on the card, then die cut them out. I used the reveal wheel add on die for one of them, so it can go around the window.


As a finishing touch, I topped each ice cream with a cherry, and also stamped 'turn me' next to the wheel, from the Lawn Fawn Reveal Wheel Sentiments stamp set.


Have a lovely day,
Gemma

LF Sweetest Flavor
LF Sweetest Flavor Add-on
LF Reveal Wheel


Altenew Classy Stripes
LF Reveal Wheel Sentiments


Monday 25 March 2019

Happy Cake Day!

Have you got your sunglasses handy this morning??
I decided to have a play with the Bokeh stencils from Newtons Nook to make 
a striking background for this stylised birthday cake... I think they go rather well together!


I started by blending Milled Lavender, Dusty Concord and Seedless Preserves 
Distress Oxide inks onto a panel of Bristol card to make an ombre effect. 
The stencils are numbered one and two and are etched with each others pattern to help 
you line them up for the best layering effect.


I sponged the same three distress colours through the stencils, making sure I had a mixture 
of lighter and darker dots all over the card. The great thing about the Oxide inks is that the 
lighter colours do show on the darker ones albeit a muted tone... I also added some white 
pigment ink to tone down the darker dots. I think these stencils give an amazing 3D effect.

With a background like that the cake just needed to be white so I layered up the pieces and 
added a sentiment on a hand cut banner which was too deep to sit across the cake stand!
I remedied that by making a cut across the stand and moving the lower half down...
 the banner hides the gap and you'd never know it wasn't meant to be that tall 😉


Thanks for stopping by :)
Jenny x

Sunday 24 March 2019

Magical Day

I'm going interactive for today's card and I have to say the new magic picture changing die set from Lawn Fawn is perhaps one of the easiest interactive die sets I've ever used.  Some of the interactive dies take a little figuring out and I have never managed to get it right first time, but this one is so simple it's fool proof!

Whilst Lawn Fawn specifically designed a couple of stamps to work and change picture, you can use any other stamps with the die too and I thought it would be fun to do a magical design to match the magic of the die so I decided to pull a rabbit out of a hat......


To create the pictures, you stamp and colour first and then line the windows in the two die pieces over your two images to create slots and tabs which then slide one picture over the other and it really is that simple!

I used the top hat from Lawn Fawn's Hat's Off stamp set and stamped that onto my two pieces of card before colouring with copics. For the "front" image I just added a few dots with a fine liner to indicate magic dust and then set that aside.


For the second image, I masked off the hat and then stamped one of the bunnies from Eggstra Amazing Easter again from Lawn Fawn but any bunny image that fits the hat would work here.  Then all you do is die cut both and fold along the score lines - this provides a channel up the sides to stop the slider moving from side to side and provides a slot in the first image through which you feed the tab on the second.  You just poke each of the 4 tabs into the corresponding 4 slots and bingo - it slides, well like magic!


To finish I added a frame in sage green along with a matching tab top to the pull tab - this acts as a stopper so the recipient can't poke the slider out of the bottom of the mechanism and both are provided in the die set.   The add on die provides a rectangle frame and different pull tab to mix up the designs you can do.   I stamped sentiments above and below the frame using MFT's Magical Day stamp set which is just perfect for this card.

It's easier for the recipient to pull the tab if the mechanism is raised on foam so I added a layer of spiffy speckles to a top fold sand base card before sticking foam squares to the back of the mechanism to finish.


NEWS FROM THE STORE

It will be a quieter week this week however, we will have:

  • The latest monthly kit-add ons from Hero Arts
  • Some Echo Park and Cartabella (we have 3 different releases of that to add, its taking a while so bear with us!)
  • Chapter 2 from Sizzix also releases early April so we should have that early the following week.

Catch you later

Tara