Saturday 22 December 2018

The last blog of 2018

We were rather busier than expected yesterday so I didn't manage to get my final blog post written up so I'm sharing it today along with a tiny bit of news.

We had our annual Book Club Christmas Dinner on Thursday night and my post is all the things I made for that for gifts and for the table.


I started with the cards and just wanted a quick but classy design I could replicate easily so opted for Concord and 9ths Joyful Noel die set - some red and green card, a bit of sparkly white and some liquid red pearls and you're good to go.  I finished with a white line border using a white pencil.


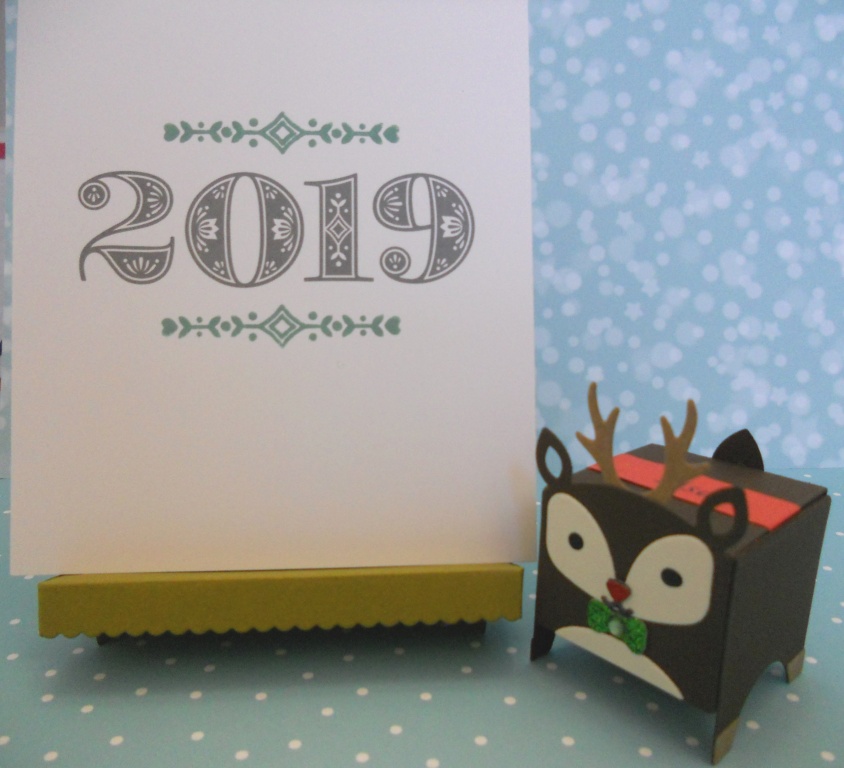
I opted for 3D place cards this year in the form of a tiny box reindeer from Lawn Fawn.  I used ground coffee and vanilla malt card stock with some glittery accents and then just printed the names on paper from my laptop and inked over it with distress oxide to make it red and glued it on the lid folding the edges underneath the inside.   Filled with tiny chocolates and it then becomes a take-away gift not just a name tag!


I also made them all a desk calendar using Concord and 9ths pre-printed sheets and just stamping onto them using their notable numbers and all season turnaround stamp sets picking a different colour for each month.  The die cut easel goes with it and enables it to stand.


All finished off by popping them in a simple gift bag - I bought an inexpensive set of plain silver (coloured kraft nothing sparkly) bags and just added a large die cut sentiment using red card backed with stick-it for mess free gluing!

Here's what the finished table looked like.


NEWS FROM THE STORE

The box of stock lost by DHL was located and delivered late yesterday.   We will sort it today and get the missing items in store.   You will be able to order them, but we won't be able to ship them now until 2nd January.

All that's left is to thank you for your custom this year, to wish you a very Merry Christmas and all the very best for a Happy and Healthy New Year.


Tara & Rick

Thursday 20 December 2018

Peace on Earth Gradient Christmas Card

Hi everyone, Taheerah here wishing you a happy Thursday!

Every Christmas, as the year draws to a close, I can't help but think of one of my favourite sentiments and use it to remind myself of what the season is supposed to be about. The world can be a cruel and unremitting place, and a lot of that may weigh heavy on us, but this time of year is one of few times where (hopefully) everyone can put their differences aside and we can have, even briefly, some Peace on Earth.

This beautiful sentiment is represented perfectly by the stunning Mama Elephant Peaceful Wishes stamp set. I couldn't think of a more fitting card to create for my last post of 2018:


Stunning, right?! I love how this turned out!


I used a few different purples, and a deep currant red, to blend a beautiful gradient over my heat embossed sentiment. How I love the rich colour palette!


I splattered on some water droplets, some iridescent gold Glimmer Mist, and some solid white mist to finish off the look. I love the depth this builds, and the wonderful pops of sparkle!


I'd love to hear what you think of this card. Is there someone you know who'd love to receive it? Thanks for stopping by - and Merry Christmas!


Wednesday 19 December 2018

Meowy Christmas!

Hello, Tallie here, sharing one last Christmas card with you. This is probably my most favourite of those I made this year so I saved the best until last! I've said this already when I posted my last card featuring this set, but these Mama Elephant Oh Kitty Tree stamps are purrrrfect for practicing my colouring!

I started out by stamping the big kitty tree from Mama Elephant Oh Kitty Tree onto an A6 panel of blending cardstock. I used MFT Extreme Black ink and coloured in with my alcohol markers.


It took me a while as I wanted to make all the kitties unique. I ended up using about 30 different markers in total! I kept to traditional festive greens and reds for the accessories. I used a couple of blue-green markers and a colourless blender to give some colour to the background.

I stamped the sentiment from the set centred at the bottom of the kitty tree and used some gel pens to add some details - snow in the background and details to the accessories.

Thanks for tagging along with me for this year, I hope you've found some inspiration. I wish you and your families a very happy holiday season and I'll see you back in the New Year!


Tallie


Tuesday 18 December 2018

Stencil Cheers


I think stencils are a great item to have in your craft room. They are easy to store, inexpensive, and come in a variety of different styles.


Altenew have recently released some new stencils so I thought I’d use one on my card today.

I layered the Altenew Sunburst stencil over my white card base, then used some distress oxide inks in cracked pistachio, peacock feathers, and faded jeans to add colour radiating out from the centre. This takes hardly any time at all to do and the colours are easy to blend to give a lovely gradient effect.


After removing the stencil, I spritzed some water over it to get those lovely droplets.

For the sentiment, I kept things simple. I die cut the MFT Cheers dienamic three times from black card, stacking them together for a dimensional look. I used some liquid glue to attach it to the card, then finished with some enamel dots around the sentiment.


That’s all from me for 2018. I’ll be back on the blog again in the new year. Wishing you all a wonderful Christmas and a happy new year.

Gemma

Altenew Sunburst Stencil

MFT Cheers

Distress Oxide Inks


Monday 17 December 2018

Hand Stamped Gift Bag


 Hello again, it's Jenny here with my last Christmas project for 2018 and this one is not for the last minute crafter!! I love how it turned out but it's definitely a one off for a special gift...


I've used the Ugly Sweater dies as stamps by cutting them from kids craft foam, I cut two pieces of foam for each shape and stuck them together. I added a cardboard tab on the back of each foam stamp so I could use them easily...


I used cheap Gouache paint but acrylic would work just as well although I think being able to add a bit of water to the mix helped the printing process. I started by using a soft grey to print out the jumpers.... I added the paint to the foam stamp with a paintbrush to make sure I had an even application.


The paper is from a roll of kids colouring paper so it did wrinkle a bit 
The paint dries fairly quickly so I was able to move on to adding the images to the jumpers


I could have left it here but I decided to add some small details with a paintbrush


When it was all dry I added a second sheet of paper behind and then used the brilliant technique of part wrapping a box to make the shape for my gift bag..


This is how I folded the end to make the base of the gift bag. After securing the one end I pulled the box out and you are left with a nice gift bag, you can change the size and shape depending on the box you use. I decided to fold the top down twice and punch two holes to add three strands of twine to keep the bag closed...


This would be a great project for older children to do or help with and a production line is definitely a good thing.... I found it easier to stamp each shape at a time and build the pattern that way.

Well that's all from me until the New Year so I wanted to wish you all a Happy Christmas 
and I hope Santa brings you all the craft goodies on your Christmas list :)

Jenny x


Sunday 16 December 2018

80th Agenda

I needed an 80th birthday card this weekend but wasn't sure what to make so I had a browse around instagram and was inspired by a cute 10th birthday card on @thetinybluebutterfly's feed and created a card featuring lots of little agenda characters celebrating the big birthday.


I selected some of the "party related" characters from the following little agenda sets from Mama Elephant:

Monkey
Bunny
Dogs
Cats

I decided to keep all the animals in shades of grey to keep a coherent design and just used pink, yellow and green for all the accents.


The 80 itself came courtesy of Concord and 9th's Notable Numbers Die cut from glitter paper from their summer glitter pack which I used to edge the strip of navy card I mounted the scene on.

Quick and easy card and there are so many characters in the range you can get them doing all sorts of things to match your needs.


 NEWS FROM THE STORE

  • Just a reminder than we are "closing" shipping at 3pm on Friday.   The store will remain open over Christmas but we are taking a break so orders placed after 3pm on Friday will not be processed until we start work again on the 2nd January.   We will not be blogging, answering emails or Facebook questions either during that time as we need a proper break so thank you in advance for your patience.


 Before we close, we will still have a few new arrivals:

  • MFT card kit stamps and dies - from this month onwards MFT are allowing us to have the stamps and dies from the card kits AT THE SAME TIME as they release the kits rather than making us wait 3 months as they did before.  WE CANNOT GET THE WHOLE KIT - if you want that, as always you have to go direct as the kits are exclusive to MFT Stamps.
  • Hero Arts November Kit Add-ons will be here this week.  Again, we can't get the kits themselves they are exclusive to Hero Arts.
  • AlteNew - the new stamps, dies, pens and embellishments are hopefully arriving by Tuesday.
 
I'll catch you on Friday for our final blog post of 2018!

Tara


Saturday 15 December 2018

Hello Emilia!

Hey stampers, Anni here!

A crafty friend of mine got a cute baby girl a few weeks ago. And of course that called for a baby card.


Whenever I make a baby card for a friend I try to put the name on it to make it special. My favorite alphabet die set at the moment is Altenew's Caps Bold Alphabet.
I took a piece of white cardstock and added some ink blending in pastell colours. For the golden shimmering hearts I used some golden paste from my stash through Newton's Nook Tumbling Hearts stencil. Then I die cut all the letters for Emilia from that piece that I created.


As I wanted to create a baby card I was in need of some cute critters. It was the time to put Avery Elle's Peek a Boo Pals to a good use. I stamped three of the animals in the set and coloured them in neutral colours with alcohol markers. I also stamped and heat embossed in white the word hello from Newton's Nook Winged Wishes on a piece of lilac cardstock. I fussy cut the images and the sentiment and then all there was left to do was to assemble the card.

This was my last post on the Seven Hills Blog for this year. I wish you and your family a very merry Christmas and a happy New Year.
Anni


Friday 14 December 2018

When is a lettuce not a lettuce.....

....when you pop a Christmas hat on it and it's a festive sprout!    The new mini stamp from Waffle Flower Craft's latest release "lettuce" looked very sprout like to me so it kicked off a couple of tongue in cheek card ideas.


After colouring a page full of sprouts and cutting them with the co-ordinating die, I added a die cut Christmas hat (check your Christmas sets for hats you can stamp or cut as lots of them have appropriate hats) and then made a really simple cheeky card by pairing a sprout with a sentiment that "fits" if your mind is twisted like mine!


I added the "pft" by hand with a black fine liner and a white pencil.

One of the marketing messages that seems to be everywhere this Christmas is that sprouts aren't just for Christmas, so I used that as an idea and sentiment for my second card.  I printed the sentiment and inked over it this time but you could spell it out with an alphabet stamp if you don't have a printer.


This time I lined up 3 sprouts, 2 wearing their hats and one jumping up and down on his torn up hat to emphasise the sentiment.  A good card to send to someone in the love sprouts camp!

 
 That's all for today - hope it raised a giggle!

Tara