Showing posts with label Winnie & Walter. Show all posts

Wednesday, 21 September 2016

Hello Autumn


Hello.
As the weather starts to cool and the evenings get darker I was inspired to make an autumnal style card.


To start I stamped and heat embossed some of the leaf images in red and gold embossing powers.
I then die cut the card with the scalloped rectangles from Lawn fawn and distressed the edges.
 And then I splashed lots of the gold gansai tambi water colours on the panel before die cutting again with the stitched rectangles.
I then water coloured a panel with more gold , while that was drying i die cut the hello.
the gold panel was placed behind the hello and then I added some red twin from Lawn fawn before adhering with foam tape. 
I didn't want to added to much embellishment as the gold embossing powder has a sparkle to it.


In Bloom:  Renees Leaves

Thanks for looking.


Wednesday, 7 September 2016

Renee's Leaves revisited


Hello.
Today I wanted to re-visit the In bloom Renee's leaves stamp set from winnie and walter.
I went with a very different look to my last card.


I wanted a very simple card but have added lots of interest from embossing and ink techniques.


To start I stamped and heat embossed the sentiment from The big the bold and friends.
I wanted an ombre background and worked the ink from one corner.


Then I stamped the small image from Renee's leaves and heat embossed in white.
I deliberately added some random sprinkles of embossing powder.
The aim was for a random messy feel.


To finish I added some splashes of the left over ink from blending, it was just mixed with some water and left to dry.
Lastly some sequins in the same colours as each card.


 In Bloom:  Renees LeavesThe Big, the Bold and Friends Image 1
Thanks for looking. 

Wednesday, 31 August 2016

In Bloom: Renee's Leaves Watercolour wonder


Hello.
Today I have a card featuring Winnie and Walter's  In bloom:Renee's leaves stamp set.


To start I stamped the image onto water colour card with versamark and then heat embossed in platinum.
Then using the Gansai tambi water colours I coloured the images really loosely.
I let it all dry then added splashes of the white gold from the starry colours set.


The panel was die cut with Lawn fawns stitched rectangles and also a smaller rectangle of vellum.
For the sentiment I used Lawn fawns scripty thanks die. 
Its cut from water colour card and then coloured with the white gold water colour.
I adhered to the vellum and then added the same adhesive on the reverse of the vellum so nothing shows through once everything is put together.
To finish I added more splashes of the white gold.


In Bloom:  Renees LeavesScripty Thanks Image 1Gansai Tambi Starry Colours Watercolour Pan Set (6) Gansai Tambi Set of 36

Thanks for looking.


Wednesday, 10 August 2016

Kindness blooms


Hello.
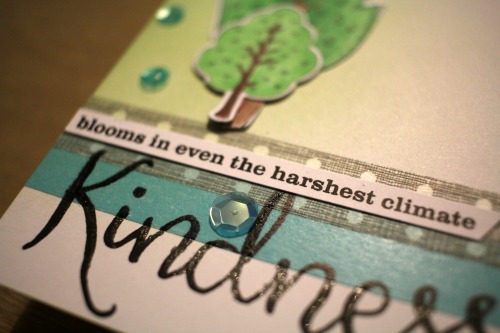
Today I have a card using the kindness stamp set from Winnie and Walter.


I started by tamping the trees and then colouring with copics. 
Then they were fussy cut.
My card base has some green altenew ink blended on to it on one side.
I then added some washi tape before stamping the kindness in black archival ink.
I went over the sentiment with some black wink of stella.
The rest of the sentiment is stamped onto some white card and placed on the washi tape.
 The trees were then added and i finished with some sequins.


KindnessGreen Fields Ink CubesWink of Stella Brush - Black

Thanks for looking.



Tuesday, 7 June 2016

Colouring With Maps !

Morning! How are you?
Do you ever want to do some quick colouring but don't have the time or feel a little rusty with your colouring skills?
Well- I've the perfect solution for you and it's sitting somewhere in your house!
MAPS!

This one is a National Geographic collection from US, Canada and Mexico- if you look at the page in the photo- you can see I've made use of the different colours and also stamped using different greens.
The finished projects looks like this
I've used the ever versatile In Bloom: Elsa's Flora 
If you look closely- because the maps are double sided, they're perfect for creating 3D elements. Check out the leaves- I've simply stamped each leaf twice and folded one in two then glued it along the fold.
You can probably see that I've decoupaged part of the central flower to give it more texture. You can't add much shading unless you add in some alcohol markers or Prismacolors, but it's such a quick and effective technique you don't really need anything else.

Do have a go- it's a perfect speedy idea and one perfect for any beginners amongst you too!

Enjoy your day, 

See you next week!

Keren x

Tuesday, 24 May 2016

Dura-lar Flowers!


Hey! Hope you're doing ok?
I'm here with a new-to-me product called Dura-lar for the very reason that I wanted an acetate that could be sculpted.
Now you can get this look with plain acetate just without so much of the moulding. It's easy...
Stamp your images onto the polyester film.
I've used the Winnie & Walter sets In Bloom:Renee's Leaves & In Bloom:Anna's Flora
It makes these flowers even more interesting, that I can mould them. You simply dip them in hot water, mould under water and then bring out still holding onto the shape which then fixes it.
This is the completed card- I just wish you could see the shine!
The really hard bit was painting. I can't make paints do what I'd normally do with pencils or markers. To be hones, I rushed it. But there's definitely room for improvement!
Hopefully you can see on the next picture both the shine and the shape in the images
 It's so much fun creating shiny flowers by painting underneath acetate. It's a simple technique and you can use any acrylic paint. I do find the more you pay, the better the quality, but you could achieve the same look with paint nicked (borrowed) from your kid's room ;-)
It's a bolder brighter look and makes these flowers really look alive!
Do hope you'll give the technique a go!

See you soon!
xx


Tuesday, 19 April 2016

Bountiful Blooms


Hi! How are you this lovely day? With some sunshine peeking through in the window and falling on a vase on flowers in my house, I wanted to create a card full of flowers, but just using one flower. A natural looking bouquet would have lots of different types of flower, but I thought just one might be a challenge.

I've used the ever lovely Winnie and Walter In Bloom: Addie's Garden 
First off, I stamped and white embossed the flowers, then coloured them with Zig Clean Color pens. I've blended a couple of colours together on some of them to try and give the realism you might find in the real thing. I created a structure like this at the top of the card to support the design of the flowers.
I extended the length of the stalks, by pulling the colour further at each end of the stalk. Trim out the stalks and create a stack as if it was a hand tied bouquet. You can see a bow in the picture- that's because I added one initially and then decided against it. 

You can see here my original design and also to show you how I send cards like this- people have asked how to send them- just find an envelope larger than the card ;-) The sentiment is from The Party (Winnie & Walter)

                                               
Hope you enjoyed the blooms. They make a lovely card that's kind of a present at the same time- but without all the hassle of having to find a vase!!

See you next week,

Keren xx


Tuesday, 29 March 2016

Re-doing Chalkboard!

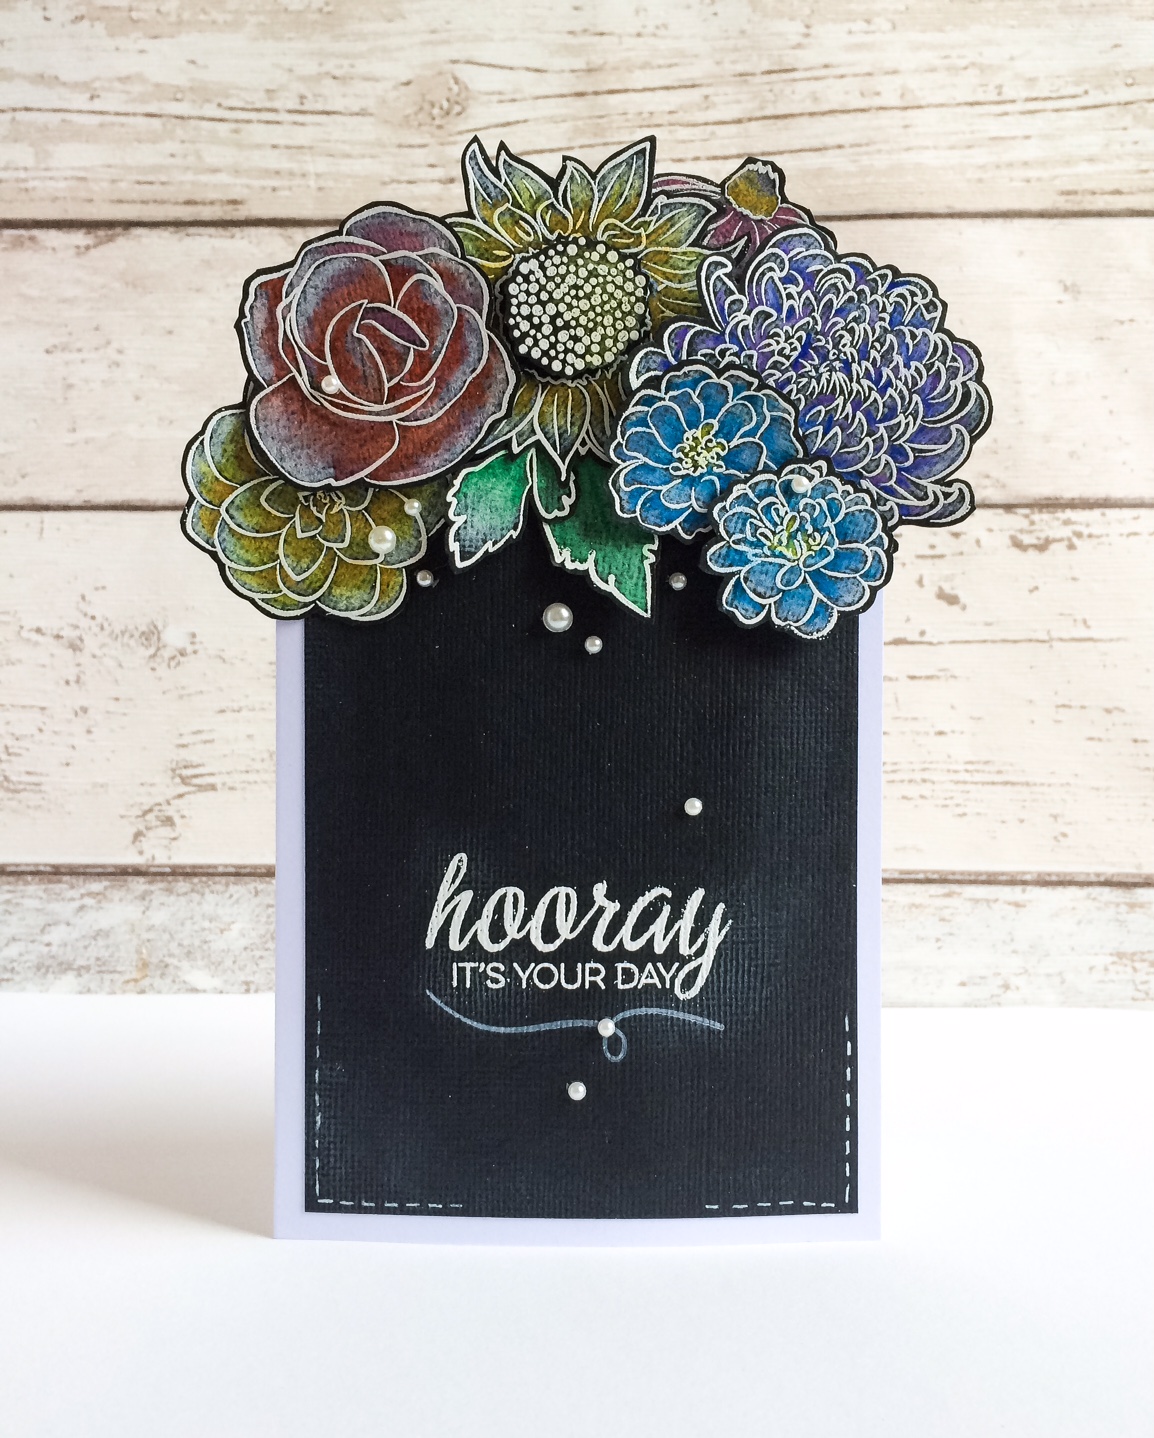
Hi! A few years back, chalkboard was everywhere. I love this look and thought trying a slightly look with it was worth a try.
I've used Prismacolors and this beautiful set 'In Bloom: Anna's Floras'
Firstly, white heat emboss onto black card. Then lay down some white pencil as a base layer to help provide a base to show up the colour.

Next, start to add colour. You may need to add several layers to give some vibrancy to the depth of colour.

Then just trim out all the flowers and stack them at the top of the card
The traditional method of using heat embossing, white ink stamped and some ink blending/smudging around small areas. I've used these but rather more subtly, focussing instead on the black based flowers.

For the sentiment, I used the Winnie & Walter Set 'The Party'
The finishing touches are simply some different sized pearls; enough to give a little focus but not to detract or 'fight' with the flowers. As they're not as bright as usual, I wanted something delicate.

Hope you like the blackboard styled cluster. The flowers are stuck slightly off the card to add some dynamism.
Do give this style a re-visit, you'll be glad you did!

See you next week!

Keren xx