It's Wednesday again and this week I am bringing you a project I recruited my niece to help out with. She's really into reading so the Lawn Fawn For You, Deer set was a perfect choice to make some bookmarks. This is such a great one get the kids involved with and they have something durable and usable at the end of it. They also make good extras to give out to friends when posting your handmade cards!
The night before, I started out by stamping several lots of the bear from the Lawn Fawn For You, Deer set - both back and front - onto some blending card stock with some MFT Black Licorice Hybrid Ink. I used my alcohol markers to colour these in and then cut them out with the coordinating dies. At the same time, I also cut some strips of Peacock, Sunflower and Chilli Pepper cardstock. The sizes varied according to the scraps I had but they all measured at least 3cm x 13cm (5 1/4 x 1 1/4 inches). I white heat embossed two of the sentiments from the set, 'This is a beary good book' and 'I can't bear to lose my place', onto the card strips.
When my niece arrived the next morning I got her to stamp some of the feathers from the Lawn Fawn Dream set in some Versamark Ink in repeating patterns across the strips of card. We also stamped some stars using some Yeti ink and used a white get pen to add some dots around the feathers.
The construction of the bookmarks is easy as you just have to stick the back and fronts together, making sure that the tummy part in between the arms stays behind the font of the bookmark. To make them more durable, I laminated them, cutting them out and rounding the corners to make it kid safe. Just make sure that you leave enough space around the laminated marks otherwise your bookmarks will peel apart.
Definitely a fun and useful project.
Happy reading, catch you next week!
Wednesday, 7 February 2018
Tuesday, 6 February 2018
Playful Cats
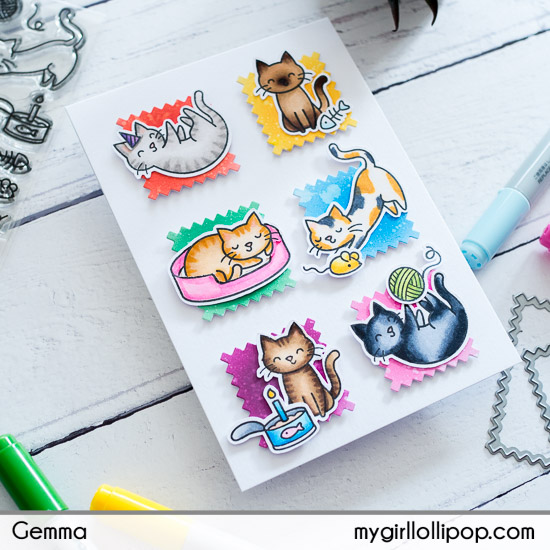
I have a bright colourful card to share today. It features a grid of squares, which is one of my favourite designs when I want to include lots of cute images on a card.
I began by inking up a piece of card with a rainbow of different inks. I spritzed them generously with water for droplet details, then die cut them using the Lawn Fawn Zig Zag squares.
I love colouring in these cats from the Lawn Fawn Meow You Doin' stamp set. As cats have so many different colours and patterns, you can have a lot of fun. I coloured more than I needed, then cut them out and chose six different cats for this card. I'll keep the others for another project.
As well as the cute kitties, this set has some wonderful accompanying stamps that really help set a scene. I gave each cat a different accessory, then glued them onto the squares.
I used foam tape to add the squares to a card base, and that's the card finished. I'll stamp a sentiment on the inside of the card.
Thanks for joining me today,
Gemma
![]() |
| Lawn Fawn Meow You Doin |
![]() |
| Lawn Fawn Zig Zag Squares |
Monday, 5 February 2018
Framed Flowers
Hello there :)
I've gone floral today and used the new Just Because dies from Concord & 9th to make a pretty framed scene....
Apologies for the photos, the lighting wasn't great when I took the them!
I've used one of the leafy dies and cut several from a piece of card that I'd sponged with various greens from the distress line.... I love that technique as you get such a variation of colour on each die cut.
I cut a couple of the thin frames using cream card and one with brown for the top layer of the stack then glued the stems behind the frame, allowing some to peek over the edges.
To create a hill and sky in the background, I used the waste piece of card from cutting the frame as a mask to sponge inside...
I've gone floral today and used the new Just Because dies from Concord & 9th to make a pretty framed scene....
Apologies for the photos, the lighting wasn't great when I took the them!
I've used one of the leafy dies and cut several from a piece of card that I'd sponged with various greens from the distress line.... I love that technique as you get such a variation of colour on each die cut.
I cut a couple of the thin frames using cream card and one with brown for the top layer of the stack then glued the stems behind the frame, allowing some to peek over the edges.
To create a hill and sky in the background, I used the waste piece of card from cutting the frame as a mask to sponge inside...
That's what a whimsical meadow looks like in my imagination :)
I added the framed flowers over the top and then stamped a sentiment from Altenew's Birthday Greetings onto a separate piece of card. I adhered the banner with dimension at the fishtail end so I could tuck an extra leafy sprig and flower at that end of the sentiment.
I'm holding on to that thought of meadow flowers and summer days for now...
it'll help me get through the cold snap this week :)
Thanks for stopping by :)
Jenny x
Sunday, 4 February 2018
Words and Numbers
I've got a really fun age card to share today that can be easily adapted to suit any birthday you want to highlight the age on. I was inspired by the gorgeous new Brush Alphabet Die Set from AlteNew.
I die cut "four" several times using thick white card and using copics shaded just one in a rainbow effect to be my focal number. I placed this one where I wanted it first and then used the other white fours around it in different orientations to make a fun number-word background.
I coloured a strip of card with the same rainbow of markers and cut a flag end on each end and stamped a Happy Birthday sentiment from the brilliant Birthday Builder also from AlteNew which has so many different fonts in different sizes I know it's going to be one I reach for again and again and again. It'll be nice not to dig through other stamps looking for the right sentiment too.
NEWS FROM THE STORE
It's going to be a busy week in store this week as we'll start to get the first of the post trade show releases......... We'll have the following arrive this week:
Some brands are still waiting for their trade show releases to be manufactured so we don't yet know when we will get them. It seems dies are the hold up for both WaffleFlower and Flora and Fauna.
We have the new release from Neat and Tangled shipping on Monday so there is a SLIM chance we'll get it by Friday but if not it will be next week.
We've ordered the fab new release from Concord and 9th but they never ship until after they release (the 9th of each month) so it will be mid-Feb before we get that.
We have already ordered the next release from AlteNew so should be back on schedule with them now and won't miss out on any new items as we did this time. I know many of you have been disappointed that we haven't received some items - very little I could do about that because of the move so I missed the pre-order - there is only one of me and I can't yet operate a computer with my feet particularly when I didn't have internet! We have everything on back order and it will arrive soon so you won't miss out for long.
We've ordered the full new release from Hero Arts along with the January monthly-add ons. This comes via a UK distributor so never comes as quickly as they release in the USA and we never know when it will come until the day before we get it. It currently says expected late February but that's as much as I know.
Could I also ask everyone to think about what they email - kindness doesn't cost and customers who send rude, hurtful or angry emails without thinking will no longer receive replies. We are happy to help, particularly where there is a problem with product you've received but please think about how you ask. You may feel aggrieved but if it's the first time you've pointed something out to us, please be nice and give us the chance to fix it before you hurl abuse at us!
Catch you next week.
Tara
I die cut "four" several times using thick white card and using copics shaded just one in a rainbow effect to be my focal number. I placed this one where I wanted it first and then used the other white fours around it in different orientations to make a fun number-word background.
I coloured a strip of card with the same rainbow of markers and cut a flag end on each end and stamped a Happy Birthday sentiment from the brilliant Birthday Builder also from AlteNew which has so many different fonts in different sizes I know it's going to be one I reach for again and again and again. It'll be nice not to dig through other stamps looking for the right sentiment too.
NEWS FROM THE STORE
It's going to be a busy week in store this week as we'll start to get the first of the post trade show releases......... We'll have the following arrive this week:
- Stamping Bella's year end release
- MFT's February release
- Avery Elle's December and February releases. The new stuff releases on February and it shipped yesterday so fingers crossed that customs clear it quickly and we should then have it for release day.
- We may have some Lawn Fawn restocks this week too, if not early next.
Some brands are still waiting for their trade show releases to be manufactured so we don't yet know when we will get them. It seems dies are the hold up for both WaffleFlower and Flora and Fauna.
We have the new release from Neat and Tangled shipping on Monday so there is a SLIM chance we'll get it by Friday but if not it will be next week.
We've ordered the fab new release from Concord and 9th but they never ship until after they release (the 9th of each month) so it will be mid-Feb before we get that.
We have already ordered the next release from AlteNew so should be back on schedule with them now and won't miss out on any new items as we did this time. I know many of you have been disappointed that we haven't received some items - very little I could do about that because of the move so I missed the pre-order - there is only one of me and I can't yet operate a computer with my feet particularly when I didn't have internet! We have everything on back order and it will arrive soon so you won't miss out for long.
We've ordered the full new release from Hero Arts along with the January monthly-add ons. This comes via a UK distributor so never comes as quickly as they release in the USA and we never know when it will come until the day before we get it. It currently says expected late February but that's as much as I know.
Could I also ask everyone to think about what they email - kindness doesn't cost and customers who send rude, hurtful or angry emails without thinking will no longer receive replies. We are happy to help, particularly where there is a problem with product you've received but please think about how you ask. You may feel aggrieved but if it's the first time you've pointed something out to us, please be nice and give us the chance to fix it before you hurl abuse at us!
Catch you next week.
Tara
Saturday, 3 February 2018
Die Cut Flower
Hey stampers, Anni here.
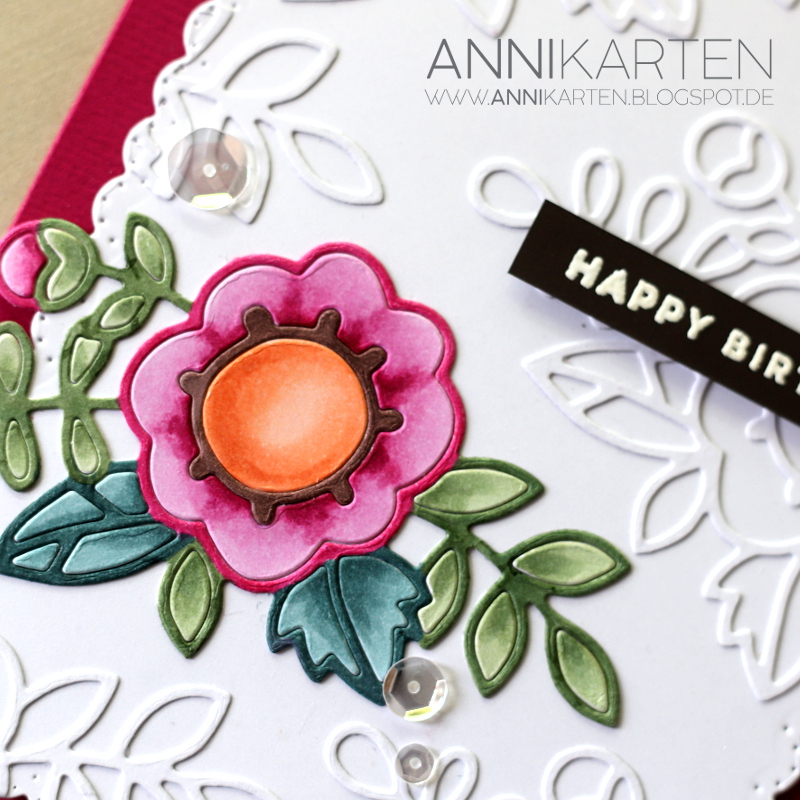
Today I have a card for you with just a little bit of stamping and a lot of die cutting.
I started by die cutting the Paper Smooches' Adorable Array a few times from white cardstock. One of the flowers I coloured with alcohol markers - the inner and outer parts of the die cut. From the other flowers I just used the outlines and left them white.
I glued them to white cardstock to create a subtle background. From this background I die cut one of the rectangles of Waffle Flower's Lacy Layers.
On this rectangle I adhered the coloured flower as the focal point, hanging over the edge.
For the sentiment I chose a small one from Winnie & Walter's Sentimental: Birthday and heat embossed it in white on a stripe of dark brown cardstock. I adhered it to the card with dimensional tape.
For the finsihing touch I added some sequins.
Thanks for stopping by and have a crafty weekend.
Today I have a card for you with just a little bit of stamping and a lot of die cutting.
I glued them to white cardstock to create a subtle background. From this background I die cut one of the rectangles of Waffle Flower's Lacy Layers.
On this rectangle I adhered the coloured flower as the focal point, hanging over the edge.
For the sentiment I chose a small one from Winnie & Walter's Sentimental: Birthday and heat embossed it in white on a stripe of dark brown cardstock. I adhered it to the card with dimensional tape.
For the finsihing touch I added some sequins.
Thanks for stopping by and have a crafty weekend.
Friday, 2 February 2018
Bright and Bold Rainbow of Happy!
Hi everybody,
Jill here, and this week I’ve got a bright and bold rainbow of Happy for you...
...with Mama Elephant’s Happy Script taking centre stage.
I love me some snuggly cosy winter vibes but, holy macaroni, the brighter sun & the lighter evenings creeping in have me so excited for springtime! I decided to let my lust for brighter days take over me and lead the way in this sparkly card of celebration!
I started with my watercolour rainbow, achieved by mixing Distress Ink with water and blending them in order across my background. I was feeling inspired to get messy and knew I wanted a bit of bling on my card so reached for some silver sparkly texture paste but it had all dried up so I decided to make my own...which went horribly wrong and I just ended up with a ton of grey sludge haha. ‘Waste not want not’ however so I persevered and used that along with Altenew’s gorgeous Tiny Bubbles Stencil and swiped it across my background. I then added a layer of silver glitter over the top to achieve my required look and left to dry.
I then cut Mama Elephant’s Happy from white card and foam and adhered together to form a nice substantial sentiment. I don’t think I will ever tire of die-cut sentiments. to this day these beautiful cursive Creative Cuts from Mama Elephant remain my absolute ‘Ride or Dies’ *pun intended :)
I also cut MFT’s Stitched Scallop Circle from some silver glitter card to use as a point to build around and, after white embossing the rest of my sentiment onto black card, adhered all my pieces in place.
I matted onto some grey card, embellished with a scattering of sequins, and there you have it.
A sparkly celebratory rainbow of Happy!
As always everything I used is linked below.
Hope you like it.
see you next week.
Jillx
Thursday, 1 February 2018
Life is Beautiful Floral Card
Hi everyone, Taheerah here wishing you a happy Thursday!
I'm not a huge fan of floral stamps as they seem to have been done to death everywhere. However, find a different way to use them and things suddenly become more interesting for me!
I decided to pull out the Altenew Floral Fantasy stamp set and have a play with a watercolour-look technique:
Beautiful right? I love the soft subtle look of the background, with just the quietest whisper of florals!
I inked up the second layer of the flowers and leaves, stamped them off once, then stamped on my card. I then spritzed a *lot* of water onto my card and dabbed off the excess ink with a tissue. I repeated this a few times until the leaves and flowers were really soft in appearance, and the colour had bled out a little too.
I opted from a sentiment from the Altenew More Than Words stamp set. It fit the look of this card perfectly!
I'd love to hear what you think of this card. Is there someone you know who'd love to receive it? Thanks for stopping by!
I'm not a huge fan of floral stamps as they seem to have been done to death everywhere. However, find a different way to use them and things suddenly become more interesting for me!
I decided to pull out the Altenew Floral Fantasy stamp set and have a play with a watercolour-look technique:
I'd love to hear what you think of this card. Is there someone you know who'd love to receive it? Thanks for stopping by!
Subscribe to:
Posts (Atom)