Tuesday, 24 September 2019

Thank You For Being So Kind


Hello, it's Liz here today. When a stamp has a larger area to colour I like to paper piece, for two reasons. Firstly, I don't need to worry about getting all the colouring and shading right on a large area and secondly I think it looks really cool to match the stamped image perfectly with the background!


I stamped the little girl from the 'Bring Out The Sunshine' set by My Favorite Things onto white cardstock and then onto the two patterned papers from the 'Vintage Botanicals'  pad by Simple Stories. The matching die set for this stamp set is available here.


Then I carefully cut around the dress, shorts and hat. Before I adhere the pieces to the main image I coloured the rest of it using marker pens. I also coloured a quick outline where the dress will go just in case my cutting is a little bit off! The large sentiment from the 'So Kind' set by Avery Elle is the perfect size for the white space left on the card.

Thanks for stopping by today, happy crafting!


Monday, 23 September 2019

Cool Penguins

Just look at this waddle of penguins!!.... you cant help but smile at such a cute bunch :)
Being penguins they are nice and simple to colour and look great against a contrasting background


The penguins are stamped and cut using the coordinating die on a separate piece of card then I stamped the
inside of an A4 card blank using the Dotted Fill-In stamp from Concord&9th and Hero Arts Dusty Blue ink.

This set comes with a few extra images to add to the dots so I used the circle 
of dots on random spots. I cut the front panel down to a narrow strip along the base
 and attached my waddle of penguins to it 


I've cut a notch/slit at the base of the back panel and then tucked the end of the front piece up into it
so the penguins curve and help the card to stand up too... a kind of simple diorama!


This is how the card looks when lying flat and easy to send through the post.
The sentiment is from an older Mama Elephant set which also has a penguin theme!


I hope they bring a smile to your face this Monday morning too :)


Thanks for stopping by :)
Jenny x


Sunday, 22 September 2019

Repeat Sentiment Stamping

I've got a fun technique today - multiple stamping of sentiments to fill your card or create a background and the new sentiment set from Mama Elephant which shrinks down some of the popular flourish sentiments that were individually on other sets into one stamp set - Paola's Wishes - is the PERFECT stamp to play with for this technique.

First of all I did a card where only the sentiments are used - by changing the colour of the central one it makes it the focal element of the card.   I stamped and embossed the mustard happy birthday in the middle (Fossilised Amber oxide ink plus clear embossing powder) first and then cleaned the stamp and used the palest grey from the Rock Collection by Altenew and stamped the same sentiment around the focal image - starting closest to it and working your way out stamping close together so the sentiments tessellate and fill the background with as few gaps as possible.   You could twist the image and rotate it for a different look too.  I mounted it onto a base made from Narwhal cardstock - the darker edge helps draw your eye to the focal point as the rest of the card is very pale.


For the second card I used the sentiments to form a background for my die cut cake using the Cake Layers Die from Concord and 9th.   I started in the same way as the Happy Birthday, stamping the first "wishing you" in the middle of the card using silver stone again from Rock Collection by Altenew so the background was more visible buts till not too strong for the focal image.  To complete the sentiment I added what I was wishing the recipient by selectively stamping a sentiment from Mama Elephant's Birthday Messages as I didn't want the work "have" in my sentence.


The wishing you sentiment is a really useful one - you can wish people lots of things!   So I did another version this time for Christmas.


I stamped the sentiment background directly onto a top folding sand card from Hero Arts using Versafine Clair Shady Lane.  For my focal point this time I used a bauble cut from Palm cardstock using the fabulous Ornament Shaker Die from Newton's Nook.  To create the sentiment I used the jolly word from Concord and 9th's Jolly die cut from cherry cardstock and combined it with a mini "a" and "christmas" from Mama Elephant's Holiday Messages.

I hope I've ins[ired you to try this technique - it's really a fun way to make the most of your sentiment stamps - they can do so much more than just be a single line on your image!


NEWS FROM THE STORE

We've caught up on the massive order backlog created by Mama Elephant's release last Sunday but we are still a little behind the pump on adding stock so we still have stuff we opened last weekend that is not yet added to store.  Will get stuff on as quickly as we can this week.   We have:

The new release from Stamping Bella - we're actually working on that today and hope to have it finished and in store by tonight or tomorrow.

We still have the Hero Arts August kit to add - the September kit is due at the end of the month.

The Flora and Fauna delivery has finally arrived after some customs clearance issues - will work on that as soon as possible this week.

We still have some fun new wooden items - will catch up on those as soon as I can.

We have to deal with some stuff relating to my Mum's passing on Tuesday so won't be in the office much at all that day which will again slow us down - can't be helped.  Sorry.

Catch you later

Tara


Saturday, 21 September 2019

Happy Birthday with a Little Surprise

Hey stampers, Anni here!

It was the birthday of a special (crafty) friend of mine last week so I wanted to make a special card for her! Last year we were on the return journey from a trip and we had a lot of fun celebrating her birthday in the car. I wanted to make a card in memory of this day. Avery Elle's Birthday Bus is just perfect for that. I also wanted to add a little surprise with an interactive element in the card. But more about that later...


I started by stamping the bus on watercolour paper using Versafine Onyx Black Ink because it is water-resistant. For the colouring I used watercolour. To cut out the image there are coordinating dies available.

For the background I used Altenew's Bubble Wrap Stencil. I blended a warm grey ink over it and let it fade to the upper part of the panel.

The sentiment came from the Birthday Bus set, too. I stamped it with Versamark and heat embossed it in white on a stripe of pink cardstock.

But now let's get to the fun part: the surprise on the inside of the card! When you open it, this cute little box pops up.


This interactive part is very easy to create when you use Lawn Fawn's Mini Pop Up Box die. You can find a video about how to put the box together on Lawn Fawn's You Tube channel.

I decorated the box with a cute little cat and a bunny with a balloon from Avery Elle's Party Pals.

Hope you like my take on an interactive card!
Thanks for stopping by and have a crafty weekend.
Anni


Friday, 20 September 2019

Warhol Pop Art Retro Telephone Hello Card

Hi everyone, Taheerah here wishing you a happy Friday!

I'm a big fan of vintage/retro stuff, and a big fan of Pop Art! So when I saw the Altenew It's For You stamp set with that awesome vintage phone I just knew what I had to do:


Awesome, right?!


I started my trimming my card base out and dividing the space into quarters. I stamped my detail stamp first using Versafine Clair inks, then overstamped with a paler, water-based colour.


I overstamped the phones with Versamark ink and heat embossed with clear embossing powder. I then masked off each square in turn and swiped the background colours on using a water-based ink! Because the embossing powder resists the ink I was able to use a slightly damp tissue to buff the colour off the phones to retain their colours!


I wanted a retro style sentiment so I reached for a fan favourite - the SugarPea Designs You're My Type stamp set! I stamped my sentiment in the centre using Versafine Onyx Black ink and I was all done!


I'd love to hear what you think of this card. Is there someone you know who'd love to receive it? Thanks for stopping by!


Thursday, 19 September 2019

Sweater Weather on Safari


Hello crafty people!
Hope that you all doing great.
I'm back with another card today, which features MFT Sweater Weather on Safari stamp set.  


As usual, I started from stamping all needed images from the stamp set on to piece of watercolour paper. I used distress inks for colouring and scissors for fussy cutting. ( you can always use coordinating dies )   


My next step was to do ink blending for the background. I used distress oxides in warm colours to create a sunset impression and added water splatters for more interest.


Once my background and images were dry, I die-cut window from kraft card panel made out of Hero Arts Hero Hues Sand cardstock with a circle die and adhered my blended background piece behind it with craft foam. I also added critters to the front with a little bit of dimension and drawn faux stitching details around the window itself.
Last but not least, I stamped the sentiment with black ink and adhered the whole card front to the card base.
That's all for today!
Thank you all for stopping by.

 
See you all next week.
Anna 

Wednesday, 18 September 2019

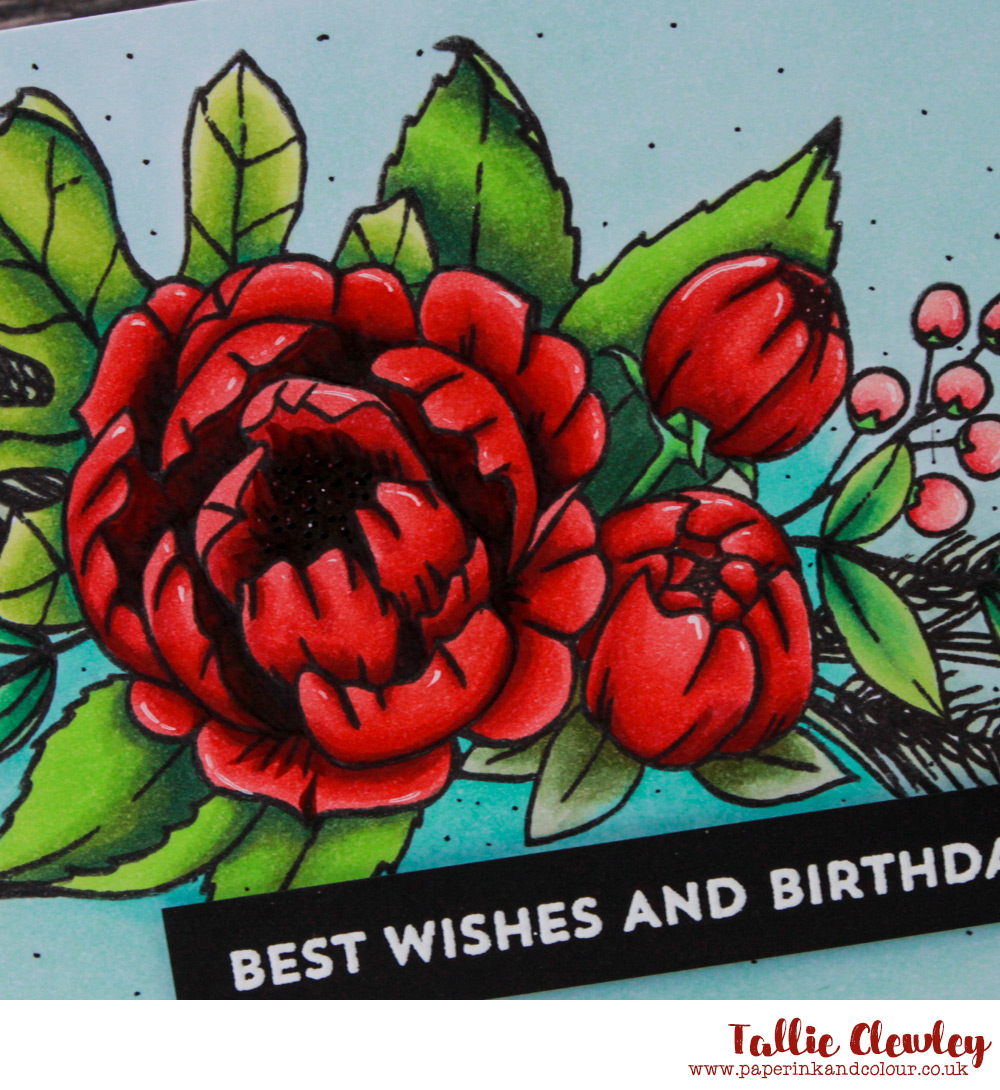
Birthday Blooms

Hello, Tallie here. I'm back today with one of my favourite floral sets: Concord & 9th's Grateful for Everything. I have used this set multiple times but never get bored of colouring or creating differently themed cards. Today, it's a birthday card and I've paired it with the MFT Bitty Birthday Wishes set for a great sentiment.


I started out by stamping the spray of flowers in some MFT Extreme Black Ink onto some blending card stock. I coloured these in with my alcohol markers, sticking to bright reds and a couple of different shades of green for the leaves. I've coloured this stamp in quite a few times and have found that it looks a lot better if you get some really deep colour into the centre of the flower, so I deepened up the shadows with some darker grey markers. I added some black gel pen to add some raised dimension for the inner flower.


I used some blue-green markers to colour in the background, going deeper with the colours immediately around the flower and leaves to give some dimension. The background looked a little plain, so I used my black gel pen to randomly add some dots around the flower spray.


The sentiment was a simple white-heat embossed greeting from the MFT Bitty Birthday Wishes set onto a strip of black cardstock.

Thanks for reading, catch you next week.

Tallie