Showing posts with label MFT Double Slider Loop Slots Die. Show all posts

Monday, 18 March 2019

Birthday Bears


Now here's a fun gathering.... I think they've come for the birthday picnic!!!
I've used the Avery Elle set called All of Us and used 'masking' to stamp two rows of bears


They're a fun bunch to colour.... we have quite a mix of bears there. I trimmed the piece out 
so I could add an interactive element behind this furry bunch.....


If you pull the tab, one of the bears holds up an extra part to the birthday message.

I've used the Double Slider Loops Slot Die from MFT to make the mechanism and cut it into
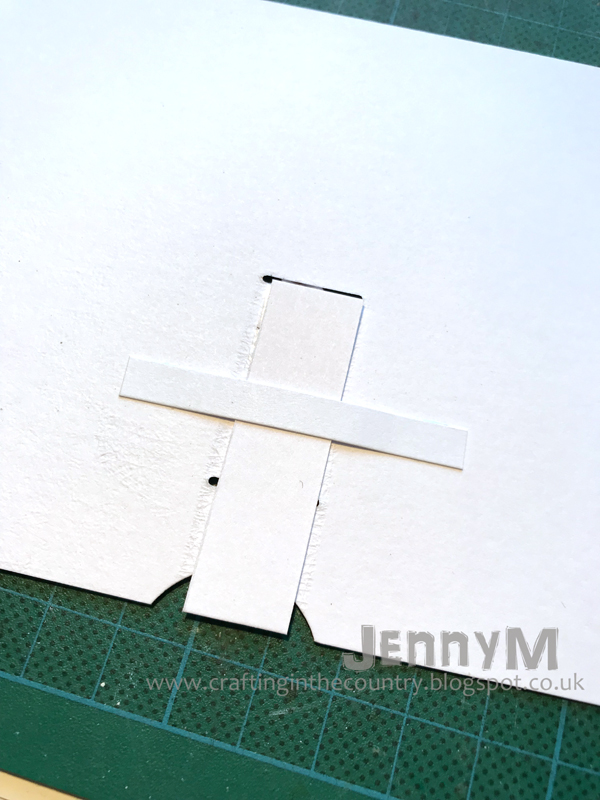
 the front of a card base.... probably not the best idea but I made it work 😉. The slider with the smallest gap was still too long for what I needed so I ran the die through twice to cut each slot with a custom space between them... this would've been much easier on a card panel not the base!! This is what the card base looked like before adding the bears. 


I attached a card strip to reduce sideways movement of the pull tab and because all of this was 
inside the card, I added a panel of card to hide it all


I used a piece of black card as a contrasting frame for the birthday bears to peek through 
and the balloons are just coloured circles with hand-drawn strings.
 Faux white stitching and a sentiment finishes it off perfectly :)


You can find a video by MFT showing you how to use and assemble the double slider
 mechanism on their You Tube Channel HERE


Thanks for stopping by :)
Jenny x


Friday, 26 October 2018

Birthday Surprise

It's our friends' son's birthday today and he loves cake and martial arts so I came up with a fun card for him!

I used Top It Off from Concord and 9th  and I stamped a chocolate cake using Espresso and Mocha inks from Altenew's Coffee Break set and then set about hiding a ninja inside - well where else would a ninja hide on your birthday????


There are 3 layers to the card to make it all work.  The cake is stamped and fussy cut and will eventually be stuck to the front of the card with foam tape in 5 places only.  I added foam to the edges of the bottom two layers, and the left hand side only of the 3rd - the right hand of that layer and both edges of the top layer are free of foam to allow the ninja free movement up and down.

I started with the middle layer first through as this is the layer where the pull mechanism goes so I cut a white card the same size as my base card and stamped the sentiment from MFT's Twice the Wishes at the top - it seemed appropriate to go with the surprise hidden inside the cake!

I placed the cake in place and drew a pencil line so I knew where to stamp the candles as they need to be underneath the ninja or you wouldn't see him when he pops out.  I stamped them shorter than the stamp but any excess is hidden by the cake anyhow.


Then comes the die cutting - centralise the double slider loop slot die from MFT and underneath cut a notch (I just grabbed a handy oval die but any shape would do, you just need space to see and grab the pull tab).  I stamped the pull and arrow onto a strip of kraft (matching my chocolate cake theme) using the mini interactive labels stamp set and then stamped and fussy cut the ninja (you could die cut him but the dies are currently out of stock) then with the addition of a 1cm wide strip of plastic we have all we need to make the mechanism slide.
  1. Thread your plastic strip through the slots and secure behind (I use redline tape as it holds strong.)
  2. Secure your pull tab BEHIND the stamped panel lining it up so it is level with the bottom - this will be the default position.
  3. Line up your tab so it pulls down as far as it will go - hold your cake in position and then line up your ninja and secure his bottom foot to the front of the plastic.
  4. Check it all works!   This is really important as it's hard to undo once you stick it all together and discover it's stuck (ask me how I know lol!)
  5. Secure the cake in place over the ninja.
  6. Secure the stamped panel to your base card with more foam tape ensuring none gets in the way of the slider mechanism.


You don't have to use a ninja obviously - you can have anything you like pop out of your cake - a present, a punch of flowers, a cocktail or bottle, or even an animal - whatever is most appropriate to surprise your intended recipient - why not give it a go!   As an extra incentive - from now through the weekend - the cake stamp set and it's co-ordinating die is on sale so you can grab one at a discounted price to make your own pop-up surprise!  (no code required)

Catch you Sunday

Tara


Sunday, 16 September 2018

Hidden Elves

I've got a fun card to share today with a mini tutorial with a whole lot of "not to do's" as I made a lot of mistakes figuring out how to do what I wanted to do, but now I can tell you what not to do as well as how to do it all better!

What I wanted to do was use the new double slider loop slots die from MFT to make multiple characters appear with one pull tab.


So I created a scene using Rosie and Bernie in the North Pole as my focal point, and then when you pull the one central tab, 3 hidden elves appear!   The elves are from the new Mama Elephant Little Elf Agenda set.


So the how to, and more importantly, how not to goes like this:

Create the background - I used two shades of blue oxides to blend a soft sky and then used a glue pen and white embossing powder to add snow.  (I had a light pencil line so I knew where my hill would roughly go.

Using the pencil line as a guide to ensure the slots will be hidden, die cut your 3 slots where you want your characters to appear, and a small circle die to cut a hole for your pull tab.

Thread some strong plastic strips through the 3 holes.   So - far - all is good :-)


Now here is where I made my first mistake - I needed a piece of card across the 3 strips of plastic so when you pull the tab all 3 move at once.  That's correct - but what I did wrong was put that on the front with the 3 characters stuck onto......


So when you pull the tab - the characters go DOWN not UP!   WRONG, WRONG, WRONG!

So I took it apart and got it correct - the acetate tabs the characters were attached to where attached with red liner tape to the plastic on the FRONT of the panel.   Here's the shot of the fix (the card tore where I peeled the previous layers apart - that was mistake number 2 - NEVER put an interactive card together before you check the mechanism!)   But it will be hidden anyhow so no big deal.


The card strip then gets connected to the plastic strips on the BACK of the panel.  I did this and check it and it still didn't work :(    What happened is that the two little girls popped up but the boy on the left didn't.   Basic physics right - the forces on the pull tab nearest to the pull tab are greater than the forces further out, so the card strip was pulled in a diagonal.

I did a REALLY clumsy fix as I had to work with what I had to get this finished to share with you.  So here's the big fat mess on the back.


I basically stuck a strip of really thick (400gsm) card stock to strengthen the strip to try and even out the pressure and stop it buckling to a diagonal.  Still didn't work, so I added a diagonal strip to exert more force on the boy elf - hey presto - that worked, but the blue card (my only super thick colour!) showed, hence the notch I had to cut out of the diagonal to stop it showing on the front!   If I do this again, I would use thick board (like the back of the do bend envelopes I send dies out in) or a wooden lolly stick and I would fold the pull tab around it so it was double thickness for pushing back up.p

So now you know what not to do on the mechanism, you should be able to apply the idea - having your pull tab centrally between any popping up characters should also make the "physics" work better.  (so for example if I'd put another elf further on the right, that would have helped spread the pull forces equally.

For the main element of the card I also did something a little different - I layered decoupage style image stamped and coloured on white glitter card (I used the Concord and 9th neutrals pack, but pixie dust from Lawn Fawn would work too)


You can see here the detailed layered and depth.  I started with an image stamped on plain white card and coloured Bernie on that layer, then added the igloo which was shaded with grey alcohol markers, then I added the mailbox again on white card and added the snow, flag and pole back on top with coloured glitter card.  The snow was added as another layer on top of the igloo for more depth and then finally Rosie coloured on plain card with glitter snowballs on top.

The sentiment is from the new Santa's Sleigh set from Mama Elephant.


NEWS FROM THE STORE


  • The latest release from Mama Elephant is live in store and selling fast.
  • We have a huge delivery of Lawn Fawn restocks which we are working on sorting and will be in store either today or tomorrow.
  • Concord and 9th's new release got held up in customs and is expected early this week.
  • Neat and Tangled also got stuck in customs - again due early this week.
  • AlteNew's latest release shipped on Friday so is due this week (customs willing!)
  • Flora and Fauna's new release also shipped on Friday so is due later this week.


That's all for today - catch you later.

Tara