Showing posts with label MFT Single Stitched Rounded Rectangle Frames. Show all posts

Tuesday, 13 February 2018

Wish Rainbow Stack

I’ve got a CAS card to share today, with a rainbow twist! 


I’m using the new Wish dienamic from MFT for this card. I die cut a piece of white card with a single stitched line rounded rectangle frame. On the inside piece, I die cut the Wish dienamic in the bottom right corner.

I added some rainbow colours to the frame, then adhered the panel and frame onto a white card base, and layered the positive 'Wish' die cut letters back onto the card. 


I then die cut the Wish dienamic from an assortment of coloured card stock, plus another white piece. 

Going in reverse rainbow order, I adhered the letters onto the card, one on top of each other. I then finished with the second white layer. In total, there are 7 layers.


When viewing the card from the front, the letters look white, but when viewed from the side, it gives a lovely rainbow effect.
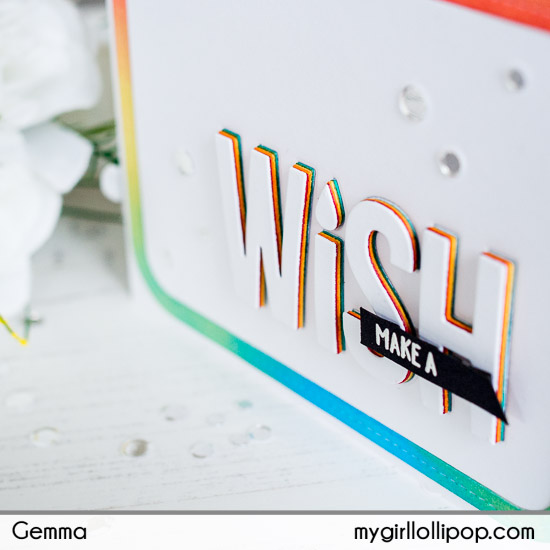

I added an additional sentiment, from Lawn Fawn Upon a Star, on top of the stacked letters. Then I finished the card with some sequins on the background.

Thanks for joining me today,
Gemma

MFT Wish
Lawn Fawn Upon a Star


Tuesday, 29 August 2017

Happy Balloons

I have a birthday card to share today, featuring the fabulous C&9th Happy Balloons stamp set and dies.


I started by die cutting a rounded rectangle frame. On the rectangle, I added die cut stitching details and then blended on some pinks inks for an ombré look. I adhered the frame and rectangle on a card base.


I stamped some balloons in different colours, adding details with embossing. I used the matching dies to cut them out, then layered them on the card with foam tape.


I tied some gold thread to each balloon and adhered the ends to the card base.

I die cut a banner and stamped a sentiment from the stamp set, then folded it along the score lines and adhered the ends to the card base. The middle part isn't adhered so it adds some nice dimension.


Finally I added some sequins from my craft stash to finish the card.

Have a lovely day,
Gemma
C&9th Happy Balloons

C&9th Happy Balloons


MFT Stitched Strip Dienamics
MFT Rounded Rectangle Frames

Tuesday, 4 July 2017

Shake those Jelly Beans!

Happy Tuesday!

Today I'm sharing some jelly bean birthday cards. I just love their funny faces!
 

I used the companion shaker die set with the Lawn Fawn How You Bean? stamp set to make some shaker cards. I've been making multiples of my cards recently as, once everything is out on the table, it doesn't take much more time to make another card or two.


To start, I stamped loads of the jelly beans and coloured them in with alcohol markers, in a rainbow of different colours. I also stamped some of the jars, lids, and labels. I stamped a face on each jelly bean too.

I used the shaker die set to cut out the jars, plus a layer of foam tape and backing panel for each. I adhered a group of jelly beans to each of the back panels, then added some loose jelly beans before sealing the shakers.
 

I chose some coloured card bases and die cut a rounded stitched frame rectangle for each. From some Lawn Fawn patterned papers, I die cut panels to go at the bottom edge, using scalloped and basic edge die cuts. I also ran these through my die cutting machine with the rounded frame so they would line up properly on the card panel.


Once these were adhered down, I added the shaker jar, some extra jelly beans falling down and the lid, leaving plenty of room for a sentiment.

Not wanting to cover those pretty papers too much, I decided vellum banners would be perfect. I stamped three banner from the Lawn Fawn Bannertastic stamp set with Versamark ink, then heat embossed them in white. I added some heat embossed sentiments, then die cut them with the coordinating dies. 


Vellum can be tricky to attach to a card, but some strong liquid glue strategically added behind the heat embossed areas works well.
 

I hope you like these fun shaker cards and the cheeky jelly beans!

Thanks for joining me today. As always, links to products used are below. 

Gemma

Lawn Fawn Perfectly Plaid Paper Pack


MFT Rounded Rectangle Frames
Lawn Fawn Bannertastic


MFT Stitched Scallop Edges
MFT Stitched Basic Edges

Hero Arts White Embossing Powder


Tuesday, 13 June 2017

Ahoy Matey

When I saw the Lawn Fawn Ahoy Matey stamp set, I just knew it was a must have. I love all the images in the set and the sentiment font is fantastic.


I had a lot of fun colouring these images. I used MFT black hybrid ink to stamp them, coloured with alcohol markers, then fussy cut them out. I also added some Wink of Stella glitter to the coins too.

To create the scene, I die cut a rounded circle frame twice from white card and once from kraft card stock. I'll keep the frames to use on other cards, as I just want the inner rectangles this time.

On one white card rectangle, I added a light blue ink at the top for the sky. This is the base layer.

On the other white card rectangle, I blended on blue distress ink, flicking with water for a more textured look, before die cutting two ocean wave borders from it.

From the kraft card rectangle, I die cut a stitched hillside for the beach, then heat embossed a greeting onto it.


Before layering the scene together on a kraft card base, I stamped some images on it with a dark brown ink, to make it look like a map. The stitched line stamp is from an Avery Elle set, which I'll link below. I blended on some dark brown ink on to the card base too, for a more aged look. This doesn't need to be perfectly blended.

Finally I layered the pieces on the card base, mostly with liquid glue but I used foam tape behind the beach for dimension.


I decorated the envelope in a similar way to the card base but in a lighter brown ink and without the added ink blending. 

Thanks for joining me today,
Gemma

MFT Rounded Rectangle Frames
MFT Ocean Waves