Hi everyone, it's Esther here for our last post before we break up for Christmas. I needed one final card for a friend and their family, and I wanted it to feel really festive and fun. My Favorite Things Strike Up The Band is perfect for this!
I started with a heavyweight card stock base, and layered up a panel of My Favorite Things Trail Mix paper in a festive green chevron pattern. Next was a panel of red card stock with lots of images from My Favorite Things Strike Up The Band heat embossed in white. I also inked the edges of this panel in a darker red to add intensity.
For embellishments, I used a Lawn Fawn Stitched Rectangle Frame die cut from the same red card stock, and went over the stitching with a white pen to make it pop. The 'happy' is the Altenew Happy Die which I cut in white fun foam and then again from the Trail Mix pad before gluing both together. I stamped and white heat embossed 'Christmas' from the end of a longer sentiment in My Favorite Things Merry Everything onto a snippet of green card and gave it a stitched edge. Finally that fun bunny is stamped and die cut from My Favorite Things Strike Up The Band stamp set and matching Dienamics, and coloured with Promarkers.
So that's it for today, but as Tara mentioned we'll have a series of "favourite things" posts starting on Boxing Day until the blog re-opens properly in the New Year. Have a lovely Christmas, and we all hope you have a very happy and fulfilling 2017! Thanks for stopping by :)
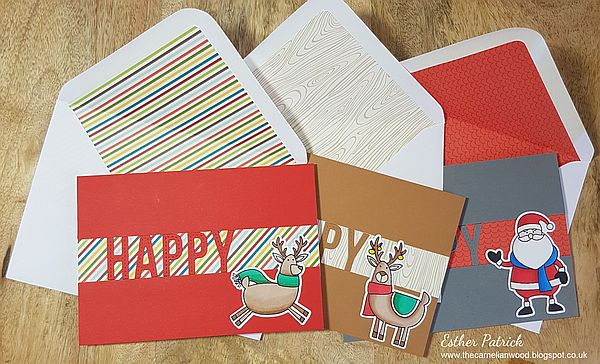
Hi everyone, Esther here with a completely different style of card to last week! This week I want to show you a really quick and easy design for batch making Christmas cards with fun matching envelopes. This is great for producing large quantities of cards that still look like some time has gone into them.
So what do you need? Just a few supplies:
Cut some card bases to the size you want. I cut my card stock to 8" high by 5.6" wide so that the folded cards were 4" high.
Cut some 1.5" strips of different papers from your paper pad and glue them to the middles of the card bases.
Cut two strips per card of coloured card at 1.5" high by 5.6" wide and glue them to the tops and bottoms of the card bases. You should have a gap of 1" in the middles where your paper shows.
Cut the letters H, A, P, P, Y multiple times from your coloured card using the My Favorite Things Stitched Alphabet Dienamic. Glue them into the gaps, positioning the word slightly to the left of centre. If you're not confident about the fit, just stick your top strip of coloured card, then the letters, then the bottom strip of coloured card. You can always trim a bit off the bottoms if you need to.
Stamp and colour some images from your stamp set, then die cut or fussy cut them out and glue one image per card at the bottom right corner.
Now take matching sheets of paper from your paper pad and one at a time use a corner rounder (or neat cutting) to round off one corner.
Hold that rounded corner at the top inside of your envelope so it lines up along its sides with the glue strips on the envelope flap. Just before the paper overlaps the sides of the envelope, make a small pencil mark, and join the two marks. Make sure your joining line is below the open portion of the envelope body. I've used a thick black pen so you can see the lines.
Cut out the shape, and add two strips of glue tape or other glue of your choice to the back.
Insert the paper into the envelop, aligning its edges with the envelope so it's centred and level.
Finally, re-score the fold line for the envelop flap.
I promise in real life this is so quick to do, and having a matching envelope creates such a fun, personalised effect! It really makes your batch Christmas cards look like they took a lot more time than they did, and will put a smile on the recipients' faces!
That's it for this week - hope you like them! See you next week, and thanks for stopping by.