Thursday, 7 December 2017

A teeny weeny gin truck

Hi it's Tara back today as Taheerah is super busy with her Advent Extravaganza on her own blog - do go and visit if you haven't as she has lots of prizes to be won every day.

So today I have a fun idea to share - as soon as I saw the truck die from Neat and Tangled I had the instant idea of using it to make my place cards for the Christmas table and adding a little festive cheer to it.


As you can see it's perfectly sized to add a miniature (gin for me naturally!) and by adding the guest's name to the number plate then you get a super cute place card come gift all in one handy and super cute little truck! 


At first it looks a little complicated as there are lots of little bits in the die but as they have given you a couple of each little piece it means you can cut out lots in one go.  The die for the truck is very large and doesn't fit straight away on a standard platform on a big shot but as I don't have an extended platform I just used standard partial die cutting techniques to run it all through in two passes.   However on this example, I actually cut off the top to make a pick up truck so didn't need to cut the roof and didn't need the extra pass.

I just die cut the windows and added acetate behind and then for the side and back panels I added patterned paper rather than extra windows as I wanted some snowflakes to match my Christmas table theme this year.

It is much easier to add all your decorations before you build the truck so I just folded all the score lines, creased them with a bone folder and then opened it up again to add the elements before sticking it all together with red line tape for strength.

I added a Cheers die to the front to go with the bottle inside but you could also add the person's name there or on the side if their name is too long to fit on the number plate.

If you wanted to make a children's version you could add a little pack of crayons and some candy canes sticking out of the top or keep the roof on and add some little chocolates.

They could also be a cute way of handing over cash - much more fun to open the roof and find the cash folded inside than just opening an envelope!

I could also see them in different colours becoming a bit of a race game around the Christmas table to keep little people occupied whilst the turkey's carved...

That's all from me for now - see you on Sunday!

Tara


Wednesday, 6 December 2017

Yeti Wishes

Hello, happy Wednesday!

Today I have a Christmas card to share with you featuring this cute little yeti from the Mama Elephant Me and My Yeti set. I've finally managed to finish and send all my cards for this year with the exception of a few extra special ones I will give to close family and friends. This card uses products from a few different companies, mainly because I had a bunch of die cuts and coloured pieces left over from previous projects and I never let them go to waste!


I started out with an A6 kraft card panel and stamped some of the small snowflakes from the MFT You Make My Heart Melt stamp set in Lawn Fawn Yeti ink, setting aside to dry.

I stamped the yeti from Mama Elephant's Me and My Yeti, coloured him in with my alcohol markers and die cut him with the coordinating dies. I had a coloured present left over from a previous project (it's actually from the Neat & Tangled Berry Merry set) and it fit perfectly between the little yeti's arms. I cut a stitched tag from a nice bright red cardstock, tied some twine through the top and foam mounted my yeti in the centre.


For the large sentiment, I die cut the Lawn Fawn Scripty Wishes several times and adhered them on top of each other for some dimension. The smaller sentiment is from the MFT Snow Globe Sentiments set, which I gold heat embossed on a banner of black cardstock.

A touch of clear Wink of Stella gives the final finishing touch!

Thanks for reading.

Tallie


Tuesday, 5 December 2017

Simple Christmas Flora


Hello there, I imagine that most of you will have got your Christmas crafting well underway now, if not finished!! But if not and you're a 'last minute Lucy' like me I have a very clean and simple 4"square card set to show you today....


Solid stamps are awesome for simple, quick designs and when they're foliage and berries it's even better because you can layer them and be a super quick flower arranger too :)

These images are from the Poinsettia Watercolour stamp set by Flora & Fauna,  apart from the set of three seed-heads which are from the Graphic Flowers set..... Flora and Fauna are a great company for mixing and matching images across the range :)


I started by cutting six 8½cm square pieces of card for my stamping panels and then got going with a production line.... I didn't use a stamping platform with these as it was far easier with acrylic blocks. The only mask I made was for the two bright green leaves, the rest is just layered.


To add a touch of Christmas bling and to frame the panel, I tapped the edges into a Versamark pad and then dabbed them into gold embossing powder before setting them with a heat gun.... I'm not a massive fan of metallic tones but I do love that thin border to complete the design :)

I opted to keep my cards all the same but you could easily change up the arrangement or sentiment if wanted too :)


Thanks for stopping by :)
Jenny x

Monday, 4 December 2017

Awesome Duo

Morning, Gemma here. I've swapped days with Jenny this week and I thought I’d share another non-holiday card, for all those winter birthdays. Actually, it’s a 2-for-1 today, as I have two cards which are variations on a theme.

My first card is one layer, all stamping. I made up the word 'awesome' from the fun Paper Smooches Graffiti stamp set. I love the mix of fonts in this set and most letters have a couple of styles to choose from too.


I then took some ink splash stamps from the MFT distressed patterns stamp set, and stamped these in different colours behind the letters. To add to the graffiti look, I stamped some larger ink splashes, from the same set, around the card edges. I also stamped some inside the card, to add more interest.


The sentiment is from the Lawn Fawn Out Of This World stamp set.

For my second card, I had originally planned to die cut the C&9 Double Cut Alphabet and add them onto a card base. I really liked the negative space left over from die cutting the word, though, so decided to use this instead.


I blended on green inks, splashing it with water for some detail. Then I cut down the panel into a strip to add to a card base. I didn’t use any foam tape, but you could do if you wanted the dimension.

I stamped the same sentiment as previously, then added some enamel dots to finish the card.


Thanks for joining me today,
Gemma

C&9th Double Cut Alphabet
Paper Smooches Graffiti
MFT Distressed Patterns
Lawn Fawn Out of this World

Sunday, 3 December 2017

Scene Building With Stamping Bella

I first discovered stamping as a way to allow me to "colour in" which was always my favourite thing to do as a child.  Being an only child if my parents wanted me to be quiet somewhere they took me then the way to do it was to give me a new colouring book and some shiny new felt tip pens.  I have been a self declared pen-a-holic since about the age of 7 and my favourite outing of the year was to WHSmiths ahead of a new school term!  Stamping Bella was one of the first brands I discovered and is still my "go to" when I want a good pen fix.   Now there are people who colour in far better than I do, but with practice I have improved on those early stamping outings, even if I'll never be an Elaine, Kristina or Sandy and it still takes me out of myself for a few precious hours.

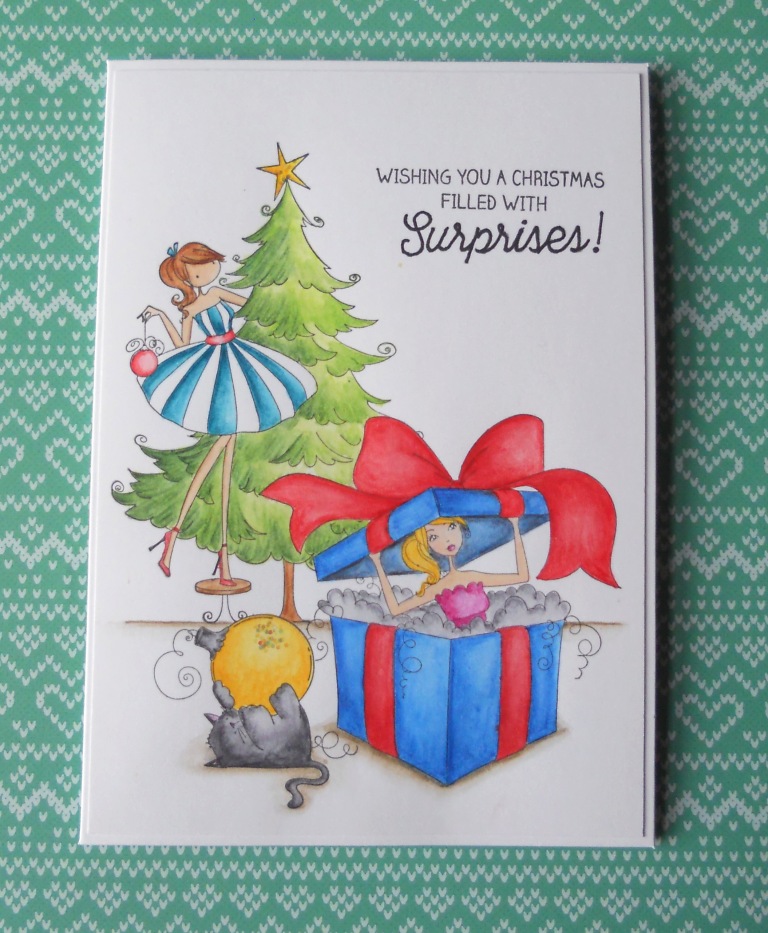
So this weekend I decided to pull out some of my Bella's and one of the great things about them is that because the style is consistent you can mix and match unrelated images and create full-on scenes with them, so I did a couple of larger (5x7) cards for Christmas.


For this first card I've used 3 stamp sets - Tina Trims the Tree, AllBoxedUpAbella and Meowy Christmas.  AllBoxedUp is not a Christmas set but it fits in this scene so its always worth checking out your non-Christmas stash and seeing how you can stretch it.

I stamped the cat first and created a mask from post-it tape and then stamped the boxed up girl over the top so it sits behind in the scene and then finally I did a partial mask for the box so I could stamp the tree behind that (no point cutting out a full mask if you know the stamps will only cross a bit of it so work out roughly where they will cross and save time on the mask)

To colour I used a couple of different mediums - I wanted to use my inktense pencils but there is no colour in them I find adequate for skin so I did the girls skin in copics and then the rest of the scene in the pencils.  To bring it all together as a "scene" rather than 3 overlapping images floating in space I drew a straight line to be the floor and added a little shadow around the images where they touch the floor.  

I wanted a sentiment about Christmas surprises but couldn't find one so put one together using a couple of MFT stamp sets "twice the wishes" for the surprise word and "winter wonderland" for the rest (this is discontinued now but we have a couple left on sale!) 


For this second one, again I combined 3 stamps - Chick Tree, FaLaLaLaLa and one of the chicks from Skating Chicks.   Again I did the same masking technique starting with the chick on the right and working back towards the tree.  I extending the snow mounds to the left of the snowman so when masking that I just used a wobbly scrap of post-it before stamping the chick tree.

This was entirely coloured with inktense pencils - if you find (as I did) that the colours are really strong and want a way to add soft colour (like the really washed out grey I sued on the snowman) then my top tip is to have a scrap of card to the side and scribble on that, wet it and pick your colour up from there with a water brush.  That way you will get a much softer shade than trying to blend out the colour direct on your image.

I just used a fine liner pen to extend the snow hills and then added a thick crust of glitter to the star using Lawn Fawn's chunky glitter which I just love for its brilliant sparkle - its fab in a shaker too.

The sentiment comes from Reverse Confetti's Sentimental Christmas and I've added the remaining 3 La's on the inside.

NEWS FROM THE STORE 

So the biggest news is our closure dates for our move are now confirmed and therefore your last chance to order before Christmas will be MIDNIGHT (GMT) NEXT FRIDAY (15th)


The store will still be live for most of that time, there will just be a day when we do essential website maintenance as part of the move, so you can still browse but CHECKOUT WILL BE DISABLED so you will not be able to make any purchases until we re-open.  We made the decision to do that as we feel opening up after not really having a break with the move will be just too overwhelming if we have hundreds of orders to come back to on day one as we'll never catch up.

The one item you will still be able to purchase will be STORE VOUCHERS.  So if someone needs a last minute gift for you, then you can direct them there.  You will not be able to spend your vouchers until we reopen on the 28th.

We will be getting deliveries throughout our closure so we should have lots of new stock for you ready and waiting on the 28th.

This week we will be getting the new release from MFT as usual and customs willing we should have it for release on Wednesday morning.

Restocks of Concord and 9th have now shipped and hopefully we will have those before the end of the week too.

Otherwise as we are getting close to our move date there will be no more new releases coming as we can't risk them coming to the wrong address (you can't redirect commercial deliveries as customs won't clear them if the invoice and delivery addresses don't match so we need to change our address before we move so have to have a cut off date)   Sorry for the inconvenience- we only plan one move ever so hopefully this is a one-time deal and normal service will resume in 2018!

That's all for today - catch you next weekend!

Tara

Saturday, 2 December 2017

Friends In The Forest

Hey stampers, Anni here!

I am back with another set of Christmas cards featuring this super cute stamp set called Friends in the Forest by My Favorite Things. The set is actually no Christmas set but I think it works with the conifers in the background and a warm cap for all the critters. I chose traditional Christmas colours as red and green to make it even more christmassy (is that even a word?).


I started by stamping, colouring and fussy cutting the animals (there are coordinating dies available, too).
Then I die cut three squares using My Favorite Things Stitched Pinking Edge Square from white cardstock. I masked of the adges and created a sky by ink blending some light aqua ink onto the paper. 


For the trees I chose a pigment ink because it is more opaque than a dye ink. I draw the stems with a brown coloured pencil.
I die cut more Stitched Pinking Edge Squares and cut snow slopes from them. That way I kept the pinking edge on my squares.


The sentiments I used are all from my go-to-set called Mini Messages by Mama Elephant.


For the finishing touch I decked the trees with sequins and pearls.

Thanks for stopping by and have a crafty weekend.
Anni


Friday, 1 December 2017

Pretty, quick make Christmas cards

Hi everybody,

Jill here, and this week I'm sharing my quick make Christmas cards that are the actual design I am using this year (I know, get me showing off, for the first time ever...I am organised early!).


It's a tough time time of year for us card makers; our nearest and dearest are well aware of our hobby and are looking forward to something fancy and bespoke, and I don't know about you, but for me I still want to make every card impressive and pretty, and to look like it took me a whole load of blood sweat and tears...but whilst being really easy to make and without taking too much time.  I mean, making a whole batch of cards for a whole load of different people...is hard! 
My answer...SENTIMENTS!  Big, bold, beautiful, stylish and superb...SENTIMENTS!


Quick and easy to make, but hopefully pretty enough to make an impact!
For me, it's all about the organisation.  I have an idea in my head, and I have all my tools and elements in place before I begin; stamps mounted, card-stock cut to size, paints and brushes ready to go etc...then I get to work. 
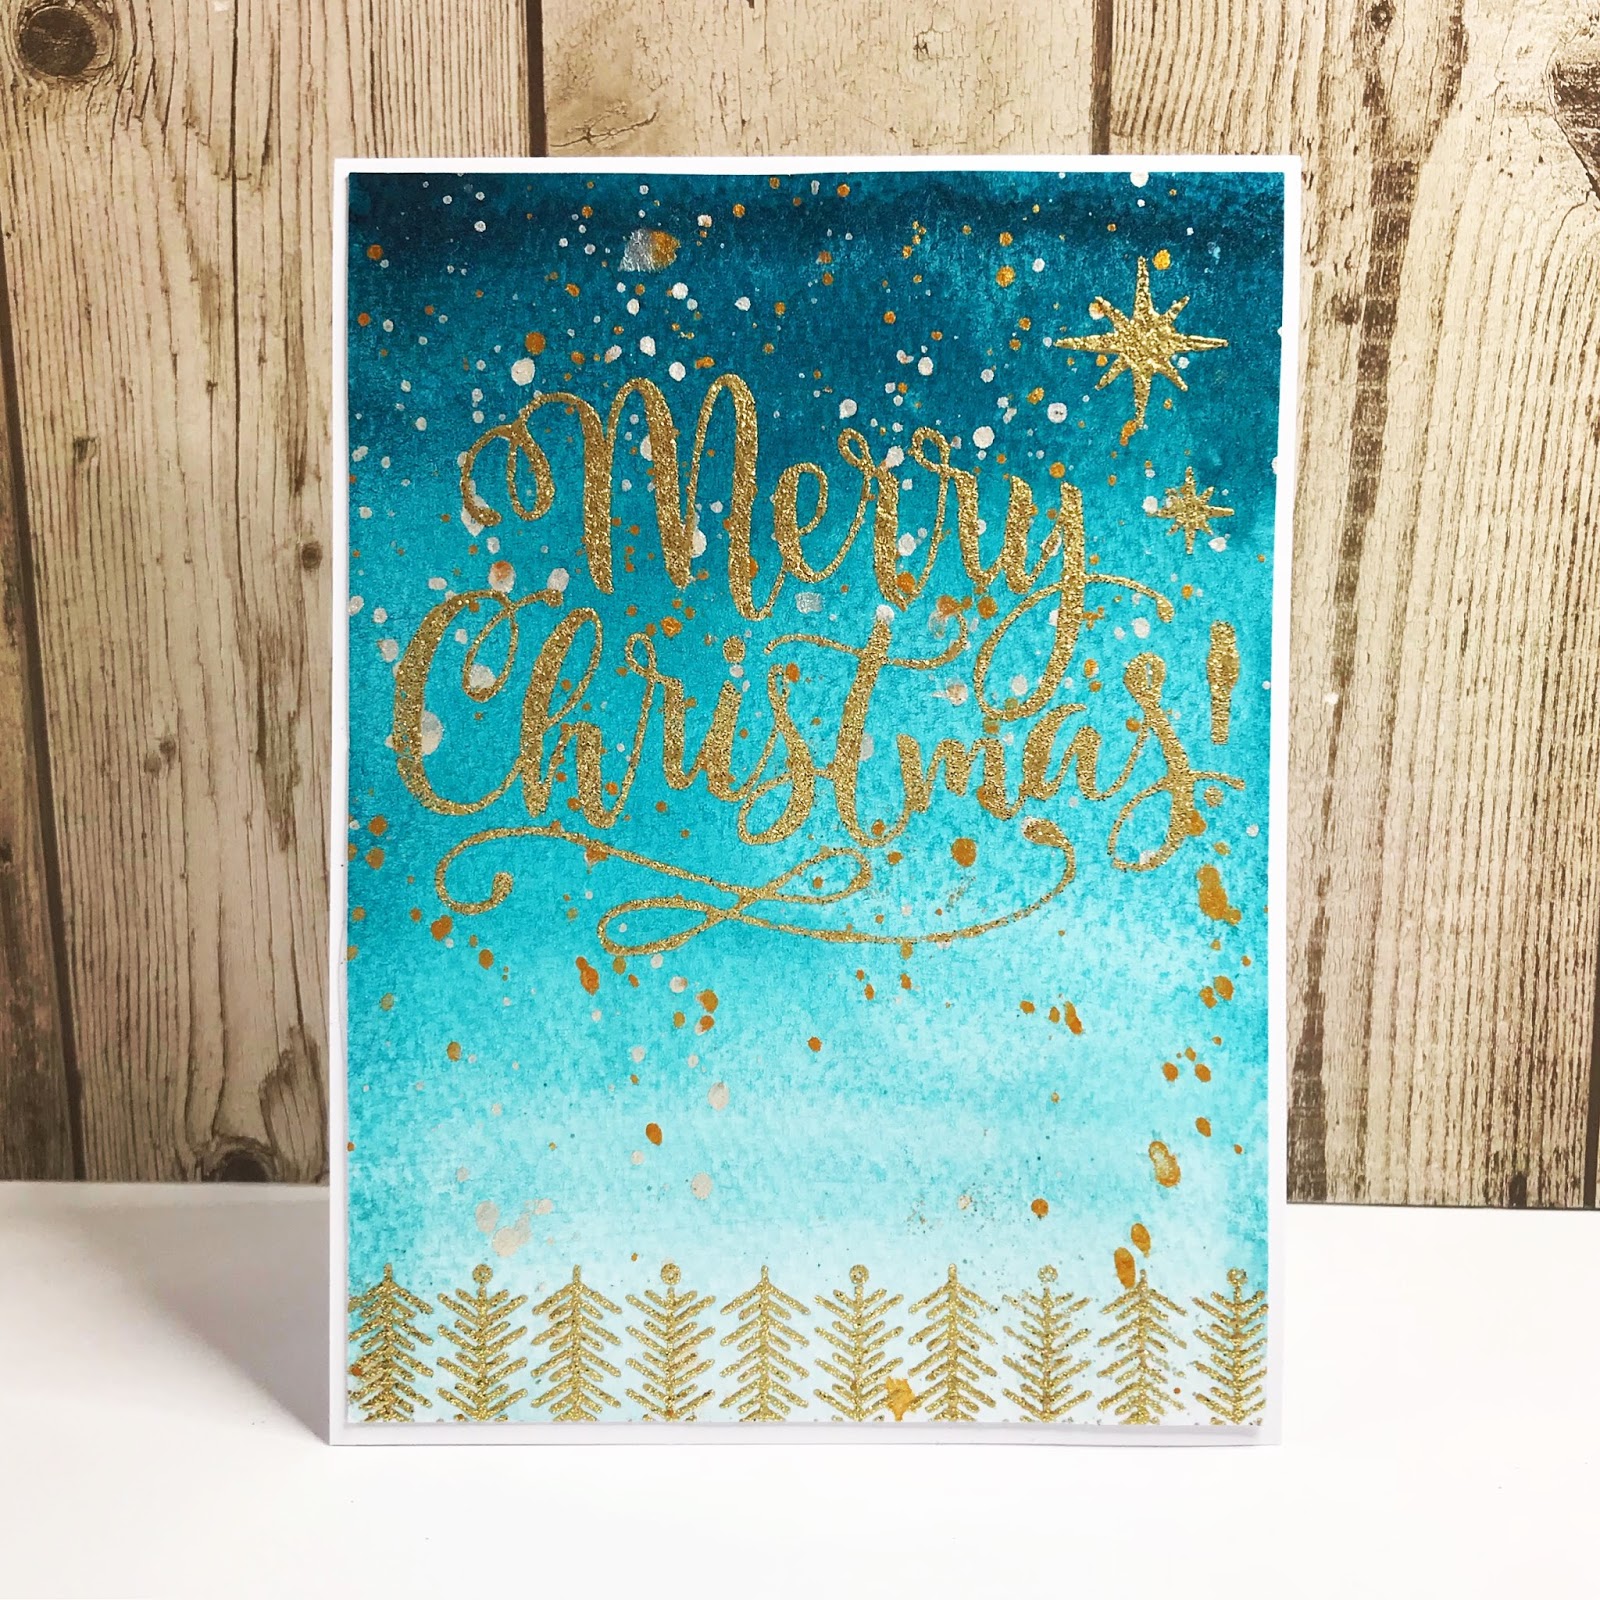
I started with the backgrounds.  I chose my colours and watercolour washed across each of my panels in an ombre effect.  Once I was done with the last one - the first one was pretty much dry and ready to be covered in plenty flicks and flickers of beautiful iridescent and gold paint from Gansai Tambi's Starry Colours.  Once each panel was dry, I had a variety of stencils and stamps at the ready to add extra interest to my background in soft and subtle white ink.  I used a variety of snowflakes and the Tiny Bubble stencil from Altenew to act as snowfall.


I then moved on to the main event - the big bold sentiment stamping.  A beautiful background with a big stand-out sentiment is my all time favourite design when it comes to card making.  I just don't think you can go wrong, and it simplifies batch card-making so much.  No colouring or fussy-cutting for example.
I decided to use Mama Elephant's Merry Christmas Wishes sentiment, but there are so many of this kind of stamp to choose from.  All fabulous fonts and stylish designs.  
I used a stamping platform to make my life that little bit easier, but really, there's no need.  I had a little production line all set up - my pile of backgrounds which I stamped onto using Versamark, covered in gold embossing powder, and left aside to do all my melting at once.  I added a little trim along the bottom from Mama Elephant's Zennith Borders.  This border always reminds me of a Nordic folk tree design so thought it would finish of the card nicely, also embossing in gold.


And there you have it, a pretty background, a big bold sentiment, and few little added bits of interest, and you could have the task complete in next to no time!

As always, everything I used is linked below.  

See you next week.

Jillx


Merry Christmas Wishes    Zenith Borders

Sparkling Snowflake StencilTiny Bubbles Stencil


Gansai Tambi Starry Colours Watercolour Pan Set (6)