Monday, 22 October 2018

Pink Pop!!

Hi there, Jenny here to start your week off with a very girly card
 which is ideal for a pop princess...


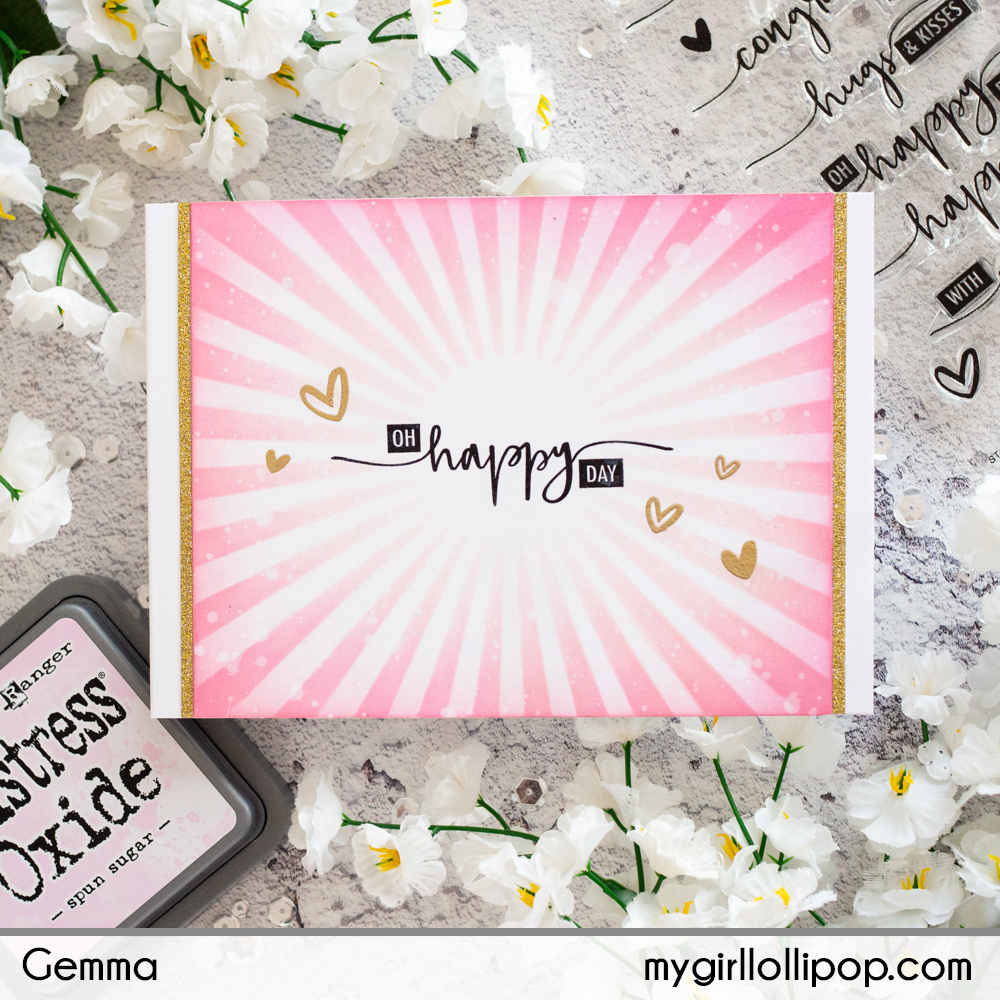
I just had to put this young lady in a pink spotlight and frame her with the large 
dome aperture from Avery Elle's Let it Snow die set.

I used the spotlight stencil to make myself a positive mask by drawing through the aperture onto scrap paper and cutting it out with scissors. I then used a bright pink ink to cover the background, making the ink darker along the edge of the light beam. After removing the mask I placed the stencil down and used lighter ink to colour the spotlight beam. That may have been a long-winded way of doing it but it worked for me 😉


I cut the outer panel in black glitter card stock and added white glittery stars.... love pink and 
black together and the sparkle matches the shimmer on her bow and outfit 
which the camera hasn't picked up unfortunately.

I added a sentiment banner and decided to keep the pink theme going by heat 
embossing  Picked Raspberry Oxide ink.


Thanks for stopping by :)
Jenny x

Sunday, 21 October 2018

Neighbourly Christmas

I'm in Christmas card mode again today, and this time I have seven cards I've made batch-style to create cards for my neighbours.  I do get bored of baking the same card so I do like to do lots of individual cards for Christmas, but having a few designs you can knock out quickly is still handy for the "less special" cards and this is one you can play around with if you want to make it simple or more complex.

I've used just Mama Elephant's new Holiday Messages Stamp and Avery Elle's Cityscape Die and some papers and that's all for all 7 of the cards I have to share today. 


I started off with the most simple design - a die cut stacked row of houses and two of the stamps from the set combined to make the perfect sentiment for neighbour cards.


I die cut 2 card and one patterned paper for all these cards to get a stacked look for the die cut and chopped off the last house on the right so the die sits more in the middle of the card rather than being a full border.


I used bright contemporary papers (these ones are from Lawn Fawn's Really Rainbow Christmas which just sold out again but will be back soon - but any bright paper works for this look).  You don't even need specially Christmas papers, this one is just green spotted. 


Contemporary papers on kraft gives a different look from the exact same design and allows papers with a more white edge to stand out when they would otherwise be lost on a white card.


A more classic paper gives another different look - these papers are from Simple Stories Merry and Bright.


Classic papers on white give a more contemporary feel but with more traditional Christmas patterns.


If you wanted to take the design a little further then here I've used Hickory Smoke distress ink to add a little stormy sky (tip - place a blank die cut down and blend away from it then you don't get ink in the windows) and then finished with some texture paste snow through a stencil.  The new one from Newton's Nook would be perfect here.


Finally I used a couple more pieces from the die set - cutting the moon from white and Santa and his reindeer from glitter scraps.  I added an offset grey layer behind the houses so they would stand out against the moon and embossed my sentiment using white embossing powder on the navy base.

Hope they give you some ideas for batch making that doesn't get boring to make!


NEWS FROM THE STORE

We heard from the distributor that his Hero Arts delivery containing last month's kit add-ons which was delayed has actually been declared lost by the freight forwarder, so he is trying to re-order the lost items along with this month's add-ons.  If they have them at Hero Arts we expect them late October/early November.

We expect to get the latest Neat and Tangled release this week.

Wplus9 also have a new release this week which is in transit.

That's all for today.  Catch you Friday.

Tara


Saturday, 20 October 2018

Santa and Friends

Hey stampers, Anni here!

I have to admit I am a little bit addictive when it comes to Santa stamps! Whenever I see a stamp set with a Santa, I HAVE to have it. There might be a little problem with snowmen, too! But today I want to talk about Santas! Why? you may ask. Well, five words: My Favorite Things' latest release. Two sets with Santas: Santa and Friends and Sassy Santa!!! And these are not any Santas but some of the cutest you've ver seen. I don't have the power to resist!


Today's card features the Santa and the reindeer from the set Santa and Friends, just the sentiment is from the Sassy Santa Set.

I started by stamping the image on white alcohol marker friendly cardstock, coloured it with alcohol marker and fussy cut it (there are coordinating dies available).


Then I die cut Avery Elle's Wonky Squares Frames from dark brown woodgrain cardstock. I die cut it a second time from white cardstock. This time I just kept the inner part to create my background.
I used the snowflakes from Avery Elle's Snow Much Fun set, stamped and heat embossed them on the square. After that I added some ink blending.

I adhered all the elements to a white cardbase, stamped the sentiment and the card was finished.

Do you have a soft spot for certain images when it comes to stamps, too? Let me know that I am not alone!

Thanks for stopping by and have a crafty weekend.
Anni


Friday, 19 October 2018

Crazy Coffee and Dino-tea

You might think I've lost the plot today with my first make - a card for coffee-loving cowboys....


The first thing I saw when I looked at the Waffle Flower Coffee Time set was a cowboy from those old western movies, the ones that strode into the saloons banging the doors open and standing there in their ponchos!   To me the coffee cup in this set is exactly that so I coloured it that way and added some eyes and an eyebrow with a marker pen.


I created the "saloon" by using the shutter die in the Mama Elephant Window Watching set and adding some extra bits to give the classic shape freehand.  I used the Small Brick Stencil to create the walls.  I used distress crayons to make a sandy floor on the background and then ink blended the sky before adding hills with the Kingdom Trio Die from grey card stock.   I wrote my sentiment by hand - my coffee take on ride 'em cowboy.

Whilst I was on a coffee theme I decided to ink up my coffee sloth from last month's Newton's Nook release.  I love coffee, sloths and puns so I think they made this set just for me!


I decided he would be perfect to make a little gift tag from so I could send a little coffee gift to a sleepy friend.  I popped the coloured and die cut sloth onto a double layered gift tag from the new Mama Elephant Scalloped Tag Trio Die set so he's on top and the sentiment on the one behind.   I also cut a third from white woodgrain textured card and used a craft knife along the perforated lines to cut out a frame for the top layer.


As much as I love coffee in the mornings, by 3 I'm all about tea - so I couldn't leave out the little tea-rex either!


I wanted to keep with the tag theme but he was too tall to fit on the same die, but using partial die-cutting it was pretty easy to lengthen the die to get a rectangle to stamp him on.  I opted to use pencil this time direct to the kraft tag - perfect to add to a nicely wrapped tea-bag to send a little drink to someone you can't share one with in person!

The new release from Newton's Nook will be live in store today and there are more punny stamps for Christmas amongst it as well as a couple of more sloths!


That's all from me today - I'll get back to getting this lot loaded to store now!

Tara


Thursday, 18 October 2018

The Easiest Galaxy Background Card Ever

Hi everyone, Taheerah here wishing you a happy Thursday!

I'm sure you all know by now that I love galaxy background cards. I've created them with practically every medium going - watercolours, ink blending, mists, glimmer pastes - you name it, I've probably tried it!

Except for the easiest way of all, of course - the Altenew washi tapes!

I had to race to get these washi tapes. They're so popular and keep flying off the shelves - and I can totally see why! The designs look amazing and the ease of covering a card in one fell swoop? Sign me up!

I pulled out the Watercolour Nebula Washi Tape and couldn't wait to play with it!


Stunning, right?! I love how this turned out!


I applied the washi tape to my card front then used my teflon bone folder to burnish the tape on so it would stay put. Instant galaxy background!


I wanted to pull out something else I haven't had a chance to play with yet - the WPlus9 Lucky Stars stamp set - love this set! I heat embossed the sentiment and stars with white embossing powder, flicked on some mist and I was all done! The easiest and quickest galaxy background card ever!


I'd love to hear what you think of this card. Is there someone you know who'd love to receive it? Thanks for stopping by!


Wednesday, 17 October 2018

Gingerbread Scenes

Hello, Tallie here! I have another set of Christmas cards for you today. I'm sorry to all those people who hate hearing the word before 1st December, but I have to get an early start on my cards otherwise a panic will ensue!

I have a thing for gingerbread stamps and dies. As soon as I saw the new Lawn Fawn Gingerbread Friends dies, my mind was whirring with the card possibilities! Paired with the Avery Elle Starry Scene stamp, and with a simple heat embossed sentiment, these cards are easy mass produced.


I started with an A6 top-folding heavyweight white card base. A stamp positioning tool makes this design easy to do, so I lined the Starry Scene background from up and stamped a gradient using three different colours of ink per colour combination. For the blue/teal cards, I used Lawn Fawn Fish Tank, Peacock and Merman inks. For the pink/purple cards, I used Lawn Fawn Blue Jay, Sugar Plum and Peachy Keen inks. I then stamped again in Versamark ink and clear heat embossed to get a shiny backdrop.


I heat embossed the sentiment from the Lawn Fawn Merry Messages set in Silver for the blue card and rose gold for the pink/purple card.

Next came the fun part - building the gingerbread! I cut several of the base layers out from both white and kraft cardstock. I used some Vintage Photo and Walnut Stain Distress Inks to add some dimension to the edges of the kraft pieces. I stacked these together to give some dimension to the card. For the faces and decoration I cut these from white cardstock and coloured different pieces in with my alcohol markers. I adhered these onto the gingerbread characters with some liquid glue.


These cards were so much fun to create and I now have 10 more cards to add to my Christmas stash!

Thanks for reading, catch you next week.

Tallie


Tuesday, 16 October 2018

Oh Happy Day


Happy Tuesday!


The Avery Elle Loads of Wishes stamp set is one of my favourite sentiment sets. I love the mix of fonts. For my card today, I’m focusing on this set.

I began by stamping a sentiment in black versafine ink, then clear heat embossing it. I also stamped some of the heart images from the same set around the sentiment, heat embossing them in gold.


Next, I layered the MFT Radiating Rays stencil over the top of the panel. I inked on distress oxide inks in spun sugar and picked raspberry.

I then removed the stencil and trimmed down the panel at the sides, where the stencil didn’t reach. I added some more picked raspberry distress oxide ink to the edges to soften the lines, the flicked the panel with water droplets.


I used liquid glue to add the panel to a white card base. I then cut some thin strips of gold glitter paper, adding the, to the edges of the panel for a nice finish.


Thanks for joining me,
Gemma