
Not only is that the sentiment on today's card but it also sums up my day (well evening) as I finally found some time to have a good play with some new materials we've had in store, and any day I get time to play is a happy day indeed!
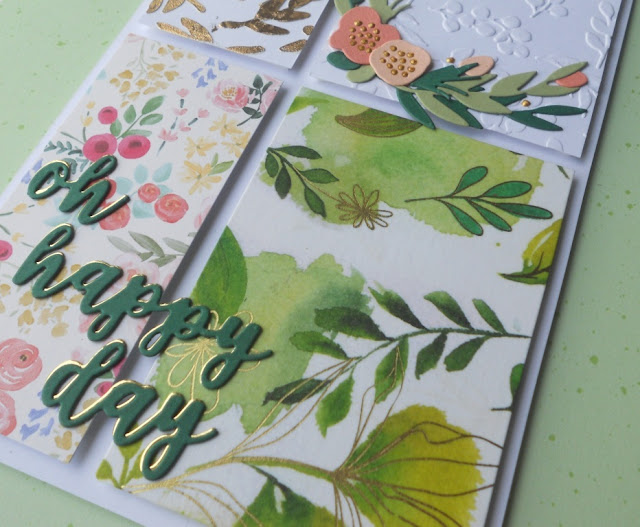
I've made what I'm going to term a "sampler" card as it features 4 panels each using a different material but all of which marry together to make a cohesive whole.

Starting top left, I created a panel of embossed gold foiled leaves using Altenew's embossing paste, Echo Park's Flower Market - Market Delights Stencil, and We Are Memory Keepers Gold Foil. Although the foils are designed for use with their Foil Quill Tool, I am aware that not everyone has an electronic die cut machine to plug the tool into, so I'll be playing around with other ways you get the foiled looked on your projects and this is one of my personal favourites - using foils with embossing paste. It's really easy to do, simply spread the embossing paste using your tool of choice through the stencil (I use a small cake decorating spatula when playing with pastes as I find I get more control from one of those - something like the ones pictured below). Remove the stencil and carefully place your foil on top, just letting it fall into place (remember to wash your stencil and tools straight away) and then then when the paste is starting to dry (refer to your product and test drying times for thicknesses) rub the foil over the raised areas to make sure its sticking all over. Leave it to fully dry and peel the foil back and hey presto foiled stencil designs!

Top Right I stuck with more elements from Echo Park's Flower Market collection and used the Bloom and Grow Embossing Folder to make the background square and added die cut elements on top using the Floral Swag dies - I cut some elements twice to build it up to be a larger cluster using shades of greens and peaches to tie in with the other elements. The white gives the whole design space to breathe but the embossing gives detail so it's not just blank.
Bottom left is where the colours came from - this time just a slither of paper from the Flower Market pad - if you are new to Echo Park, then this is how their collections work - they have a paper pad at the core and then have other elements from dies to stencils all designed to work with each other.
Bottom right and we have more newness from Altenew in the form of one of their stunning foiled washi tapes - I opted for Misty Meadows as it had similar themes to the Flower Market collection. I cut a piece of card to the size I wanted and placed a larger piece of washi over the top and folded the edges behind as sometimes I find washi edges can lift over time.
The sentiment comes from an older Avery Elle set - Oval Burst and I cut it twice, once from the pine card I used on the floral swag and once from gold mirri so I could layer them up and pull the gold theme together. To make the "samples" into a card I just popped them on foam tape and spaced them so there was even gaps throughout.
I hope this encourages you to look at what "collections" you can pull together in your stash and make some sample panel cards.


NEWS FROM THE STORE
It's going to be a busy week!
We have the following stock to add over the next few days:
Lots of stuff from Ranger:
Some beautiful new paper pads and washi tapes from Simple Stories
The brand new release from Mama Elephant (live on the 15th) with restocks too
The brand new release from Lawn Fawn (live on the 16th)
The following are either already in transit or will be shipping this week for next week:
It's OK - we don't need to sleep...........
Tara
I've made what I'm going to term a "sampler" card as it features 4 panels each using a different material but all of which marry together to make a cohesive whole.

Starting top left, I created a panel of embossed gold foiled leaves using Altenew's embossing paste, Echo Park's Flower Market - Market Delights Stencil, and We Are Memory Keepers Gold Foil. Although the foils are designed for use with their Foil Quill Tool, I am aware that not everyone has an electronic die cut machine to plug the tool into, so I'll be playing around with other ways you get the foiled looked on your projects and this is one of my personal favourites - using foils with embossing paste. It's really easy to do, simply spread the embossing paste using your tool of choice through the stencil (I use a small cake decorating spatula when playing with pastes as I find I get more control from one of those - something like the ones pictured below). Remove the stencil and carefully place your foil on top, just letting it fall into place (remember to wash your stencil and tools straight away) and then then when the paste is starting to dry (refer to your product and test drying times for thicknesses) rub the foil over the raised areas to make sure its sticking all over. Leave it to fully dry and peel the foil back and hey presto foiled stencil designs!

Top Right I stuck with more elements from Echo Park's Flower Market collection and used the Bloom and Grow Embossing Folder to make the background square and added die cut elements on top using the Floral Swag dies - I cut some elements twice to build it up to be a larger cluster using shades of greens and peaches to tie in with the other elements. The white gives the whole design space to breathe but the embossing gives detail so it's not just blank.
Bottom left is where the colours came from - this time just a slither of paper from the Flower Market pad - if you are new to Echo Park, then this is how their collections work - they have a paper pad at the core and then have other elements from dies to stencils all designed to work with each other.
Bottom right and we have more newness from Altenew in the form of one of their stunning foiled washi tapes - I opted for Misty Meadows as it had similar themes to the Flower Market collection. I cut a piece of card to the size I wanted and placed a larger piece of washi over the top and folded the edges behind as sometimes I find washi edges can lift over time.
The sentiment comes from an older Avery Elle set - Oval Burst and I cut it twice, once from the pine card I used on the floral swag and once from gold mirri so I could layer them up and pull the gold theme together. To make the "samples" into a card I just popped them on foam tape and spaced them so there was even gaps throughout.

I hope this encourages you to look at what "collections" you can pull together in your stash and make some sample panel cards.


NEWS FROM THE STORE
It's going to be a busy week!
We have the following stock to add over the next few days:
Lots of stuff from Ranger:
- Alcohol ink restocks
- New Pearl Alcohol inks
- Distress Oxide Sprays
- New stamps and stencils from Simon Hurley
- and a few other miscellaneous bits like the new improved alcohol ink pen, empty distress oxide pads so you can mix your own colours, and clever anti spill rings from your alcohol inks.
Some beautiful new paper pads and washi tapes from Simple Stories
The brand new release from Mama Elephant (live on the 15th) with restocks too
The brand new release from Lawn Fawn (live on the 16th)
The following are either already in transit or will be shipping this week for next week:
- Concord and 9th's new release
- Neat and Tangled's new release
- Newton Nook's new release
- Avery Elle's new release (released on 23rd)
- Altenew's latest release of stamps, dies and pins.
It's OK - we don't need to sleep...........
Tara


