I wanted to highlight some of the new Tonic Studio products today as I've been itching to play with the Nuvo Crystal Drops for ages. I have a couple of "non dot" applications to share with you using them.
Firstly I wanted to make some Christmas decorations with a modern twist. If you've seen any interior shows recently you'll know that grey is the new magnolia so I thought I'd make some decorations to match. I've made a couple but I may make more and turn it into a funky row of bunting.

I started with some Narwahl cardstock from Lawn Fawn covered with stick-it on the back for ease of glueing and the Lil' Inker Designs Baubled Wreath die. I die cut it twice, once with the die facing the cardstock, once with the die facing the stick-it - that way you can flip it and sandwich two together with a sheet of acetate in the middle and create a decoration you can "fill" with the crystal drops. I used a selection of colours in greys, and teals to keep on my theme.

This is the back view - if you were making baubles for the tree then I would fill the back once the front is dry, but as I think I will make something I can hang on the wall I will just keep them as is.
You could do them in any colours - the glitter drops would look really festive and the light would shine through them more.

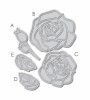
Secondly, I thought I would have a go at using the drops to "paint". I die cut the Outline Rose die from Wplus9 from more Narwahl cardstock and stuck it straight onto a thick base card. I then used dandelion yellow, pumpkin and rhubarb drops, drawing lines with them on each petal and using a pokey tool to blend them together. I used green and gold for the leaves and did the same blending. I like the kind of cloisonné enamel effect you get when it dries. Its a really quick and fun technique to play with too.


Tara
Firstly I wanted to make some Christmas decorations with a modern twist. If you've seen any interior shows recently you'll know that grey is the new magnolia so I thought I'd make some decorations to match. I've made a couple but I may make more and turn it into a funky row of bunting.

I started with some Narwahl cardstock from Lawn Fawn covered with stick-it on the back for ease of glueing and the Lil' Inker Designs Baubled Wreath die. I die cut it twice, once with the die facing the cardstock, once with the die facing the stick-it - that way you can flip it and sandwich two together with a sheet of acetate in the middle and create a decoration you can "fill" with the crystal drops. I used a selection of colours in greys, and teals to keep on my theme.

This is the back view - if you were making baubles for the tree then I would fill the back once the front is dry, but as I think I will make something I can hang on the wall I will just keep them as is.
You could do them in any colours - the glitter drops would look really festive and the light would shine through them more.

Secondly, I thought I would have a go at using the drops to "paint". I die cut the Outline Rose die from Wplus9 from more Narwahl cardstock and stuck it straight onto a thick base card. I then used dandelion yellow, pumpkin and rhubarb drops, drawing lines with them on each petal and using a pokey tool to blend them together. I used green and gold for the leaves and did the same blending. I like the kind of cloisonné enamel effect you get when it dries. Its a really quick and fun technique to play with too.


NEWS FROM THE STORE
- It will be a quiet week from a new stock point of view - but there are more new releases pending, I just need a little time to get my orders in! Watch this space next week for more news including new stock from Winnie and Walter and Lil' Inkers and the new crystal drops and fine glitters from the Nuvo range.
- We will have our restock of Perfectly Penned from Concord and 9th though so grab them quick if you want them as they sold out in 6 hours last time! We got as many as they could spare but we don't think it will be enough and will of course re-order as soon as they get more made!
- We also hope to finally have our gift vouchers working this week and will be doing a newsletter explaining how they work as soon as they are ready to go so make sure you are signed up to our newsletters if you aren't already.
Tara