Friday 30 June 2017

June Challenge Winners

It seems our die cut a die cut challenge was a bit confusing as we had a few comments from people who didn't understand what we meant and a few entries that just featured die cutting, the idea was to alter one of your die cuts by using another die to do it.   It's a fun way to stretch your stash if you didn't try it for the challenge so do try it if you can.

We did have some great entries though and I can confirm that our winner this month was Caroline from KISS who used an inlaid die cutting technique to die cut her flowers into each other and into her die cut panel.  You really nailed the technique Caroline!


Drop the store an email Caroline and we'll get your £20 voucher to you.

Our runners up this month really grabbed the technique by the horns too.

Naama used the technique to cut her smile sentiment into her die cut butterfly aperture.


Ashwini used a butterfly too and die cut it from the middle of her die cut rainbow stamped banner


Cris used her die cut run ray cover panel to die cut a circle of waves to form the centre of her card - such a fun idea and great way to turn a border die cut into a central feature!

Here's your winners badge for your blogs!


If you didn't win this time, or were too scared by the challenge to enter, then pop by here tomorrow afternoon as we'll have a nice simple sketch for our July challenge for you to play with for another chance to win £20 to spend in store!

Tara

Simply Sweet Forest Friends

Hi everybody,

Jill here, and this week, I'm keeping things sweet & simple...


...using the adorable Sweet Forest Friends from My Favourite Things.


Oh my, the little critters in this Sweet Forest Friends are soooo cute...I just can't!  The style of this set is so sweet, and lines so simple I wanted to stick with the same theme with my design and create a very cute and clean card.
I started by cutting my frames using Lawn Fawn's Stitched Rectangles.  I took the centre panel and stamped my design onto it.  I masked off as I went so the little critters could all be gathering in front of the tree.  I stamped my sentiment from the same Sweet Forest Friends set onto my panel and clear heat embossed.  I then coloured my images and my background using Zig Clean Colour Real Brush markers and left to dry.
Whilst that was drying, I took my outer frame and stamped one of the teeny flowers from the set all over it, I also took this time to stamp out a ton of the small flowers from the set onto a spare scrap of card.  I then coloured all of my pieces, again, using my Zigs and fussy-cut the teeny weeny flowers.


Once all my colouring was compete and my pieces were dry, I pieced them back together, adding an extra layer beneath my main panel so it stands slightly forward and added my flowers to my scene.  Once my scene was complete, I felt it was lacking one little touch, so stamped out, coloured and fussy cut a few of the little butterflies from the set and added them to my card.  This finished off my piece a treat and added some lovely dimension.
I finished by adding Glossy Accents to my critters eyes and noses and there you have.


I really hope you like it.
As always, everything I used is linked below.

See you next week.

Jillx

Sweet Forest Friends  Small Stitched Rectangle Lawn Cuts Image 1  Zig Clean Color Real Brush Pen (12 piece set)

Thursday 29 June 2017

Magical Unicorn Card

Hi everyone, Taheerah here wishing you a happy Thursday!

If you're a follower of various card designers and trends in general you can't have failed to notice the unicorn trend lately! From memes to stamps to frappuccinos, everyone's been getting in on the action - and it's easy to understand why. There's something about unicorns that is quite simply magical!

I've scoured high and low for the perfect unicorn stamp (and, *ahem*, 'collected' a few along the way) - but I knew my search was over when I saw the Neat & Tangled Magical Day stamp set! My friend Elena always illustrates the cutest of stamps for Neat & Tangled, but the unicorn she drew here is not only cute, but perfectly proportioned, graceful and pretty to boot!!

I was excited to play with this set and came up with the following card:


Isn't she just the prettiest?!


I stamped and coloured my unicorn with pretty coloured reminiscent of My Little Pony! I didn't get her mane or tail perfect but I did give them a good coating of shimmer to pretty them up! Her horn got some shimmer too, before I trimmed her out ready to go!


I used one of my favourite rainbow dies - the My Favorite Things End Of The Rainbow Dienamics set - to die cut the rainbow and cloud from white cardstock. I watercoloured the rainbow in pastel shades before giving them a coating of shimmer, whilst the cloud got a good mist of some shimmer spray for extra magic!


I assembled all my elements onto my card base with dimensional glue gel, adding some splatter to my base, before stamping the sentiment and scattering with sequins to finish! I challenge you to find someone who wouldn't be won over by this beauty!


I'd love to hear what you think of this card. Is there someone you know who'd love to receive it? Thanks for stopping by!


Wednesday 28 June 2017

Night garden card with My Favorite Things and Avery Elle


Hi everyone, it's Esther here with a card inspired by the idea of a night garden.


I started by die cutting a "starburst" panel with a centre circle using Avery Elle Burst Elle-ments. I cut stars from the centre circle with My Favorite Things Stars in Sky Vertical Dienamic, and replaced some of them with silver stars.

The flowers were die cut using My Favorite Things Stitched Flowers Dienamics and coloured with alcohol markers.

The bunny gazing up at the night sky is stamped and die cut using My Favorite Things Snuggle Bunnies, again coloured with alcohol markers.

Finally I layered everything up, raising the outer starburst panel above the starry sky using foam tape and stacking the flowers on top around the bunny. I decided not to add a sentiment as I didn't want to make the card too busy or hide too much of the gorgeous starburst background panel.


That's it from me this week. Thanks for stopping by!


Tuesday 27 June 2017

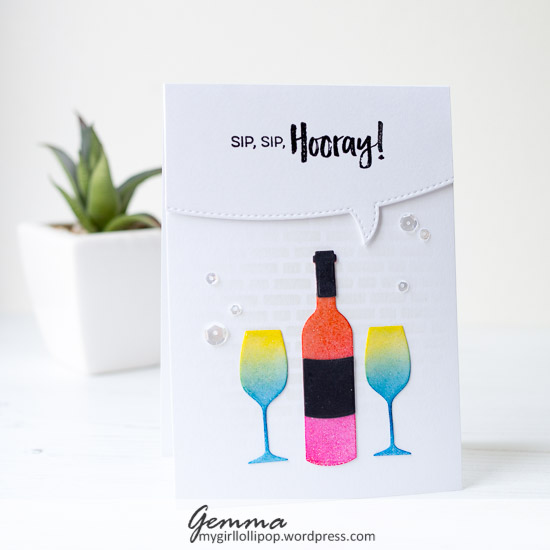
Say It With Wine

Happy Tuesday!

I'm having fun with glitter embossing on my card today. By adding clear glitter embossing layers to stamped images or die cuts, you can really add some sparkle and shine to your projects.


To start, I used the MFT English Brick Wall stencil and MFT grout grey ink to add some detail to a white card base. I used light blending to keep the background fairly subtle. Once that was done, I set the card base aside to work on the other elements of the card.

I die cut a wine bottle and glasses from the MFT Wine Service die-namics, then blended on some inks. I went for bright vivid colours as the rest of the card is more plain, and a black bottle label and top.


The die cuts need some glitter, and clear sparkle embossing powder is perfect for the job. As these are small die cuts, I adhered them to some low tack painters tape. By using tape, you have something to hold whilst heat embossing and keep your fingers from burning.


After adding to the tape, I used a Versamark ink pad to add the sticky ink to all the die cuts. I covered them with clear sparkle embossing powder, then heat embossed them. I repeated the process to add a second layer of embossing, which adds even more sparkle and dimension to the die cuts.

I left space at the top of the card for a speech bubble containing a sentiment, which I stamped with black Versafine ink and heat embossed in the same clear sparkle embossing powder. I used foam tape to attach the speech bubble to the card base.


Finally, I added some sequins around the card for extra sparkle. I also made a second card with a different sentiment.


Thanks for joining me.
Gemma

MFT Stitched Speech Bubble Edges

MFT Uncorked

MFT Wine Service

Versamark

Hero Arts Sparkle Embossing Powder
MFT English Brick Wall Stencil


Monday 26 June 2017

Air Dancing for You!!

Hi there, Jenny here..... hope you all had a good weekend :)

I'm back to congrats cards again, it's always good to have some on hand especially this time of year with exam results coming up but this card could be for any celebration really...


Okay!... please tell me they made you smile too? Those air dancers have great expressions and I love how they look all bunched together and overlapping. This is a fun Congrats card and I wanted the dancers to stand out so instead of making them pop up on the inside of the card I made a very simple easel design so they stood out on the front.


I used the large words in the set to decorate the front of a card base in Moonlight ink and then scored about 7½cm from the bottom of the front to make a mountain fold.
When it came to the dancers, I stamped and coloured them on separate card before cutting around them with scissors. The arms for these guys come paired but I find it much better to trim them apart so you can mix and match and change the position of them on the bodies.


I arranged them on the card front to see what would work best and then used a strip of low tack tape to pick them all up together and apply glue and foam pads to the back.... remembering to keep to the lower portion of each image!

After adhering the dancers, I stamped and embossed the sentiment onto a strip of black card and backed it with a piece of foam to make it stand proud of the card... this acts as your stop for the easel design. What a great sentiment to go with these images!


These guys just crack me up.... especially the three with hair, hope they made you smile too :)


Thanks for stopping by, hope you have a good day :)
Jenny x

Sunday 25 June 2017

A Fuse Free Squidgy Card

Sometimes we see a new technique and can't wait to try it, but then realise it requires an expensive tool that we just can't justify for the number of times you know you won't do it!   For me that was wanting to add liquid to my cards to create squidgy shakers but I knew I wouldn't use a fuse tool more than a couple of times, so I figured out a way to do it without the tool and I'll you how......

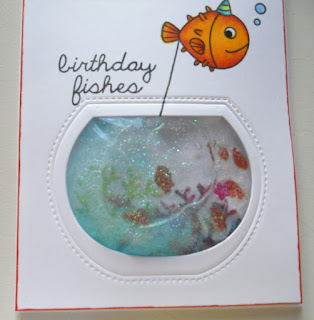
The new Fish Tank die from Mama Elephant gave me the perfect opportunity to create a squidgy card and here's the finished example, paired with a coloured image and sentiment from Waffle Flower Crafts using their Birthday Fishes mini stamp.


What you need to create your squidgy part is really simple - a zip lock bag (just big enough to fit behind your die cut but ideally longer to keep the liquid away from the zip lock), some clear liquid hand soap and some strong glue with a narrow applicator.


For this version I die cut lots of little gold fish from the Mama Elephant Fish Tank die from some orange sequin material (you can buy the sheets of it) as its water proof.  It takes a few passes through the die cutter as its pretty tough but its great as you can essentially make your own sequin shapes with any dies you have.  I added a few pink star fish too.

Pop those into your zip log bag and add any other elements you like - sequins, beads etc - I used a little fine glitter in clear and blue.  Now add a few squirts of your liquid soap - DO NOT FILL THE BAG - you want just enough to give a squidgy area the size of your die but you need some empty space too.  Keep the soap clear of the zip lock element - if any gets on, wipe it off before the next step.

Use your glue (I used glossy accents as the long tip makes it easy to get it in the right place) to add a line of glue to the channel in the zip lock.  Squeeze out the excess air, but keep the soap at the bottom of the bag, then close the zip lock tight.  Allow to dry - keep the top of the bag upright so the soap can't run towards it until its dry - once dry you have a super tight seal which won't come undone - so you have a squidgy liquid you can add to the card with no fancy tools!


Whilst it was drying I worked on the rest of the card.  I die cut the fish tank on my top panel and drew around the hole on the base card with an embossing tool lightly so I could see where it would be.  I then added a couple of pieces of coral that I'd die cut and coloured with copics onto the base card so they would show behind the bag and look like they were inside the fish tank.


To secure it all in place I added a couple of strips of double sided tape under the bag at the top where it wouldn't be seen through the die cut hole.  Then I edged around it with 2 layers of foam tape to get it to the same thickness as the ziplock bag.


To finish the card I stamped the little fish balloon and sentiment and coloured with copics.  I embossed the larger tank around the die cut hole for added interest and edged the card with the darker orange marker.  A little double sided tape behind in the middle helps keep it all straight - remove the tape from that but leave the release tape on the foam layers and pull that off with tweezers once you know it's right.


Hope you give it a go!


NEWS FROM THE STORE

We will have the following arrivals in store this week:
  • Kuretake restocks
  • Sugar Pea Designs new release
There are some more new releases pending from Stamping Bella, Paper Smooches and all the usual brands that release monthly will start to come through in early July.  As ever Facebook is the place for your up-to-the-second arrival information.

WE CANNOT GIVE ETA'S ON INDIVIDUAL ITEMS - PLEASE USE THE OUT OF STOCK NOTIFICATION SYSTEM - it works we promise!
 

Catch you next week

Tara