Wednesday 31 May 2017

Grey, pink and gold geometric card


Hi everyone, it's Esther here with a geometric card that uses really simple masking and ink blending to create a modern look.


I used three strips of Post-It tape to mask off triangles on a card panel, which I inked using three colours from Altenew's Rock Collection mini ink cubes set: Limestone, Silver Stone, and Industrial Diamond. This is temporarily out of stock, so use the Altenew Warm Gray mini ink cubes set instead for a sophisticated taupe colour palette.

The pink splatters were a happy accident - I obviously hadn't cleaned up my craft sheet from a previous card as well as I'd thought, but I loved the effect and decided to keep going.

A sentiment cut from gold card using a Concord and 9th Wonderful Words die, "you are" stamped using part of a sentiment from My Favorite Things Magical Unicorns, and some pale pink sequins from Neat & Tangled Sweetheart Sequin Mix finished the card off.


That's all from me for this week - have a good one!


Tuesday 30 May 2017

Pegasus Duo

Today I have a shaker card to share, featuring the adorable Pegasus horses from Avery Elle. This is such a lovely set to colour, and the sentiments in the set are great too. 


I began by die cutting a scalloped rectangle from white card and from this, die cutting a rainbow. I made sure to leave enough space at the bottom of the card for a banner to go.

I added acetate behind the rainbow cut out, and used foam tape to build a space for the sequins to go. I chose sequins in rainbow colours, then sealed the shaker with some blue patterned paper.


Next, I stamped out two Pegasus horses, colouring them with alcohol markers and adding Wink of Stella clear glitter for some sparkle. I then fussy cut them out. I added two die cut clouds to the base of the rainbow, then the horses over the top.

For the sentiment, I stamped a Lawn Fawn Bannertastic banner and chose a greeting from the Pegasus stamp set. I die cut the banner, then added to the card with foam tape.


I adhered the shaker panel to a pink notecard, then stamped some stars to the top of the card to finish.


Thanks for joining me today,
Gemma


Monday 29 May 2017

Birthday Dress

Hi there, Jenny with you this Bank Holiday Monday..... I hope the summery attire on my card doesn't curse the weather too much!!! I was in need of a girly birthday card so I decided to ink up the Heatwave Stamp set from Waffleflower... another fab layering stamp set to play with :)


I love teal and black together.. so striking and almost retro when mixing it with off white neutrals.
I started by layering the dress and shoes, they are really quite easy to line up, and stamped the glasses too which I turned into sunglasses with black and teal coloured markers. 


I decorated a card base using a couple of borders from the Pattern Play stamp set, I took my inspiration for this from an item of my own clothing... I think it makes a fun background :) 

To make the clothing stand out on the card base I used the Doily Square die to make a matt and cut the word 'Birthday' into it using MFT's Bottlecap letters... love the pattern showing through the blocky letters :)  I added 'Happy' which is stamped in the same teal ink onto a Sentiment Strip because I didn't have the right coloured embossing powder to match the natural card base!!


Thanks for stopping by :)
Jenny x

Sunday 28 May 2017

All At Sea

I've got 3 fun cards to share today all on a sea theme using new products from Hero Arts and Avery Elle - it's a long post so grab a cuppa!

Firstly I couldn't wait to play with the Tentacles stamp from Hero Arts - as soon as I saw it I had loads of ideas for how it could be used  ("I feel your pain",  "Just reaching out",  "Hang in there" etc etc) but I also thought it would make a fun birthday card.


I stamped it onto cartridge paper so I could water colour using the new to store water colour pencils from Prima - you can either wet the pencils and paint directly with them, or use them like a normal pencil and blend with a water brush and that's the approach I took.  I used the Spring & Fall and Vintage Lover sets.  To twist it into a birthday card I drew some simple birthday image (cake, candles, present and a cocktail glass) as if the tentacles were holding them and raising them up out of the sea - they were very simple shapes to draw but you could search your other stamps for smaller images to stamp instead if you didn't want to draw.  I fussy cut it out and mounted it onto a sheet of paper from the Lawn Fawn Watercolor Wishes pad and added a wave using the Mama Elephant's Ocean Waves Trio die.   I wanted strong colour on the wave so I used Prima's water soluable oil pastels - these are great for adding bold colour to large areas and blend really easily with a water brush.   The sentiment comes from MFT's Twice the Wishes stamp set.


For my next card I also twisted things up a little.  The way the narwhal's on Avery Elle's Extraordinary face each other reminded me of a guard of honour at a military wedding so I decided to make an underwater wedding card for a couple of crabs....


I stamped the narwhal's onto post-it tape so I could mask them and cross their horns to form the guard of honour.  I took the shell and hat from the new Manatee Stamp and Die set from Hero Arts and stamped them onto post-it tape again so I could mask them and stamp the crab from Avery Elle's Bubbles set so I could change it into both a bride and a groom.  I added a scribble line to form a veil for the bride.

I coloured all the image with Zig Clean Color Brush markers and a water brush.  I tend to prefer to scribble my colours onto my acrylic block  and pick them up with the water brush as I can blend the colours that way and its a nice soft water colour look.  For the narwhals I used green-grey and turquoise-green - putting them on either side of the block gives you 3 colours from 2 pens.  You can get a bolder colour effect if you blend the pens directly on the paper so they are very versatile.


To put the whole scene under the sea I used the Abstract Wave Stencil from Hero Arts with sno-cone ink (a really soft colour) directly over the top of the whole card - it's quite scary to cover up your careful colouring but a soft colour does work!   The sentiment is from Extraordinary - i just selectively stamped "birthday" to make it just "day"


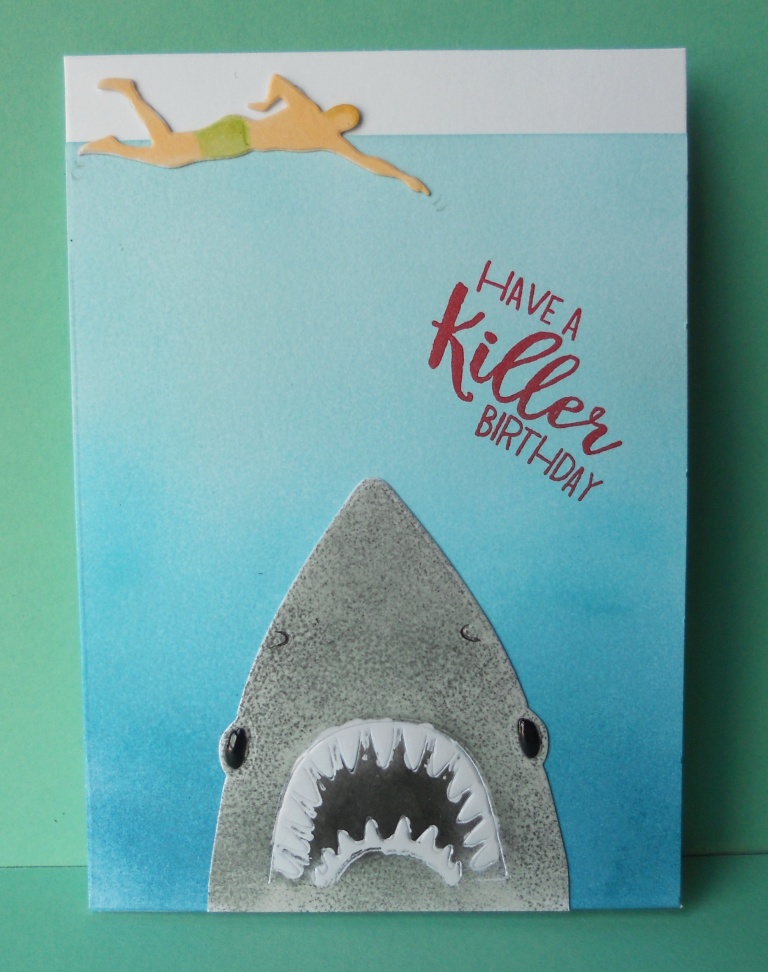
For my final card I went full on Jaws (well it was on TV last night!) with the new Paper Layering Shark and Killer Messages Stamp Set.  The recipient would need a slightly twisted sense of humour but it made me laugh and was an easy make. 


I die cut the shark from white card and used glossy accents on the teeth.  I used the Rock Collection ink cube set from AlteNew to colour it - using the palest shade all over to create a base colour and then as shark skin feels like sand paper I wanted to add texture to I used a small piece of natural sponge to dab on some dotted colour in the two darker shades.  I used the darkest to blend the inner mouth and then just wiped all the ink off the teeth as the glossy accents resists the ink.  I used a couple of layers of it on the eyes too so they were raised and really shiny.

I used Cool Summer Nights to blend a sea background onto more white card getting darker at the bottom and I trimmed the top so it was just a little shorter than my base card so I could have my swimmer swimming on the surface.   I finished with a sentiment from the Killer Messages set stamped in red for the realistic Jaws feeling!


NEWS FROM THE STORE

  • We have the latest couple of releases plus restocks from Paper Smooches in transit and will have them next week (not sure what day yet as Bank Holidays make customs even more unpredictable than usual!)
  • We also have MOST of the new release from Lawn Fawn coming back hopefully on Tuesday - we ordered the day after release day but they had already sold out of a few items themselves so we just grabbed what we could.  We'll try again for the other items when we see they have them.
  • We have also ordered more from Mama Elephant to try and get the cats back in stock as they sold so quickly but again, we are waiting for it to ship.  Brands can take 2-3 weeks to process our orders which is why we can't always get everything back as quickly as you'd like but we do get everything back eventually so use the out of stock notification system to make sure you don't miss out on items you want when they come back!
  • We have the latest release plus masses of restocks from AlteNew on order but are waiting for them to ship.
  • We will also have new releases from Newton's Nook, Lil' Inker Designs, Sugar Pea Designs, Neat & Tangled and MFT coming in the first couple of weeks of June - more details of what will be here when will be in future Sunday posts.

Enjoy your bank holiday - catch you next weekend.

Tara


Saturday 27 May 2017

Wish Big!

Hey stampers, Anni here!

Today I have a very PINK card for you. I wanted to make a card with this super cute set called Elphie Selfie by Lawn Fawn. And I thought pink would go great with the grey elephants.


The card took me quite some time because I had to colour all these images. I used coloured pencils. Colouring with coloured pencils takes always longer than colouring with for example alcohol markers. But I really really love to colour with coloured pencils. It is very soothing to me, blending is easy and I get much more detailed with pencils. So when I have a little bit of extra time on hand I choose coloured pencils.


When the colouring and fussy cutting was finished the rest was easy and finished in no time at all.
I cut down a piece of watercolour cardstock into a rectangle and created a background by smooching down dye inks in lilac, pink and orange. I choose the colours I used for the images but in a lighter shade. On this panel I stamped one of the sentiments that were included in the stamp set.
For the last finishing touch I added some glossy accents to the balloons.

Thansk for stopping by and have a great weekend.

Friday 26 May 2017

Otterly obssessed.

Hi everybody,

Jill here, and this week I am going otterly adorable with a peek-a-boo window card...


...featuring the delightful Otterly Adorable from Mama Elephant.


I am otterly obsessed with these amazing creatures, they are soooo cute, sweet, and adorable and best of all...they hold hands with each other when swimming so they don't float away!!!  I mean...gaaaaah *heart bursts into a million pieces*  
So every time I see this sweet set, it just makes me smile and makes me want to ink it right up.

I've spoke before about how obsessed I am with my My Favourite Things Stitched Triple Peek-a-boo die and because there's a ton of different images in the Otterly Adorable set, all doing different things & swimming different ways, I thought it would work perfect to have a little group of them swimming along and 'peeking' through the windows.


It was a very simple card to make.  I started by colouring a piece of card in sea greens and blues to use as my background and, using the cloud border from Mama Elephant's Landscape Trio dies upside down, cut some waves from it.  I then stamped out all the images I wanted to use and clear heat embossed them so I had a raised edge ready to colour with my Zig Clean Colour Real Brush Pens.  I used them with water to create a watercolour finish.  My sentiment is from the same Otterly Adorable set and is stamped out and heat embossed within the banner from Lawn Fawn's Penelope's Blooms.  To add a little 'something something' to my sentiment banner I inked it up from the back in matching colours to background and waves.


I built up my little scene how I wanted it to look from behind the Peek-a-boo windows using wet glue and foam tape and embellished with a scattering of pretty clear sequins.
I adhered my vellum banner in place by placing a teeny bit of wet glue behind the most bold outlines and letters so that it is barely visible.


I really hope you like it and that these adorable otters make you as happy as they make me!

As always, everything I used is linked below so be sure to stop by.

See you next week.

Jillx

Otterly Adorable    Stitched Triple Peek-a-Boo Windows Dienamic
 Zig Clean Color Real Brush Pen (48 piece set)  Penelope's Blossoms Image 1

Thursday 25 May 2017

A Floral Hello

Hi everyone, happy Thursday! I'm Taheerah and those of you who are regulars to the blog might recognise that I'm a new face here! I'm delighted to be joining the Seven Hills Crafts DT as the newest of Tara's awesome team!

So as I'm new, I thought I'd say hello! And what better way for a cardmaker to do that than with a 'Hello' card?


I loved pulling out the Concord & 9th Hello Lovely set for this quick and easy card! That massive floral spray really speaks for itself!


We always seem to want to colour our flowers (who can blame us when nature gives us so much inspiration?!) - but for those who are intimidated by colouring, I wanted to show you how you can create a stunning effect by colouring the background instead! That's precisely what I did, with some watercolouring!


I heat embossed the 'Hello' sentiment with gold embossing powder. A little splattered gold mist to finish things off nicely, don't you think? The end result almost looks like marble!

I hope you have a great day! I would love to get to know you all a bit better - why not say 'hello' back in the comments? :) Thanks for stopping by!