Saturday 31 March 2018

Happy Birthday to Moo!

Hey stampers, Anni here!

I just recently showed you two cards using Lawn Fawn's Hay There set. I can't stay away from these super cute farmyard critters, I just had to make another two cards with this set.


For today's cards I tried a new to me technique: Colouring with coloured pencils on coloured cardstock. And I have to say I really like it.

I started by die cutting two squares, one with a die from My Favorite Things' Stitched Pinking Edge Square STAX and one from Stitched Mini Scallop Square STAX, also from My Favorite Things. I used grey cardstock for this.


Then I stamped the animals with My Favorite Things' Extreme Black Hybrid Ink - I love it - onto the squares and coloured them. I added some details free hand like grass and clouds.
I love how the colours show up on the cardstock and how bright they appear.


I also stamped sentiments from the Hay there set onto the squares. Then I underlayed the squares with cardstock matching the colour of my sky and added it to a cardbase.

Thanks for stopping by and have a happy Easter weekend.
Anni


Friday 30 March 2018

Metallic Florals, Challenges and a new Community Group

Good morning - hope you're all having a fabulous start to your Easter weekend.  I'm here today as Jill is taking a little break for a few weeks as she has a lot going on at home.  She'll be back in May and the DT past and present will be here on Fridays whilst she's away.

I'm kicking things off with a floral card as we are launching our new challenge this weekend which is all about florals too.  The challenges now have a new home though - in our brand new Facebook Group which is just for our customers (you will be prompted for an order number when you join)  Our group is called SHC VIPs and as well as being the home for challenges where it will be easier for non-bloggers to add their images as all you need to do is add a picture to that month's album, there will be a chance to share your makes, hints and tips and ask questions about crafty issues you may be struggling with.  We hope it will be a fun community as it grows over the coming months so do join us there.

So April's challenge (we're starting early!) is a nice easy one - just show us your favourite florals - stamped, die cut, stencilled - whatever takes your fancy.  As always we ask that the focal images are products we sell in store and we'll pick our favourite project after the challenge ends on 30th April to win a £20 voucher to spend in store.

I decided to play with something new as I was so excited to see it when  the Wplus9 release arrived that I know it will be a firm favourite!   So here's my bold metallic floral using the Tossed Floral Background.


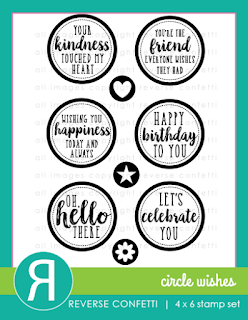
I die cut it from 300gsm white card and then used 3 embossing powders to get an ombre metallic effect using from left to right, Hero Arts CopperHero Arts Gold and AlteNew Rose Gold powders.  I decided to mount it onto a black panel for added drama and then used a black die cut circular sentiment using Circle Wishes from Reverse Confetti.  I used the same powders to create an ombre effect from top to bottom this time.

I'll be back on Sunday with my usual post and run down of the week ahead.

Tara


Thursday 29 March 2018

Life Is Magical Floral Card

Hi everyone, Taheerah here wishing you a happy Thursday!

I thoroughly love the look of high-end stationery. From premium notecards to wedding invitations, modern stationery really does convey an opulence in a sometimes surprising way.

High-end stationery is one of my favourite looks to recreate in card form, and one of the best sources of modern designs is Flora And Fauna. I pulled out the Live Life Wildflowers stamp set and set about creating my design:


I love how fancy this looks!


I stamped my pattern to create the card background using several different stamps from the Live Life Wildflowers set using Versafine ink, and then watercolouring some of the blooms in a rough/loose style.


I stamped the sentiment from the Unicorn Magic stamp set onto some black cardstock and heat embossed the design. The little added trim of gold glitter cardstock really helps add a designer touch!

I'd love to hear what you think of this card. Is there someone you know who'd love to receive it? Thanks for stopping by!


Wednesday 28 March 2018

Simply Thinking of You

Hello, crafters. I have a simple card to share with you today. Sympathy cards are never the most fun to send but unfortunately they are necessary. I needed a card design that was simple but heartfelt, and the new Lawn Fawn Simply Celebrate has a perfect flower arrangement.


I started off with an A6 white blending card panel and stamped out the flower banner in some MFT Black Licorice Hybrid Ink. I also stamped out the 'THINKING OF YOU' sentiment from the Lawn Fawn Simply Sentiments set, making sure there was even spacing. I coloured this in with my alcohol markers, sticking to a basic palette of reds, yellows and green.

I used an Avery Elle Wonky Stitches rectangle to cut out the panel before mounting it directly onto a top-folding A6 red card base. A little bit of clear Wink of Stella over the flowers to give some shimmer, followed by some Glossy Accents (alternatively, you can use Nuvo Crystal Glaze) finishes off the card.


In contrast to my card last week, I love how you can create so many different moods with this stamp set. At least this set will be well used!

Thanks for reading, catch you next week.

Tallie


Tuesday 27 March 2018

Alien Birthday Shadow Box Card


Today I’m sharing a shadow box card featuring the cute aliens from Lawn Fawn Beam Me Up.
 

I usually create a galaxy background when I make space related cards, but I thought it would be fun to use some bright colours this time, to create an alien landscape. 

I chose some patterned paper from my stash and cut two pieces for the box. I die cut a window in one side, then joined the two box pieces together with double side adhesive to get one long piece.

I measured the width of the panel at the back of the box, and cut some clouds to go directly on this panel (The cloud dies I used are out of stock, but I’ve linked to a great alternative below). I added a little pale blue ink to the tops of the clouds, before adhering them directly on the inside of the box. 


Next, I cut two hills from purple patterned paper, using the tab dies that come with the shadow box. I adhered them into the box (just on one side for now). I love the purple alien landscape against the orange sky.

I then coloured lots of images from the Beam Me Up stamp set, adding them to the tabs in the box. I also adhered some images on the inside back and side panels. The planets are from the Lawn Fawn Out of this World stamp set.


Once all the images are in the box, I finished putting the box together. I find it easier to do this part at the end.

For the sentiment, I chose some from the Beam Me Up stamp set, and heat embossed them in white on black card. I then die cut them with some banner dies and adhered them to the box. I’ll add a panel at the back to write a message to the recipient.


The shadow box die is one of my favourite interactive dies. The box is simple to put together, looks great, and fits in a standard size envelope for posting.

Thanks for joining me today,
Gemma


Monday 26 March 2018

Summer Splash


Hi, Jenny back again with a splash of summer for you today..... we appear to have drone 
footage of a private swimming pool... hehehe 😄
Yes the Avery Elle stamp and die set called Splash is quite popular in blogland at the moment and I wanted to to try an idea using the Avery Elle Letter Balloons elle-ments to add some more floatie fun to the pool....


I thought the balloon letters would pass as floaties once the tied knots where chopped off... they are coloured with alcohol markers along with the ring and ladies from the stamp set. The pool is made with distress oxide inks smooshed onto watercolour card... they give such a good water effect. I needed the pool shape to be larger so I die cut the pool edge then chopped it in two places so I could give the illusion of a larger pool which goes off the edge of the card front.


To make the terracotta coloured terrace I clear heat embossed a hexagon background then blended MFT Peach Bellini Ink over the pattern. Unfortunately this background has been discontinued but a similar effect could be gained with the Moroccan Lattice background from MFT  or this Scales stencil, which looks like paving to me.


This lady is relaxing by the pool on a lounger I made using the diving board and ladder die. I just cut the board in patterned paper and card and the ladder in black card, I then trimmed the ladder to make  legs protrude from under the sun lounger.
I felt the pool side needed some homemade greenery so I made a couple of green leafy plants with free hand snips and placed them into white square planters... sometimes you have to improvise 😉 I think all that's missing now is a glass of something sparkly in their hands to complete the picture!!


Thanks for stopping by 😊
Jenny x

Sunday 25 March 2018

Zodiac Placecards

As well as crafting, my other creative love is cooking so I often have friends for dinner.  When I saw the Uptown Zodiac Girls from Stamping Bella I thought they would make really fun place cards for a girls night in dinner party and I have one of those coming up so I've started working on mine and I have a couple of share today.


I stamped them with Extreme Black Hybrid ink because I wanted to use pencils and watercolour to shade them.  I started with pencils and added all my shading and details.  For Virgo that meant creating the folds in the dress (following the images on the stamp packages really helps here if folds aren't your thing!).  For Pisces that meant some folds but I also added some little semi circles to hint at scales.

Once I was happy with my shading, I then used a trick I learnt from a recent online class for using a single wash of watercolour over the top of your pencil to bring it all together and in this case to add shimmer.  You want a really watery wash so your hard work of pencil colouring still shows through and do a test patch first as the colour you pick can alter the colouring underneath.  I used a shimmery blue on Pisces and a very lemony-green on Virgo.

To make them stand up I die cut them out (I used a 300gsm card stock to stamp them on so they had some structural integrity) and then also die cut an oval from the same card stock and cut that in half down the longest length.  Cutting a snip into your half oval from the top and the same length slit into the bottom of your girl and slotting one into the other gives you the perfect "standee" to pop on the table.


You could then either add individual names to them or, for more fun (and providing all your guests have different signs!) just go with the star sign label so they have to work out where they sit.


NEWS FROM THE STORE

  • We received the latest release from Wplus9 late on Friday so will work on getting that live asap this week.
  • We have ordered the latest AlteNew release but it has not yet been shipped to us.  Hopefully that will happen this week and we'll get it online as soon as we can.
  • We are still waiting for the remainder of our Art Impressions order to ship - we only got about half of it so want to wait until it all arrives before adding it to store.

We have had quite a few customers recently who haven't had their correct or complete address on their orders - can I please remind you all to double check that your address details are correct on every order (if your PayPal address is different it will over right the address on our system so check that is correct and up to date too) and when you get back to our store from PayPal double check that everything is correct before confirming your order.  This goes for checking the items in your basket too - if you haven't cleared your cache before ordering older items can reappear so it's always best to check BEFORE you confirm as that's the point of the step in the process to allow you to be sure that you are ordering what you actually wanted to order ;-)

Right off to do a little gardening in this precious couple of hours of sunshine before the beast comes back for its' 3rd onslaught over Easter!

Catch you next week

Tara


Saturday 24 March 2018

Hey There Fabulous Friend!

Hey stampers, Anni here!

It's snowing! AGAIN! At the end of March!!! It is supposed to be spring! It's unbelievable!

In another attempt to elicit spring I am making again cards with lots of flowers. A lot of die cutting and no stamping at all was involved.


I just recently bought Concord & 9th's Just Because Die set! I love it so much because it is so versatile and just perfect for masculine cards in my opinion (but I didn't make a masculine card today). The Just Because Stamp set is beautiful, too, and goes great with the die set but I haven't used it for these two cards.

I started by die cutting the flowers and leaves from watercolour cardstock several times - I used up all scraps of watercolour paper in my stash.
Then I pressed some different shades of Distress Oxide Inks (they will be available at Seven Hills Crafts soon - YEAH!) onto my craft mat and sprayed them with some water. Then I dipped all the die cut pieces into the puddles, let them dry and dipped them in again - this time chosing another matching colour.


For both cards I die cut sentiments from Concord & 9th's Fabulous Phrases. Again I die cut several ones to stack the sentiments up. This is an easy way to achieve some dimension.

For the card above I also die cut a scallop rectangle from Mama Elephant's All Prettied Up. On this rectangle I arranged a lot of flowers and leaves with the sentiment in the center. The card turned out a little bit wild and not the CAS style I prefer.

That's why I decided to make another card - and because I had still some leftover die cuts. The second card turned out really clean and simple. I just used three flowers, some leaves and a sentiment. For a finishing touch I added some gems and that finished up the second card.


Let me know which card you prefer? The simpler one or the one full of flowers? And please tell spring to come over when you meet it!

Thanks for stopping by and have a great weekend!
Anni


Friday 23 March 2018

Birds On A Wire

Hi everybody,

Jill here, and this week, I’ve got a string of sweet birds sitting on a wire...


...using Lawn Fawn’s superb Simply Celebrate.


I used this set last week and as I had it out was looking at it and thought, ‘wouldn’t it be brilliant if those little balloons fit nicely behind those little birdies as if they were holding them....’ and low & behold, they did! Those smart cookies over at Lawn Fawn think of everything!

So straight away a little scene popped into my head if a string of sweet birds sitting on a wire sending celebratory messages!


I started by stamping all my elements out; the balloons from Simply Celebrate and the trees from Lawn Fawn’s Joy To The Woods I stamped directly onto my base card, and the string of birdies I stamped onto a separate piece of card. I then coloured everything using my trusty Zigs for ease and speed. I fussy cut around my birds leaving a thin white edge that I then coloured to blend in with my background.


I then cut the thinnest piece of black card to act as the ‘wire’ the birds are sitting on, and Waffle Flower’s adorable Tiny Twine Bow to tie it to the trees. I stamped my sentiment, again from Lawn Fawn’s Simply Celebrate, onto my card and heat embossed in red.

I finished by adding a layer of Glossy Accents to my birdies beaks and my bright balloons, and there you have it.


I really hope you like it.


See you next week.


Jillx

Simply Celebrate Joy To The Woods Image 1

Zig Clean Color Real Brush Pen (24 piece set) Tiny Twine Bow Die Image 1