I really liked the new designs of shaker pouches MFT brought out this month and decided to have a play with them this week before we went away so I've got a longish post with lots of photos to share today. First off I used the
new gift shaker pouches to create a gift shaker card (although I do think these would make fab windows too!)
I went with a simple green and blue colour scheme on a craft card so it would be a great card for boys or girls. I used some green paper from
Reverse Confetti's Fun Times pad (the blue is from my scraps drawer) and
die cut the present using the co-ordinating die. You can leave the bits behind the pouch clear or do what I did and piece the die cut squares back in so the gift looks more complete. I just placed the top layer over the base card, drew around the holes with pencil and glued the squares in place. Because each "window" is separate, you can include different shaker elements in each if you want. I went with two different ones across the diagonals - stars and circles from the
Nuvo Golden Years Confetti pack. I piled a little on top of each square and then used
Lawn Fawn's glue to draw around the paper and the edge of the card so I could glue my top layer (with the window pouch already glued in place behind) on top and hold the shaker bits in securely. This is pretty much my glue of choice for everything now - so easy to apply accurately and SUPER-strong when dry!
You can see here in this close up how none of the different shaker bits mix together. The die set gives you the ribbons and bows to finish of the parcel in style too.
For the sentiment I used the
Birthday Candles stamp from MFT as I really love the fun placement of Birthday and it works without the candles! However stamping it with the same colours didn't work as the "happy" didn't show up well - it got lost on the kraft. As it had 3D elements I couldn't stamp it in a platform, so couldn't over stamp it with another colour without risking messing it up, but all was not lost....
I used a green glitter gel pen and carefully drew over the happy by hand to make it stand out more! We all make mistakes in crafting - the key is finding tricks to keep the trash can empty!

I really enjoyed putting this together and am going to make a few in different colours to keep in my stash as they are the perfect "one size fits all" birthday card to suit all tastes.
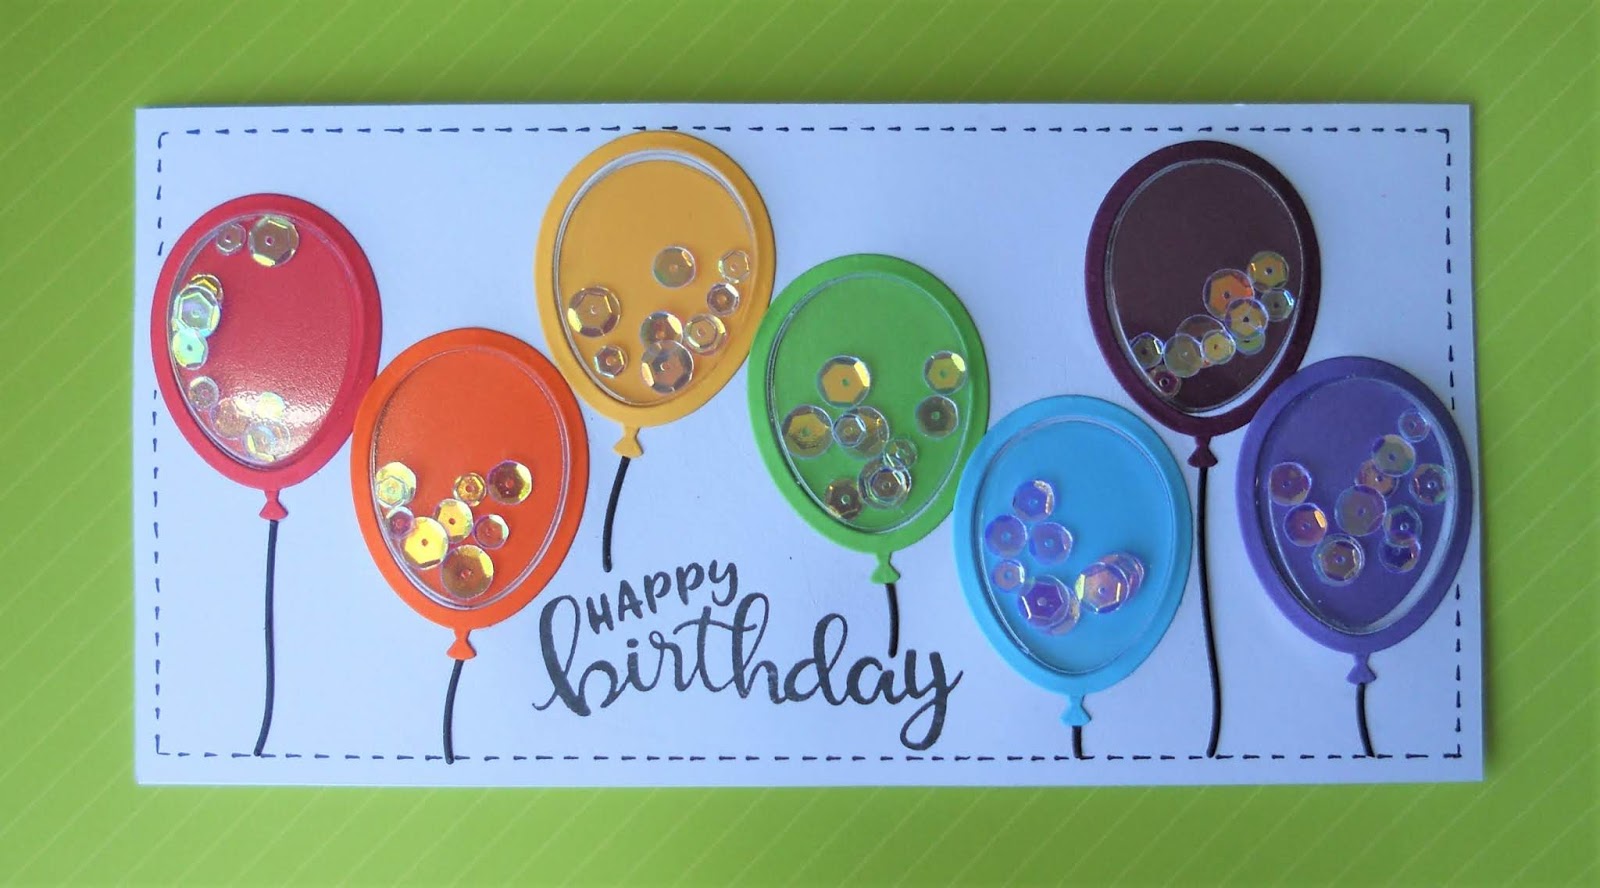
I decided to use the other pouches in this release to do another equally "works for anyone" birthday card, this time with an added rainbow cos everyone loves rainbow colours right?

I basically did the same process as before, but this time used the
Mini Balloon Shaker pouches and the
co-ordinating die set. This is basically a scaled down version of the original sized balloon but the smaller size means you can get a lot more of them on a single card. This rainbow of balloons floating up the card full of shaker fun really makes me smile!
I used a DL card and played around with the pouches to get a layout which fit them all on. Then it was a case of die cutting the die from scraps of rainbow coloured card using the balloon frame die, using the "frameless" die to cut the holes in the front panel and sticking it all together as before (tracing the holes in the front onto the back to get the coloured bits from the frames in the right place) I used a sentiment from
Newton's Nook Birthday Essentials because it fit the space perfectly. I hand drew a black dotted border to add a little detail to finish.
NEWS FROM THE STORE
We're actually on a break so up to date eta's aren't possible, however, what I do know will be in store later in the week is as follows:
- Lil' Inker's new release will be in store by Wednedsay
- Mama Elephant restocks will be live by Friday
- Lawn Fawn restocks (including the reveal wheel sentiments they missed out of our last delivery) will ship this week so there is a slim chance they will be here by Friday too.
See you later!
Tara


