Showing posts with label Concord & 9th Shine Brighter. Show all posts

Tuesday, 16 August 2016

Shrinking & Pokemon!


Hi! How are you?
This is a post of two halves. One more labour intensive and one so simple, my 8 year old supervised me making it!
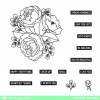
I guess I have been unconsciously affected by seeing lots of lovely Pinterest type pictures of weddings or parties with those lights streaming down from the ceiling and an elegant array of flowers on the table. That was my starting point for this card using the Shine Brighter set from Concord and 9th
It's years since I've dug out my shrink plastic, and I really needed it as several of the full sized images wouldn't have fitted on the card.
You can see the difference when shrunk . I stamped onto the shrink plastic using Stazon black ink, cut out around the lines and then added some alcohol ink. You can see just how much darker and vibrant the colour is, so you can be a little more sparing initially.
The light bulb bottoms needed some black shrink too...
This photo shows you the glue. I used glue dots as they both stuck the twine to the card and then I could pop the 'tops' on. The issue with other glues is that the shrink surfaces aren't always completely flat so it's harder to adhere them.
I've coloured in the flowers brightly as a good contrast and needed another colour to help finish off the scheme. I'd spent a while trying to get the right colours and as I was finishing off, I thought of another card- ridiculously simple, but is definitely my favourite. I couldn't devote a whole post to it, so thought I'd add it today!
We (like probably millions around the world) have been playing 'Pokemon Go'. It's a surprisingly good game that you play on your phone and has taken us all around our city 'catching' 3D 'Pokemon' (I can't call them animals or I'll get told off, but they kind of are'. 
Anyhow, I was just thinking about the design of one the Pokeballs and realised it would be so simple with some circle dies and a fun sentiment from Mama Elephant's 'Wanderlust'
I just thought the top sentiment would be perfect. This card could be an invite, a birthday card- you name it. It was using simple circle dies like these Lawn Fawn ones.
Die cut 3 same sized circles in black, red and white cardstock. Cut a circle out the red and white cardstock and then cut them just under in half and place onto the black circle. Die cut a smaller circle and then assemble

After William (my little boy) had made sure that it was correctly representing a Pokeball, I remembered some M&M's I'd got cheap at the weekend, specifically for use in crafting ;-)
They were the perfect colours and I recreated smaller balls using punches.

For any of you with kids or nerd friends, this would make a fun greeting and some great party favours or snacks to keep them quiet!
Have a great day and I'll see you next week!

Thursday, 28 April 2016

White Organic Blooms On Navy


Hi there, happy Thursday! Lydia here with you and I'm so glad you stopped by.

Today I have been playing again with one of my favourite new floral stamp sets, Mama Elephant 'Organic Blooms'. I wanted to show that you don't have to have every colour under the sun to colour these beauties, so if it have minial supplies you can still create with this.


I have used very miniumal supplies on this- a navy card base, white ink, white embossing powder, a white coloured pencil and a couple of splashes of white spray.


I stamped the Mama Elephant 'Organic Blooms' in white ink, all the way around the outside edge to create a frame for my sentiment to fit inside. Once this was dry I took my white pencil and traced over the white ink and then added some extra shadows and details with it.

I then stamped my sentiment from Concord & 9th 'Shine Brighter' in the space that was left in the same white ink and added white embossing powder and heat set it. To finish I added some splatters with some white spray and my card was complete.


Thank you so much for stopping by, I do hope you like my card and give this technique a go yourself.

Hugs, Lydia x


Tuesday, 22 March 2016

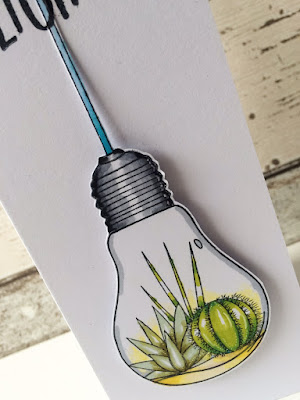
Tiny Terrariums!


Hi! Hope your Tuesday is going well! 
Too often, we create cards with a 'man' or 'woman' in mind. I wanted to create something that would do for just about anyone!
I wanted to use the Concord & 9th set 'Shine Brighter'


The plants are gorgeous and make the cutest terrarium. I wanted to give some depth to the card and so hung the bulb from one of the flower stems. 
I've added details with Copics and some Prismacolor pencils. The two work so well together.
I really love the way you can create such different looks from one set. 
It's easy to create more dimension in an image by leaving portions white plus adding little highlights with a gel pen. This way, it means the images look far more lifelike.

Do check out the sets and other gorgeous stamps from Concord & 9th

See you next week,


Thursday, 10 March 2016

Bright Bold (Mini) Blossoms


Hi there everyone! Lydia here with you today with a fun and bright (and quite simple too) card.

I am totally ready for spring and even summer but the only way I'm going to get a bit of it at the moment is by stamping.


To start I cut a circle using a die out of a sticky note- I used this as a mask to stamp around but you could just draw around a circle and stamp around it, if you are adding a die cut circle for the sentiment on top.

I stamped around the mask using Altenew 'Mini Blossoms' and lots of gorgeous bright inks-there are lots of gorgeous new bright and bold inks in store now ..... have you tried the new Hero Arts or MFT dye inks ? They are scrummy :)


I'll let you in on a secret.... my mask lifted while stamping on near enough my last image. If that hadn't of happened I would have just stamped my sentiment (from Concord & 9th 'Shine Brighter') straight on to my base card in the middle of the masked circle...... but it did and I', not one to throw out cards if they go a little astray. So all I did to fix this problem was to cut the same circle I used for the masking out of white card and stamp the sentiment on that. Fixed!

Thank you so much for stopping by today!

Hugs, Lydia xx

Tuesday, 2 February 2016

Brighter Days!

Hi! Back to a normal Tuesday- last week's blog hop was great fun wasn't it!
Today, believe it or not, I'm using exactly the same set with an added extra set....
https://sevenhillscrafts.co.uk/brands/concord-and-9th/shine-brighter.html
Plus, I've added in this Tree Ring Background stamp
https://sevenhillscrafts.co.uk/brands/concord-and-9th/tree-ring-background.html


By stamping in Versamark and adding white Hero Arts embossing powder then watercolouring in the images you get this soft and pretty effect. I think the sentiment is one of my favourite all-rounders as there are so many that I know for whom this would be perfect.
https://sevenhillscrafts.co.uk/hero-arts-white-embossing-powder.html
The tree ring makes a superb background layer to add images onto, but would be equally good stamped in different colours too.


There are some new arrivals in the Concord & 9th section so do go and see.
 
Hope you chance to be creative today. With all this cold and wind, I reckon the best tonic is a good dose of crafting!
See you next week,
 

Thursday, 21 January 2016

Shining Light-Bulb


Hi there, happy Thursday! It's Lydia and I'm sharing with you a card with one of the newer brands in the store Concord & 9th.

I really love the funky and fresh feel of the Concord & 9th sets and 'Shine Brighter' immediately caught my eye. I have just used the main light-bulb and a sentiment to create my card..


I started by stamping the light-bulb in really light ink onto some watercolour card so I would then have a guide to do my inking. I took a yellow ink and blending tool and added it to the light-bulb and went out in a circle. I then took some dark blue ink and went from the edges to the edge of the yellow blending - I didn't want these two colours to blend much as I would have ended up with a green.

I then covered up the yellow blending and flicked on some silver mica powder mixed with water to give a star-like effect.

To give more of a 'glow' I added some white ink into the middle of the light-bulb and blended out a little but not quite as far as the yellow.


I then stamped the light-bulb again in a darker ink, stamped in the metal piece of the bulb and sting and coloured these with coloured pencils. I added the sentiment into the bulb and covered the bulb in glossy accents to give a glassy look.

Thank you so much for stopping by and I hope you like my card!

Hugs Lydia x