Showing posts with label Lawn Fawn Simple Stitched Hillside Border. Show all posts

Tuesday, 15 January 2019

Happy Village Reveal Wheel


Today I’m sharing a Lawn Fawn Reveal wheel card. This is my favourite interactive die and I think it’s a must have.


I teamed it with some other Lawn Fawn goodies. For the background, I used the Stitched Cloud Backdrop Portrait die to add some subtle detail.


The scene is created with images from Lawn Fawn Happy Village, all coloured with alcohol markers and die cut with the coordinating dies.


I added a Lawn Fawn Simple Stitched Hillside along with the Simple Roadside border (the latter is currently on sale in the store).


For the reveal wheel opening, I added a sentiment from the Lawn Fawn Plane and Simple stamp set. The birds and sun/cloud are from Happy Village. I then created my own rainbow with alcohol markers to show in the window for one of the turns of the wheel. As the window opening is similar in shape to a rainbow, it works really well.


Thanks for joining me today,
Gemma

Stitched Cloud Backdrop
Simple Roadside Border
Simple Hillside Border


Reveal Wheel

Happy Village

Plane & Simple


Monday, 7 May 2018

Be a Little Shellfish

Hello, Gemma here on a Monday as I've swapped days with Jenny this week.
This sentiment makes me laugh every time I see it! The Year Six stamp set is another great mini set from Lawn Fawn.


For my card today, I began by cutting square card base, along with a square piece of card the same size. From that, I cut out a MFT peek-a-boo circle window

I blended blue ink onto vellum, then cut it with some MFT ocean wave border dies to get two vellum waves. On another piece of vellum, I used a lighter blue ink to create a sky area.

I layered these onto the card base so they would show through the peek-a-boo window. For a sand bank, I die cut a piece of yellow watercolour paper with a Lawn Fawn stitched hillside border die, then layered this onto the card base too.


I added lots of foam tape behind the card panel, then attached it to the card base. Then I added the shellfish with foam tape too, and a little fish from the Lawn Fawn Duh-Nuh stamp set in amongst the waves. Both are coloured with alcohol markers and Wink of Stella glitter. I also added some white gel details to the shellfish.

At this point, I realised that I'd forgotten to add the sentiment! Luckily, a stamp positioner helped me to stamp it without making a mistake.

Thanks for joining me today,
Gemma


Tuesday, 26 September 2017

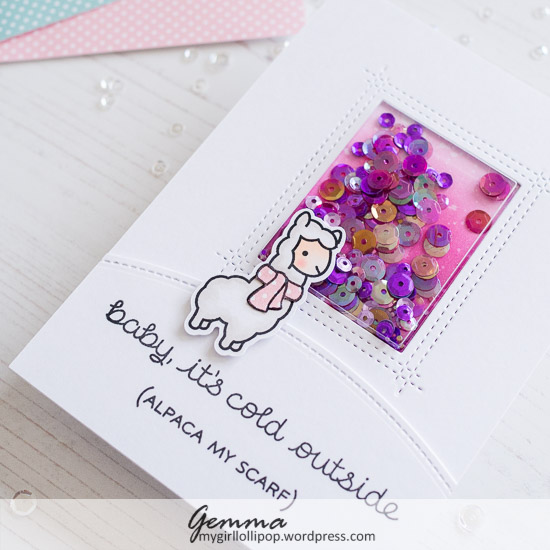
Alpaca My Scarf Shaker Card

I love the Lawn Fawn Winter Alpaca stamp set as the sentiment always makes me smile. 

I went to a farm park with my nieces recently, and we saw some alpacas. I told them about the sentiment and it made them laugh too, so I thought I would make cards for them featuring the winter alpaca. Today I'm sharing one of these cards. 


This card was quick to make so would work well for Christmas cards, perhaps with more traditional Christmas colours.

I used a rectangle peekaboo window from MFT to cut a window in a piece of card. I also used one of the MFT shaker pouches. I'm a huge fan of the shaker pouches as it makes it so easy to create an interactive card. 

On a card base, I blended some ink and flicked with water for droplet details.

I added some Hero Arts Ombré purple sequins to the shaker pouch. This is a large pack with a really beautiful mix of iridescent sequins, that show different colours when they catch the light. 

I attached the card panel with shaker to the card base to seal in the sequins. 


For the sentiment, I used a stitched hillside die to cut down a piece of card. I added the sentiment, then attached the hill to the card with foam tape. 


The alpaca is coloured with alcohol markers, and I added a patterned paper scarf. I used a mix of foam tape and double sided adhesive to add the alpaca to the card.

Thanks for joining me today,
Gemma

LF Simple Stitched Hillside Borders

LF Winter Alpaca
Hero Arts Ombre Sequins

MFT Rectangle Peek A Boo

MFT Rectangle Shaker Pouches


Tuesday, 13 June 2017

Ahoy Matey

When I saw the Lawn Fawn Ahoy Matey stamp set, I just knew it was a must have. I love all the images in the set and the sentiment font is fantastic.


I had a lot of fun colouring these images. I used MFT black hybrid ink to stamp them, coloured with alcohol markers, then fussy cut them out. I also added some Wink of Stella glitter to the coins too.

To create the scene, I die cut a rounded circle frame twice from white card and once from kraft card stock. I'll keep the frames to use on other cards, as I just want the inner rectangles this time.

On one white card rectangle, I added a light blue ink at the top for the sky. This is the base layer.

On the other white card rectangle, I blended on blue distress ink, flicking with water for a more textured look, before die cutting two ocean wave borders from it.

From the kraft card rectangle, I die cut a stitched hillside for the beach, then heat embossed a greeting onto it.


Before layering the scene together on a kraft card base, I stamped some images on it with a dark brown ink, to make it look like a map. The stitched line stamp is from an Avery Elle set, which I'll link below. I blended on some dark brown ink on to the card base too, for a more aged look. This doesn't need to be perfectly blended.

Finally I layered the pieces on the card base, mostly with liquid glue but I used foam tape behind the beach for dimension.


I decorated the envelope in a similar way to the card base but in a lighter brown ink and without the added ink blending. 

Thanks for joining me today,
Gemma

MFT Rounded Rectangle Frames
MFT Ocean Waves