Showing posts with label Distress Oxide Inks. Show all posts

Sunday, 15 December 2019

Happy New Year!

Yeah I know I'm a bit early, but I already missed the Christmas posting date for Australia, so I'm sending a new year card instead in the hopes that it will arrive in time for that!


I used the new Lunar Sayings from Mama Elephant for the main sentiment - I really love the chubby balloon letters they used.  I stamped it all over my square base card in grey, twisting it to be more of a general patterned background.


I stamped it again and coloured with altenew markers and then cut it out with scissors and my finger knife so I could pop it up using pinflair gel onto the party background circle.

To create the background I embossed the MFT Fireworks set (sorry that's currently sold out but there is a mini firework from Altenew you could use instead) and then ink blended some dark blue, black and purple inks over top, buffing the ink off the fireworks.   I added some splatters of extra sparkle using the Altenew Metallic Watercolor Paints.


NEWS FROM THE STORE

We have received all but one of the final deliveries we expect before we close on Friday for Christmas and the store update.
  • Colorado Craft Company - restocks are on - I will be adding the new release this morning.
  • Waffle Flower Crafts - both the binder release, restocks and the latest release will be added today too.
  • Sugar Pea Design - the latest release and a few restocks will be in store tomorrow.
  • Altenew - the ink release and lots of restocks were finally shipped on Friday - they arrived at East Midlands today so fingers crossed they will arrive tomorrow and I will get them added as quickly as my fingers can type!
The store will then close on Friday and there will be no more daily posts on this blog after Friday either - I may do a couple of update posts over Christmas whist we're working on the new website, but when we reopen in early January, the blog will be getting a makeover too and will be "in" the store and should hopefully be easier for you to comment on without the dreaded blogger issues!

Right - I'd best get to work as we still have to decorate the house for Christmas today too!

Tara


Wednesday, 11 December 2019

Jingle Bells Reindeer Games


Hello, Tallie here. In the last few weeks in the run up to Christmas, I find I need some quick and simple cards to give to those who suddenly surprise you with an extra Christmas card. With designs like this one, you can colour up a bunch of characters in advance and create the simple scenes as and when is needed.


This cute little reindeer from the MFT Reindeer Games stamp set is a perfect size for a centre piece in this card design. I stamped him out in some MFT Extreme Black ink onto some blending cardstock and coloured him in with my alcohol markers. I die cut him out with the coordinating dies once finished.


The background is really simple. I've mentioned before that I have a DIY stencil made from a circle die cut (I used the 2 inch size from this set) from some thick acetate. I blended on some Distress Oxide inks in Picked Raspberry and Broken China. I love the purple-ly blend you get when you mix these two colours!


A bit of foam tape, some red ribbon and a white jingle bell help to dress up the simple reindeer. The sentiment is a strip from the MFT Bitty Holiday Wishes stamp set.

I hope you've finished all your Christmas cards and there are no last minute panics!

Thanks for reading, catch you next week.

Tallie

Friday, 1 November 2019

Fall/Winter Coffee Lovers Blog Hop

It's the start of the Fall/Winter Coffee Lovers Blog Hop today and I'm playing along with a card as the store is one of the Super Sponsors again so there is a £25 store voucher up for grabs - head on over to the start of the Blog Hop and find out how to win!

Plus we have a spot prize - everyone who leaves a comment on my blog post by noon (GMT) on Friday 8th will be put in a prize draw and one randomly selected commenter will win an Echo Park Coffee Cup Enamel Pin badge.


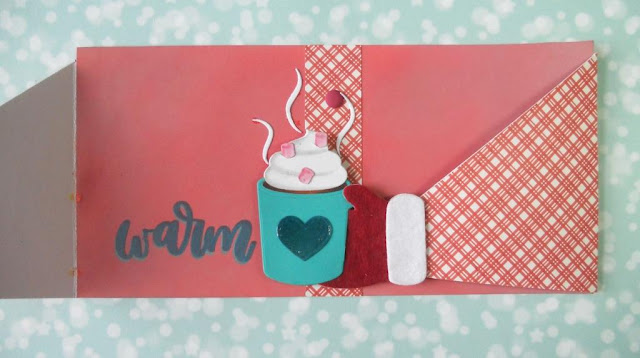
I've gone with a wintry theme to my card - sending a warm hug in a mug full of cocoa and topped with cream and marshmallows.   I had tonnes of fun making my hugging hands card!


 To create the hug I used the fab Holiday Hugs die set from Waffle Flower crafts and cut two sets of arms from both white card stock and some patterned paper the Holly Jolly pad from Simple Stories.   I used the mitten dies that come in the same set to create some felt mittens for that added chilly winter feeling.  If you find felt hard to glue, then try backing it with sitck-it before die cutting it sticks perfectly then and the backing helps get a clear die cut too!   I crossed the hands over and then measured them against more white card so I could create the right width pack panel so the hands could be holding a mug  (22cm wide x 11 cm tall)  I used a couple of distress oxide inks to blend the background and added more of the patterned paper down the center so it looked like the yoke on a coat and added some decorative dots to act as buttons.


For the all important mug of chocolate I turned to the MFT Hot Cocoa Dies and set about building my mug in layers so I could make the hand hold it.   If you want to recreate it then you need to die cut two mugs with the handle facing the same way (you can put it in either hand just make sure whichever you pick you cut two of the same) from coloured cardstock;  two sets of whipped cream, one set of mini marshmallows, one oval and one heart from white cardstock.  Take one mug and glue the oval coloured to look like cocoa in place.  Colour the mini marshmallows - I went with pink for contrast.  Take one set of whipped cream and add some shading with grey markers.   Take a craft knife and cut 3 tiny slits into the whipped cream and slot the marshmallows in - you can just glue them on top if you don't want to do the slits but it makes them look more realistic if they look like they are sinking into the cream, add a little glue behind each where they sit on top of the cream and then glue the cream onto the cocoa.   Take the second whipped cream and glue it behind - this covers the slits.   Colour the heart and add it to the mug - I added glossy accents for some shine too.  Now you need to cut the bottom of the handle away from the mug so you can slot the mug over the mitten - see the image here which shows the mug and mitten from behind.


Add a little glue on top of the felt mitten to hold the mug in place then flip over and glue the second mug behind - this hides the cut handle but also makes it neat and tidy as the back is seen when you open the card.


I added some of the steam curls to the back and used parts of an MFT Christmas sentiment to create a more generic sentiment so it could be for any wintry occasion.  I just took my scissors to the Warm Holiday Wishes stamp to make it into 3 separate words - don't worry about scissor surgery on stamps - you don't damage them as long as you cut carefully with sharp scissors and its easy to put them back together on an acrylic block so you can use them the way they were intended too - this way they just become more versatile.  I double stamped it first in oxide (peacock feathers) and then on top with versafine clair (warm breeze) to get a shadow effect.


I hope you've enjoyed my project and are having fun hopping around all the blogs with some suitable steamy liquid in your mugs whilst you browse.   Happy Hopping!

Tara


Wednesday, 23 October 2019

Thank Ewe!

Hello, crafters!

Tallie here with you today with a quick and simple (at least, for me!) card design featuring the Avery Elle Peek-a-boo Pets stamp set and some alpha dies. A simple pun livens up this thank you card!

Starting with the background panel, I made a DIY stencil from some acetate and a Nesting Circles die. I aligned the circle over a white A6 panel and blended on some Distress Oxide inks in my favourite sky combo: Faded Jeans, Mermaid Lagoon and Cracked Pistachio.

I stamped out two shee and their trotters (if that's what you call them?) from the Avery Elle Peek-a-boo Pets stamp set with some MFT Extreme Black Ink onto some blending cardstock and coloured them in with my alcohol markers. To get the impression of really fluffy sheep, I used small 'C' shapes with some light earthy colours. I cut these out with the coordinating dies.


To create the punny sentiment, I used some more contrasting Distress Oxide Inks in Fired Brick, Candied Apple and Abandoned Coral to colour a white panel. I have a few favourite alpha dies for such occasions : (1) Lawn Fawn Finley's ABCs for taller and chunkier letters; (2) Concord & 9th Simple Serif Alphabet Dies for wider and squatter letters; or (3) Neat & Tangled Journalling Alphas dies for tall and skinny letters. I chose the Finley's ABCs as I thought these would fit better in the space, stacking three layers to give some dimension.


I needed a simple sentiment so I white heat embossed a partial sentiment from the MFT Bitty Thanks & Gratitude stamp set, trimming it into a strip and foam mounting it above the the alphas.

I'm now trying to think of other sentiments that I could use with this type of design. Or perhaps you could use the letters to personalise the card with the name of a recipient!

Thanks for reading, catch you next week.

Tallie


Wednesday, 16 October 2019

It's a Penguin Parade!

Hello, Tallie here with you today!

I say this every time Mama Elephant come out with one of these sets, but I love the new Penguin's Waddle stamp set. They are so great for practising your colouring and you have a scene card created without much effort.


I started out with the A6 background panel, ink blending on some of my favourite wintery sky Distress Oxide colours: Faded Jeans, Mermaid Lagoon and Cracked Pistachio. The key to getting good dimensional layers in a snowy background is three different layers: 1) clean water splatters, 2) bigger splats of white acrylic using a larger brush, and 3) smaller splats of white acrylic using a smaller brush or toothbrush.


I stamped out the penguins from the Mama Elephant Penguin's Waddle stamp set in some MFT Extreme Black Ink onto some blending card stock. I coloured the cute little scene in with my alcohol markers, sticking to some warm greys, purples and pinks for the colour scheme. If I added another colour (like the yellow) I tried to use the 'rule of threes' and place it in three different places on the card to balance it. I cut this out with the coordinating die and foam mounted it to my background panel.


I'm a big fan of simple sentiments so the new MFT Bitty Holiday Wishes Stamp Set has all sorts of sentiments to choose from. I chose one with a line from one of my favourite Christmas songs and white heat embossed it onto a strip of black card, foam mounting it above the penguins.

A few touches of Glossy Accents and the card is finished!

Try out your own scene cards!

Catch you next week.

Tallie


Monday, 7 October 2019

Plant Lady

Hi there :)

My card today features a great stamp set from Flora and Fauna which arrived in store 
on Friday along with a whole host of other gorgeous stamps and dies, 
I love plants so this set just had to come home with me...


As a background, I used the Faceted Turnabout stencil in shades of yellow 
and neutral Distress Oxide inks... I used Scattered Straw, Fossilised Amber, 
Mustard Seed and Antique linen. The stencil is easy to use and doesn't 
really require a stamping jig to use it.. just turn it and line up the shapes by eye...


I love the tiled background effect for the plants and the 
oxides have such a lovely matt texture too


I stamped the plants in various colours of dye ink and added shading with 
coloured pencils, I trimmed mine out with scissors but a matching die set 
is available for this stamp set too. 
This stamp set will mix and match with lots of others in the range too :)

Thanks for stopping by :)
Jenny x


Thursday, 3 October 2019

Hero Arts Flower Garden Bold Prints 3 Ways & a BONUS card!

Happy Thursday!

It's Bev here again with some more Hero Arts product inspiration. I promise I will share inspiration using other companies too ;)

Today I am sharing three cards and a bonus card using Hero Arts Flower Garden Bold Prints, the whimsical floral pattern really stood out to me.

This stamp is HUGE when it comes to stamps, it's a 6 x 6" and it is a cling style rubber stamp. Before the days of using a stamping tool, this size stamp would have put me off buying it a little. However, with the use of a stamping tool, this stamps beautifully every time.

First up I chose to stamp the design in good old VersaFine Onyx Black ink. I absolutely love this black ink and other when using alcohol markers, it's my go to.


For this card I used coloured pencils to colour the details of the stamped image. With such a busy pattern I trimmed it to just over half the width of my base card and added a small sentiment from Mama Elephant - Paola's Wishes


The size of these sentiments are just right for a focal point on a card and I adore the script hand drawn font to them too.

Not a fan of colouring, well then how about some heat embossing. A lovely pattern like this already has impact, so some simple heat embossing in white onto some coloured card is another great option for this stamp.


I used Hero Hues premium card stock in Azalea, its a lovely bright raspberry colour, one of my favourites! I used VersaMark ink and Hero Arts Detail White Embossing Powder. 


And like my first card I added another of the sentiments from Mama Elephant - Paola's Wishes. This time heat embossed onto some black card, layered with white and adhered to the card front using foam adhesive.

Lastly I was inspired by the Autumnal weather and gave my Distress Oxide Inks an outing. This is another option for those that want a quicker option of adding multiple colours...


I started with a piece of smooth white card 10.5 x 14 cm, blending my chosen DOI colours of Forest Moss, Peeled Paint, Festive Berries, Spiced Marmalade, Fossilzed Amber & Scattered Straw from top to bottom. I then splattered it with some watercolour water that I'd left on my desk which had a little shimmer to it, a little happy accident! 


I used a MFT Stitched Rectangle Die to die cut my panel. The sentiment is from Concord & 9th Confetti Turnabout and it is stamped and embossed onto a scrap of brown card and adhered using foam adhesive. 

Now for my bonus card...


Amazingly, when I was die cutting my rectangle I actually thought about the placement of it prior to cutting! This maximised the use of my off cuts to create this card. 


The die cut frame is adhered to a kraft card base using foam adhesive and then I have added a die cut and stamped sentiment from Concord & 9th Turnabout Tool Kit.

That's all from me today, I hope I have given you some inspiration for ways to use your Hero Arts Flower Garden Bold Prints stamp and I look forward to sharing more with you next week.

Crafty Hugs 
Bev x


Products Used Available from the store...


Wednesday, 2 October 2019

Snow Friends One Layer Scene

Hello, Tallie here. Today I have a one layer winter scene featuring the Snow Friends stamp set from Mama Elephant's latest release. I've really been into creating one layer scenes recently so I wanted to keep the design simple so the colouring would stand out.


I started out by planning out my scene so I knew what order to stamp the elements in - 1) Bunny and Dog, and 2) Bear. I stamped the bunny and dog snowmen first with some MFT Extreme Black ink onto some blending cardstock, covering with some fussy-cut masks once dry. I could then stamp the larger bear snowman so it was in the background and again cover with a mask.

I wanted to create a circular focal point to the card so I used an MFT Stitched Inside & Out Circle die to create my own acetate stencil. I layered this over the stamped scene and blended on some Distress Oxide Inks in Faded Jeans, Peacock Feathers and Cracked Pistachio. This is my favourite winter sky combo!


After removing the masks, I added some colour to the scene using my alcohol markers. I stuck to more muted accent colours rather than bright reds, greens and purples.


I wanted to keep it simple so I chose one of the sentiments from the Mama Elephant Scripty Xmas stamp set, centring it just below the scene.

A few last accents with a white gel pen to make it into a snowy scene finished off the card.


Hopefully it's not too early to start inspiring you with my Christmas cards! :)

Thanks for reading, catch you next week.

Tallie


Wednesday, 21 August 2019

Hey Honey - Happy Bee-day!

Hello, Tallie here. I love the Hey Honey set from Sugar Pea Designs so I made a handful of different Bee-Day cards. These simple but bright cards are sure to put a smile on a few beekeeper faces!


I started out by stamping the bear, hive and bees the Hey Honey set in some MFT Extreme Black Ink onto some blending cardstock. I coloured the bear and hives in with my alcohol markers. For the bees, the stamp set has two separate pieces - the body and the stripe detail. I stamped the body in some Lawn Fawn Carrot and Sunshine ink, and then stamped the body detail in black over the top. I cut all the pieces out with the coordinating dies.


For the background, I blended on some Faded Jeans, Mermaid Lagoon and Broken China Distress Oxide Ink to contrast with the die cut pieces. I die cut a piece of kraft cardstock with a Lawn Fawn Stitched Simple Wavy Border die and white heat embossed several different sentiments from the MFT Meant to Bee set.


I used some foam tape to pop up the kraft panel and then adhered the bear, hives and bees in a scene behind. A few dot details with a white gel pen finishes off this set!

Thanks for reading, catch you next week.

Tallie