Showing posts with label Avery Elle. Show all posts

Thursday, 5 December 2019

Last Minute Christmas Cards!

Hey, it Bev Here!

How is everybody's Christmas preparations going? I seem to be getting slightly worried now that I have left making some of my Christmas cards far too late! So now it's time for some quick, last minute and mass produceable ideas ;)

Today I am sharing a duo using Avery Elle Peaceful Pines, a clear stamp set which ticks the quick and mass produceable boxes.


For both my cards I've mixed traditional and non-traditional cards to make a duo of cards using all the stamps contained in the stamp set.


These are super quick to stamp, especially with the use of a stamping platform. If you use a medium stamping platform it is possible to position both the pines and the coordinating sentiment in the same platform to stamp and repeat to mass produce a batch of cards!


For the 'Merry' card I have used Altenew Olive & Moss inks from the Tropical Forest collection for the pines, Ruby Red from the Red Cosmos collection and Aqualicious from the Sweet Dreams collection for the bauble.  I added some glitter dimensional to the bauble for a little sparkle, always a good addition to Christmas cards. 


For my second card using the 'Peace' sentiment I decided to mix up the colours a little and add in some Rubellite from the Cherry Blossom collection.


This time I decided to add two hanging baubles, but this time I added glitter dimensional to the berries within the pines. The bases for both cards is my favourite Hero Hues Paradise card. My apologies for using this colour, that is currently out of stock :( 

That's all from me today, I hope I have inspired you with your last minute Christmas card ideas!

Crafty Hugs 
Bev

Products Used:-


Thursday, 18 July 2019

Thank you with magnolias


Hello all! Anna here. 
 I'm back with a new project - this time it's Thank You card featuring Avery Elle stamps.


My first step was to stamp almost all the florals from Avery Elle Magnolia stamp set on to watercolour paper. I decided to use Distress inks in pinks and greens for my colouring today. 


After my colouring was done, I went and fussy cut all the images. ( If you don't like cutting by hand,  there are also coordinating dies available here )
To create this ombre background, I decided to use distress oxides. I love the look of lavender colour picking from under the main floral. It gives the whole card completely different look from what it would look like with plain white background.

Before adhering all the flowers on to the background, I stamped a sentiment from another Avery Elle set - Floating Wishes stamp set - with black ink and added frame around my card panel. For that I simply masked off the edges, using masking tape ( you can also use post-it notes or washi tape ) and used dark grey Zig Real Brush marker ( You can use whatever grey or black marker you got ) to draw thick line.
 

After arranging all the florals, I used foam squares to adhere them in place and added a few clear sequins around for more interest.
This card is all done! 


Thank you so much forstopping by! I will be back with another fun project next week.
See you soon! 
Anna  


Thursday, 11 July 2019

Mama Elephant Big News stamp set - birthday card


Hello there! Hope, that you're having a great day. 
 I'm back to show you this girly birthday card, made with Mama Elephant Big News stamps set. 


Let's start with the main images - I decided to use all three critters from this set. I just couldn't decide which one to chose, they're all soo cute! 
 After stamping them on a piece of watercolour paper with waterproof ink, I coloured everything with Distress Inks and added a little sentiment to each of the wooden signs. I chose greetings from the same set because they're so little and fit perfectly into small spaces.


My next step was to fussy cut all of my coloured animals and move to the background.
For this, I decided to do ink blending with Distress Oxides in lovely pinks. I also added water splatters and few metallic splatters for much-needed interest behind the focal images.
 

After my blended background was ready, I adhered all the critters with foam squares and stamped an additional sentiment from Avery Elle Simple Sentiments stamp set.
To tie everything together I added few sequins and glossy accents to the boards.
This card turned out so cute! I'm definitely going to do similar - boy version of it with blues and maybe greens too! 


Thank you all for stopping by today! I will be back with another card next Thursday.
See you soon!
Anna 


Wednesday, 17 August 2016

Dog-gone awesome


Hello.
With all of the new Avery Elle release in store I thought I would revisit an older stamp set.


I have used the furry friends stamp set. 
I love these cute images.
The puppy is stamped in black  momento ink and coloured with copics before being fussy cut.


I thought the bed would be perfect to use with the seven hills felt packs.
As I don't have the matching dies I stamped onto the felt using black archival ink and again fussy cut.
I kept it all very simple and everything was put together on some patterned paper with some paw prints stamped in the same colour. 


Furry Friends Image 1Marvelous Monochromes Felt PackLets Polka in the Meadow 6x6 Paper Pad

Thanks for looking.

Wednesday, 3 August 2016

Tickled pink


Hello.
I'm back from my blog break today, thanks Tara for filling in for me.
Today i have a card using the fun hogs and kisses stamp set from Avery Elle.


I wanted a clean and simple card but have used a bright colour to add a bit of impact.
To start I stamped the pig image onto my water colour card panel.
He was then coloured with Inktense pencils and a water brush.
Once it was dry I the water coloured the whole panel with distress ink.
For the main sentiment i i have die cut the scripty thanks from Lawn fawn in black so that it stands out.


Hogs & KissesScripty Thanks Image 1

Thanks for looking.

Tuesday, 26 July 2016

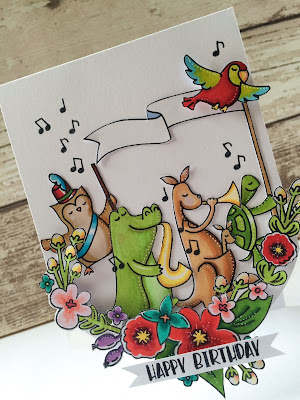
A Musical Birthday!

Ta-dah! Birthdays are always accompanied with music; whether it's whilst blowing out the candles or dancing!
I recently got two Avery Elle sets and thought they combined perfectly to make a pretty birthday scene.


I die cut a circular portion off the card blank by slotting the card into the centre of a circular die so only the bottom edge of the card is touching the die. Make sure the back half of the card is lying flat or you'll die cut that too.
Then add an acetate bottom to the card. I love doing these as they really add more of a focal point to the card elements.

I've added the cut out floral element onto the card with foam pads. It helps make the scene look more dimensional and gives depth to the images.
I've added lots of little gel pen dots to the images- it makes them seem less 'flat' and adds more detail.
I've trimmed all of these animals out, but you could use the Band Camp Elle-ment dies to make your life a whole lot easier!

Hope my little musical interlude has inspired you to combine your stamp sets. 
Am off to sing in an opera right now.
Not.
Would love a voice to be able to do that. I'll live vicariously through the band camp stamp set instead ;-)

See you next week
xx


Wednesday, 9 March 2016

Pug life


Hello.
I have a couple of cards today that i have made for my daughter.
I wanted something funny and teenager relevant so this little pug dog from Avery Elle's furry friends set seemed like the perfect way to go.


I started with a die cut rectangle of water colour card and coloured it with distress inks and a blender.
I splashed some water onto the ink to add some interest then some stripes of washi tape.
The dog is coloured with prisma color pencils and fussy cut and he was placed onto a paper pieced bed.
For the sentiment I used milos abc to make "Pug life" I'm sure this will get a thumbs up from my daughter.
To finish I added some sequins.


My second card also for my daughter features another of the little dogs from the same stamp set. 
He is also coloured with Prisma color pencils.
This design is much simpler and just has a  seam binding bow to finish.

Furry Friends Image 1 Milo's ABC's Image 1

Thanks for looking.


Wednesday, 2 March 2016

Bear hugs


Hello.
I have some cuteness from Avery Elle to share with you today,
I have used the Beary sweet wishes stamp set that features three little gummy bears and some sentiments.


To start i stamped all of the gummy bear images on to water colour card with black archival ink then coloured with Inktense pencils and a waterbrush.
I then used the matching dies to cut them all out. 
The background is a black scalloped rectangle from lawn fawn with some lets polka paper die cut from the stitched rectangles.
The sentiment is stamped onto a stitched circle and adhered to the panel.
each of the bears is place don foam squares in rainbow order , just because :)
The final step was adding some wink of stella to each of the bears so they have a beautiful shimmer, 
Thanks for looking.

Beary Sweet Elle-ments DieBeary Sweet Wishes

Wednesday, 24 February 2016

Love moo


Hello.
I have a simple card today using the awesome hogs and kisses stamp set from avery elle.


My daughter absolutely loves anything with cows so i chose this image with her in mind.
I stamped the image and did some colouring with prisma color pencils.
I then fussy cut the image although i have the dies lol.
I used some lawn fawn patterned paper washi tape and sequins to finish the card.

Hogs & Kisses


Thanks for looking.

Tuesday, 19 January 2016

Stuck Duck


Hello! How are you today?
With the onset of wintery weather and SNOW (except we've still not any yet!), my mind went to a snowy scene as I wanted to use Storybook characters with the Snow Caps die set

The great thing about the Storybook set is that you can create your own breeds of animals. I wanted to create some mallards as the scene's main characters. 
One has got stuck in the ice (hence the 'stuck duck').
Now obviously his friend had raised the alarm and sent for Air Sea Rescue who ingeniously thought of commandeering the local cable car and simply lowered the rope down whilst 'stuck duck' wound it around himself.
The rescuing rabbit simply tucked the rope under his paw, and let the motion of the cable cars winch the shivering duck to safety.
Ha!
To complete the wintery effect, I've added a printed snowy acetate sheet onto the front. I secured it on the reverse of the front and also at the front bottom left which was then neatly hidden by the sentiment from Weather It
Once you start thinking 'scene' and allow your mind to wander a little (or..ahemm, a lot!) then your card will take shape pretty quickly and you'll use the shapes you have in the sets to define what you create. I used the line shapes in the die set to be the snowy silhouettes and added the frozen pond with inked vellum. 
Do have a go by grabbing a few dies and stamps together and trying to be creative with what you have on hand. The patterned paper details were all using the Everyday Collection
Well that's enough daftness from me.
Hope you get chance this week to be creative!

See you next week,