Showing posts with label Gemma. Show all posts

Tuesday, 28 May 2019

Leave a Little Sparkle

Today I thought I’d leave you all a little sparkle, as it’s my last regular post on the blog. I’ve had a fabulous time as one of the Seven Hills Crafts design team. A huge thank you to Tara and Rick for letting me share my projects with you each week.


My card today features the Lovely Legs 'Be a Mermaid’ stamp set from Colorado Craft Company. The stamp sets in this collection are perfect for different colouring techniques. 


One of my favourite ways to colour is to use alcohol markers as a base layer, then add coloured pencils over the top for finer details.


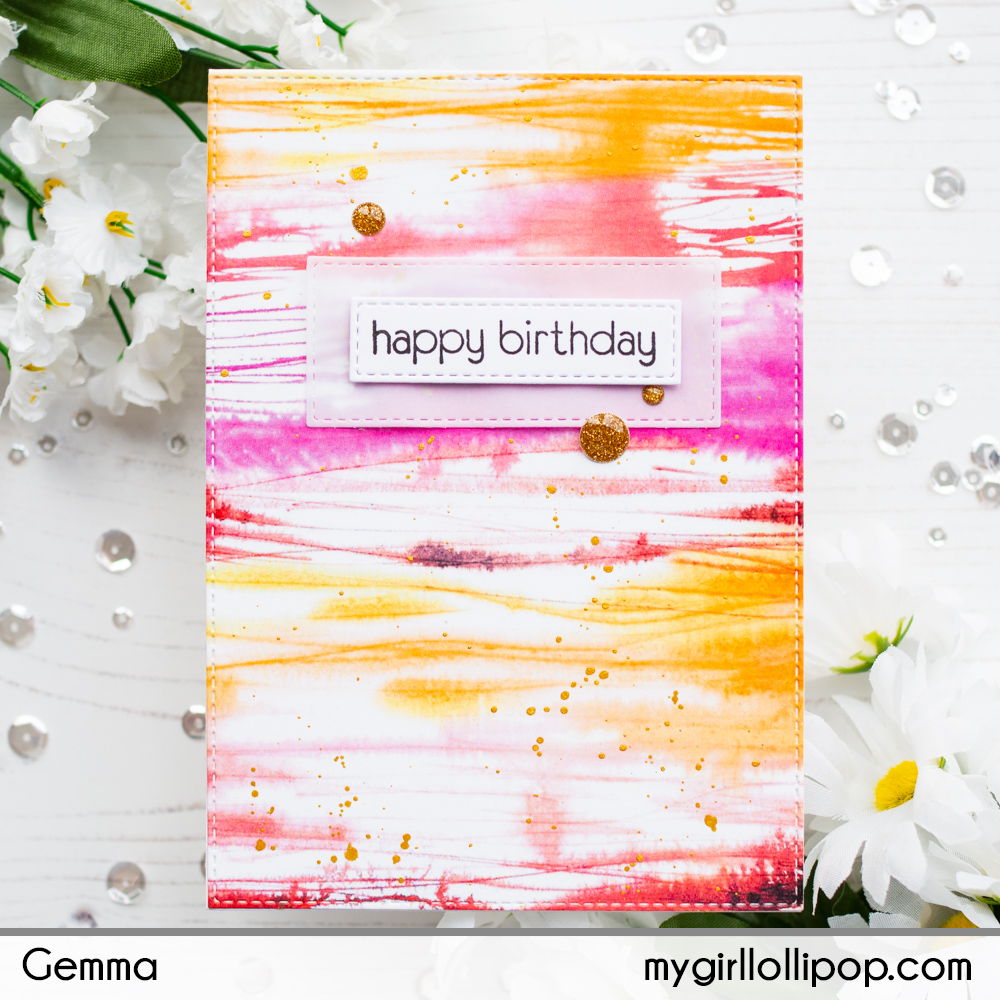
I stamped the mermaid image on white card with MFT Grout Gray Hybrid ink. This ink is alcohol ink friendly and light enough for no line colouring.


On my card base, I added a strip of Lawn Fawn Really Rainbow Scallops patterned paper and some silver glitter card. I then trimmed down the mermaid panel and embossed a sentiment from the same set at the top in silver.

I adhered the panel to my card base, then finished the card with a few embellishments for extra sparkle.


Thank you for joining me each week and for all the lovely comments on my blog posts. I hope to pop back here every now and then so, until next time, have a fabulous day and leave a little sparkle wherever you go.

Gemma 


Tuesday, 21 May 2019

Little Mermaiden Agenda


Today I’m sharing a card featuring the fabulous Little Mermaiden Agenda from Mama Elephant. I created a underwater scene, adapting another set from Mama Elephant for one of the scene elements.


I began with the background. I die cut the Mama Elephant Hillside Cover die from white card, masked off the border, then added a blend of distress oxide ink. I used picked raspberry, wilted violet, broken china and peacock feathers for the ocean. For the sea bed, I used antique linen and frayed burlap.

I flicked the background to get some droplet texture, and added some more texture to the sand bank by adding dots of brown alcohol marker ink.


Mama Elephant have some other sea sets which would work really well with the mermaids. As I don’t have these, I decided to create some sea grass myself by drawing on card with my alcohol markers. I trimmed them out and adhered them to the scene.

Next, I stamped and coloured some Little Mermaiden Agenda images. I had fun using different colours for their hair. Can you spot Ariel and Flounder? 

I had an idea to create a large clam shell for the mermaids to sit in - a bit like the opening scene of Ariel's sisters singing in The Little Mermaid. To create my shell, I used the oval and circle frames from Little Agenda Frames. I coloured the frames to look like a shell, trimming the bottom off the circle frame before adhering on top of the oval frame. 


I added two of the mermaids on to the shell with foam tape, making sure to hide the edges where the frames meet. 

I adhered the shell and mermaids to my card, using foam tape for dimension. I then added some tone on tone stamped fish to the background, using the two small fish included in Little Mermaiden Agenda

I finished with a stamped sentiment from the Mama Elephant Birthday Messages stamp set, some white and glitter gel pen accents, and some clear jewels for bubbles.


Have a lovely day,
Gemma
ME Birthday Messages
ME Little Mermaiden Agenda

ME Little Agenda Frames
ME Hillside Cover


Tuesday, 14 May 2019

Stencil Striped Embossing


For my card today, I used a great stencil from Echo Park called Best Summer Ever Good Vibes stencil. I love the irregular lines, which I always think helps so you don’t have to be too perfect.


I blended on some distress oxide inks over the stencil, to add lines to part of my card. I used Blueprint Sketch, Wilted Violet, Evergreen Bough and Cracked Pistachio.


I dried the ink on the panel with a heat tool, as I need all the ink to be dry before I do the next step - heat embossing.

With an embossing pen, I drew lines along the edge of the stencilled lines. I then heat embossed them with metallic silver embossing powder.


To finish, I stamped a sentiment from the Mama Elephant Scripty Bday stamp set and added a few enamel dots.


Have a lovely day,
Gemma


Tuesday, 7 May 2019

Enchanting Washes


My card today features some beautiful patterned paper. Patterned papers are great for when you need a card quickly but don’t have time to make your own background.


The patterned paper I chose is from the Altenew Enchanting Washes paper pad. I cut a piece to fit my card base, adhering it with liquid glue. 


To add extra interest, I flicked the background with gold perfect pearls. Any gold paint would work well for this.


Next, I stamped a sentiment from the Altenew Birthday Builder stamp set. I layered this over some vellum, then adhered to the card.

I finished by adding some gold enamel dots around the sentiment.


Have a lovely day,
Gemma


Tuesday, 30 April 2019

Happy Happy Happy Birthday To You


Today I have a bold sentiment card to share, using panels of colour and a classic alphabet die set.


An alphabet die set is something that I think everyone needs in their crafty stash. The Altenew Simple Alpha set is perfect as it’s a good size for building custom sentiments on cards or scrapbook layouts.


To begin, I chose 5 colours of distress oxide inks - squeezed lemonade, twisted citron, mowed lawn, evergreen bough and peacock feathers.

I used masking tape to section the card base, then blended on ink to create the panels of colour. I added water droplet details, then put the card base aside to dry.


Next, I die cut from white card all the letters needed for my sentiment. I glued two layers together for dimension. I then adhered them to my card base.

To finish, I added some Wink of Stella clear glitter to the letters.


Have a lovely day,
Gemma


Tuesday, 23 April 2019

Little Agenda Fairies

Today I’m sharing a card featuring the sweet Little Agenda Fairies from Mama Elephant. I love the Little Agenda stamps as they are quick to colour and you can feature lots of a card together.


I coloured my images with alcohol markers, then used the coordinating dies to cut them out.


For the background, I used the MFT Circle Stencil to add circles of distress oxide inks in squeezed lemonade, dried marigold and spun sugar.


I stamped two sentiments from the Mama Elephant Birthday Messages, then added the fairies to the card with foam tape.


Have a lovely day,
Gemma


Tuesday, 16 April 2019

Ewe Go, Girl!


Today I have a fun encouragement card to share, featuring the MFT Ewe & Me Forever stamp set. This was super quick to put together.


I began by cutting a panel of rainbow striped paper to go across the width of my card. I matted this on a piece of green glitter paper, then adhered to the top half of my card.


Underneath the panel, I stamped a fun greeting from the MFT Ewe & Me Forever stamp set.


I had several previously stamped, coloured and die cut images stored with this stamp set, so I picked two of the sheep and adhered them over the panel with foam tape to finish.


Have a lovely day,
Gemma


Tuesday, 9 April 2019

Curious Cat

Today I have a cute card to share, featuring some lovely MFT products.


Cool Cats is an older set from MFT and I just love these sweet images. Included in the set is the cat face with another image showing the same cat shown in full from the back. These can be used together, to make the card inside a part of the scene.


I began by trimming down an A6 card base. I want the card to still fit in a standard C6 envelope, so the card needs to be shorter to allow for the cat at the top.

On another piece of card, I die cut the MFT Stitched Strip dienamic to add some interest. I left space at the bottom for a stamped sentiment from the Cool Cats stamp set.


I die cut some small paw prints from the panel, using the MFT Paw Prints die set, then layered a piece of patterned paper behind the panel and added both to my card base.


Next, I coloured the stamped images of the cats, then adhered the top of them together with liquid glue. I positioned them over the top of the card, then added more liquid glue to stick them down. To give the cat on the inside something to stand on, I added a strip of the same patterned paper under his feet.


At this point, I felt like the card was missing something. I thought I’d give the cat something to be looking at, so I added the fish bowl above the sentiment as a finishing touch.

Have a lovely day,
Gemma

MFT Cool Cat
MFT Graphic Grid
MFT Stitched Strip


MFT Paw Prints