Showing posts with label Jenny. Show all posts

Monday, 16 December 2019

Festive Cocktails

Hello, well it's my last blog post before Christmas and I've just got one more card to share...
perfect for that friend who loves a festive tipple.... we all have one of those 😉


I've used the Newtons Nook Cocktail Mixer stamp set and chose three of the drinks to colour 
and die cut. The three windows are made using the Triple Peek-a-Boo windows die which
 is unfortunately out of stock but any shape could be substituted here.


Behind the windows on the card base I blended blue ink and added a wavy snow bank too.
The sentiment, which gave me the idea for the card, is from MFT's Sassy Pants Holiday
I stamped it over a brushstroke just for a different look... works quite well I think 😊
I added a touch of glitter, a couple of holly sprigs along with some falling 
snow and called it done... pretty pleased how it turned out.


So that's all from me for 2019 
Wishing all our crafty readers a happy Christmas 
and all the best for 2020
Thanks for stopping by :)
Jenny x

Monday, 9 December 2019

Peeking Rudolph

Hello hello. 
I'm sharing a clean and simple Christmas card today using older Christmas
stash..... anyone else love rediscovering all their Christmas stamps each year?


I've used Finley's ABC's to spell out Rudy's name and used a circle die instead 
of the 'O' so he could peek through like the cutie he is :)

Luckily there's no repeat letters so its simple to die cut on a panel of card which is layered 
over a strip of glitter card adhered to the card base. I stamped, coloured and trimmed out the 
deer image from Polar Peek-a-boo pals and gave him a scarf too then tucked him into the circle aperture.


Thanks for stopping by :)
Jenny x

Monday, 2 December 2019

Brrrthday Hot Chocolate

I have a card for a winter birthday today which, with a change of
 sentiment, could easily be a Christmas card instead...


Mmmm a nice mug of Hot Chocolate is perfect for a cold day 
especially a Brrrthday.... love that play on words :)

I've used Lil Inkers mug die and added extras from the Comfy Coco dies to
 make a yummy drink with mallows and wafer twists.The snowman face 
is from the Comfy Cocoa stamp set and I think he's fabulous... I've used markers 
and pencils to add shape and dimension to all the pieces.


The wafer twists are made using the striped peppermint stick stamp which I have stamped 
in brown ink on Kraft card then added shading with pencils. For a cosy background
 I've added a knitted pattern in white ink and the fun sentiment is from Ready Set Snow

Anyone else needing a Hot Chocolate now??

Thanks for stopping by :)
Jenny x


Monday, 25 November 2019

Advent Boxes

It's just a week to go before the opening of advent calendars gets underway and this is 
one I made last year actually, using the Triangle Box die from Neat and Tangled. 
I think the die sold out quickly last year before I could share it so I'm getting it ready 
for Sunday and thought I'd show you...


I used an old 12 x 12 Christmas Paper collection to cut 25 boxes from, that way I knew they'd 
all look pleasing together. The boxes come together quite quickly and then I used double sided
 tape to assemble them into the triangle shape....


I have used a wide strip of jute to wrap around the whole triangle shape which adds to 
stability and also gives a lovely finish. I used the small triangles in the set to cut card and 
vellum which are layered for the numbers..... the numbers are heat embossed in gold or 
white using the Lawn Fawn Celebration Countdown Stamp set.


The boxes either open up or down and are a perfect size for a small chocolate.
I used a small loop of twine attached behind the numbers to help opening the doors, 
I also had to add a loop of twine to the top so I could hang it up which helps
 with stability when fully laden! 😉

Now I best getting adding the chocolates!!


Thanks for stopping by :)
Jenny x


Monday, 18 November 2019

Bright Lights

Hello hello, its Jenny again bringing you a bright and colourful Christmas card which is 
ironic as it was anything but bright when I took these photos!! 🙄


The Party Lights stamp and die combo from MFT is a great set. I love different the curly strings for 
the lights and you have three options for adding the bulbs... three stamps that line all the bulbs
 up exactly where you need them or individual bulb stamps and of course, the dies

I've used grey pigment ink to stamp the wires across the card panel, they are easy to line up 
if you need to extend them. I have used the matching multi bulb stamps for each string
 and used different coloured inks for the bulbs. I thought it was not the best idea when I first 
started but actually it worked very well and of course using the stamping alignment tool helped.


It just so happened that the word Bright from the Rainbow Wishes dies fitted the space
 perfectly ... that never usually happens! The rest of the sentiment is from Mini Merry 
Messages and just snuggles into the gap nicely.


To add some dimension I used Nuvo Crystal Glaze on the bulbs, they really lift the 
design with a little bit of shine on each bulb 😊


Thanks for stopping by :)
Jenny x


Friday, 15 November 2019

A Birthday Announcement!

Hello there, it's Jenny back again today. Apologies if you were expecting to see another edition of
 Found on Friday, fear not, it will return at the end of the month instead with a double edition 
as Tara is rather busy with the shop at the moment.

I have revisited the Oyez stamp set from Waffleflower today with a fun birthday card 
using the Town Cryer which I enjoyed colouring...


After colouring him I cut around him with scissors but a coordinating die set is available here.
For a background scene I used the buildings from Mama Elephants City Sidewalks which 
are stamped onto the card base. I masked them and sponged on 
a light blue sky and grey pavement.


I decided to leave the buildings uncoloured so our Town Cryer could take centre
 stage... I love the clean and simple design this gives too. The sentiment from the 
set just nestles snugly into the space.... I think this makes a great card for 
guys and its not often you can say that!


Thanks for stopping by :)
Jenny x

Monday, 11 November 2019

Autumn Anniversary

I'm dodging back today from the onslaught of Christmas card making to the glorious colours of 
Autumn whilst there are still leaves on the trees... they've not been blown away yet!!


I needed to make an anniversary card so I reached for the Autumn Leaves dies from Newtons Nook
and cut a whole bunch in different seasonal shades. The fun thing with these dies is you can swap the veins 
and stalks around which makes a colourful display and saves on the die-cutting too.

For a sentiment I used an oldie but goody... Perfectly Penned from Concord & 9th, and stamped
the letters onto a piece of card. I then used an Altenew Fine Frame, which was coloured using the same 
ink as the sentiment, to adhere around the sentiment and trimmed the edges to make a framed
panel. I then arranged and adhered the leaves and acorns around the sentiment.

I just love those vibrant colours against the cream card 😊


Thanks for stopping by :)
Jenny x

Monday, 4 November 2019

Red,White and Grey Christmas

Now here's a contemporary colour palette for a Christmas card and quite different for me 
too but I rather like it. The Holly Berry Turnabout stamp set contains two turnabouts which
 means you can stamp the berries in a different colour to the leaves... brilliant! 


I've not tried embossing a turnabout stamp before but it's actually quite easy to do. My top tip is 
don't go straight to a card front for this design as I still haven't found a cardstock or heat 
tool that doesn't cause warping and this is a lot of embossing!

I used a 5½" grey square card panel on my turnabout jig which had been prepped with an 
anti-static powder bag and then used Versamark ink to stamp each turn and add white 
embossing powder with each turn too. I removed the panel of card when 
I had finished and heat embossed the whole pattern together.


My card did warp a little so I left it for about an hour before placing it back onto the
 jig to stamp the berries with Candied Apple Distress Oxide ink. When all the stamping was 
complete, I trimmed the piece and added it to a 5" square card base.

To add a greeting to such a busy pattern, I used the coordinating Holly Berry die set and cut 
a label shape from white vellum and then the scripty frame from white and red glitter
 cardstock. I trimmed the words away from the frame on the glittered piece and 
adhered them, slightly offset. over the white piece.


I added wet glue behind the frame and lettering so I could adhere the label to my card front and 
then added a bow and bell which were up-cycled from some Christmas packaging last year 😊
I'm thinking this will have to be a hand delivered card though!

I had plans to use greens for the leaves in this turnabout so it 
was good to try something different.


Thanks for stopping by :)
Jenny x


Monday, 21 October 2019

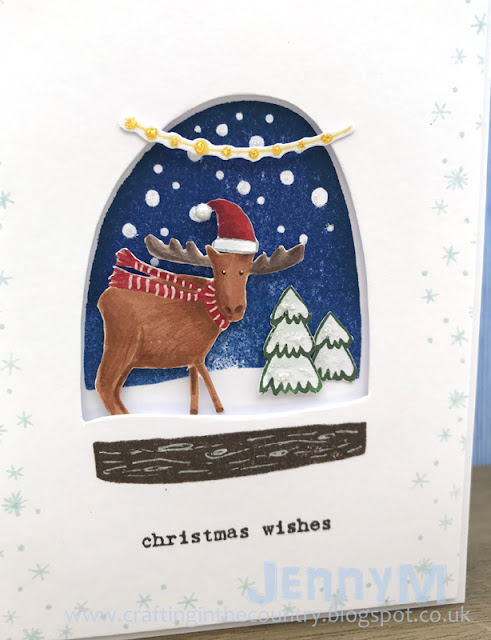
Christmoose Wishes

Hello there,
It's been good to have some craft time this weekend after having the 
flu/bug thing last week that seems to be doing the rounds 😷 
Glad that's behind me, so onto some more fun with Flora and Fauna I thought...


This card is made using the Snow Much Fun Snow Globe stamp set plus a couple of 
older sets for extra little trimmings. I started by stamping my snowy sky onto a card base 
use dye inks so i could blend three different shade for a gradient look. 
Whilst the stamp was still in my positioning tool I stamped the image again in light ink
 on a separate panel of card so I could use it as a guide to cut out the aperture...


There is a die set to coordinate with this stamp set which would make this easier but 
as I don't own the dies, I used a craft knife and did it by hand. One of the drawbacks of 
using a knife is the abrupt raw edge you end up with, so I use a large round ended parchment 
style tool and a piece of foam underneath to run around the inside edge to smooth the cut edge.... 
it really does make a difference!


I stamped the moose and trees in coloured inks for some no line colouring with 
Copics and cut out the images... the trees are a great shape which can be shortened 
for using in background. I added some doodled woodgrain with a white gel pen and 
used the Santa hat, garland and sentiment from the Woodland Snow Globe Stamp set 
which has plenty more images you could mix with this newer set.


To add a subtle pattern around the edge of the card I used a cluster of sparkles 
and dots from Flamingo Holiday in Sno Cone dye ink.... a few touches of glitter 
glue and I was pleased with how it turned out 😊


Thanks for stopping by :)
Jenny x


Monday, 14 October 2019

Amazing Type!!

Once I saw the cute typewriter die from Sugar Pea Designs I was inspired to try this 
interactive card.... it seemed the perfect idea for a typewriter...


.... and if you pull the sheet of paper up....


I've used a die to cut the slit in the circular panel behind the typewriter but you can 
easily use a knife to do the same thing. I inked through a sun ray stencil onto the 
front of the circle and then worked out where the slit had to be.


This is the back view... as you can see the sheet of paper is thin card which has a strip of 
card added at the bottom to stop it coming all the way through from the back. 
I added foam tape around the rest of the panel so the moving card can slide more easily.


To add a subtle pattern to the card base I used a Typewriter background stamp in
 pale grey... a perfect match for this die!! :) A smattering of stars in silver and black 
and I called it done, I can add my message on the inside depending on the occasion :)

Thanks for stopping by :)
Jenny x