Showing posts with label Kuretake Zig Clean Color Markers. Show all posts

Friday, 14 September 2018

Grateful Twice!


 Hello! Hope you're having a lovely day. I'm just back for a guest post and as I love floral stamps, this Concord and 9th 'Grateful For Everything' set seemed a good candidate to be inked up. There's a great matching die set if you're not a fan of cutting out too


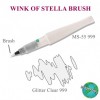
I thought I'd create using two different mediums and started off with a watercolour pen. You can get the same look using Zig Clean Color Real Brush Pens and an AlteNew waterbrush. Stamp and and heat emboss with white embossing powder first


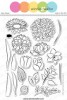
The set has these beautiful mini spatters that really soften the look around your image and also an image (that I've not used yet) to perfectly match up around the outside so you can have a watercolour-esque band of colour around your image. I decided to try a different look using pencils on black cardstock

Black cardstock isn't as straightforward to colour on without adding a white or light layer of pencil first. I did a shortcut and added a light wash of white acrylic paint which really sped the process up!


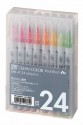
Using pencils is all about adding layer upon layer of different colour to get the dimensional look. I'm still learning using them, but love the softness they bring to a project. You could start off your journey with these Prima watercolour pencils and use them with or without water

I finished off the card with a few sequins and a little paint splatter from some white acrylic paint. You can see my mistake here as I was colouring at night and picked up a blue pencil instead of white for colouring around the outside!

I truly love this stamp set as there are so many looks you can get from it! The sentiments focusing on being grateful are wonderful too!
Thanks for joining me today, and I'll see you again sometime!

Keren xx


Friday, 2 March 2018

The Dog's Woof's Wicked Party!

Hi everybody,

Jill here and this week, I’ve got a rad doggy party for you...


Using the utterly incredible, The Dog’s Woof, from Mama Elephant.


These kind of ‘group shot’ designs that Mama Elephant have come out with recently are just beyond brilliant. They make colouring so fun, coming up with different designs and personalities for each one of the ‘gang’, and being able to change the look so easily with your colouring. Just brilliant.
I started by stamping out my doggy crew and heat embossing in clear to make life easier when it came to colouring. I then coloured using my Zigs with water.

I stamped out the balloons from Mama Elephant’s Up And Away, created a mask, and stamped out again and again creating a whole cluster of balloons, which I then coloured in lovely bright colours using my Zigs again. I also created a quick background wash with the help of my magnificent Zigs once more, and adding a few flicks of white for added interest.


My sentiment is from Mama Elephant’s Occasional Labels and is stamped out, clear heat embossed, and fussy cut.

I then cut around all of my elements and adhered in place using foam tape, adding some silver thread behind as the balloon strings and using the foam tape to keep them in place.


I am a dog obsessive - no joke - I recently even landed my dream job of working a rehoming centre, so this set was an absolute ‘must-have’ for me and I LOVE it! I actually can’t wait to use it again...and again and again and again...


I hope you like the dog crew party!

As always, everything I used is linked below.


see you next week.


Jillx

The Dog's Woof  Up and Away Image 1  Occassional Labels

Zig Clean Color Real Brush Pen (24 piece set)

Friday, 26 January 2018

Lovely Loving Piggies

Hi everybody,

Jill here, and this week I've got some sweet, loving piggies...


...using the Lovely Piggies from Mama Elephant's latest release.


This was an instant 'must-have' for me as I have nothing like it in my stash, and everybody has a soft-spot for these sweet creatures surely?
You get a load of different designs of the Lovely Piggies in the set so the possibilities are endless.  I decided to make a Valentine's themed card because I just *had* to use the little cupid piggie first...so cute!
I wanted to do some no-line colouring but my skills really aren't that sharp so went the utter cheat route haha.  
I started by stamping out my piggies in a pale ink and coloured over-top using my Zig Real Brush Markers, (to disguise the line), mixed with water for a lazy laid-back watercolour look.  I created my background by using the cloud border from Mama Elephant's Landscape Trio as a stencil and gently ink blending over top to create a soft sky of pinks and blues.  My piggies are playing upon My Favourite Things Cloud 9 Dienamics and my sentiment is from Mama Elephant's Love Quotes (an oldy but a goody and comes out almost every time I get lovey dovey!).


I finished with a wrap of ribbon and a cute little bow and there you have it.

Lovely Piggies sending love this Valentines.

I really hope you like it.  As always, everything I used is linked below.

See you next week.

Jillx

Lovely Piggies Landscape Trio Creative Cuts Image 1

Love Quotes Image 1


Cloud 9 Dienamics  Zig Clean Color Real Brush Pen (24 piece set)


Thursday, 23 February 2017

Sparkling Watercolour

Hi there everyone and happy Thursday! Today I'm sharing a springtime card with a little added sparkle!  


I stamped some flowers and leaves from two Winnie & Walter stamp sets- Addie's Garden and Anna's Flora, on to some watercolour card with VersMark and then heat embossed with white embossing powder. I then watercoloured the images with Zig Clean Color Markers and added some Clear Wink Of Stella on top of the watercolouring.


 I cut these flower clusters out and added these to my card blank with foam pads for dimension. Before adding the clusters I did add a little black splatter for interest. For the sentiment I used Winnie & Walter 'The Big, the Bold & Greetings'. The large 'sending' I stamped and fussy cut out and added to my card with foam. I used the same stamp set to add the additional 'warm hugs' phrase to the sentiment.

I hope you enjoyed my card and I'll see you again next week. Hugs, Lydia x

Saturday, 4 June 2016

Watercolor Strip

Hi crafty friends! Today I want to share a project with you that is very easy to make and perfect if you are looking for some relaxing, distracting coloring at the end of the day.


I started out by masking off my strip on my cardbase and stamping the various images in a random pattern. The coloring was done using my ZIG Clean Color Real Brush markers, but you can use _any_ coloring medium you like. I wanted to add a lot of sparkle to my project, so I used only water into which I had added Perfect Pearls. This guaranteed the shimmer across my entire strip.


For the sentiment, I reached for a Paper Smooches set and then spend a few minutes trying to line it up. The MISTI really helped here because – thanks to the grid lines – you can count how many little squares are to the right and left of the sentiment to ensure it’s dead center. And straight :)


Thank you for stopping by today! I hope you got inspired!

Sunday, 22 May 2016

Cosy Felt

I bet you could all guess what I'd be playing with today - I did say I couldn't wait for Newton's Nook fabby new book themed stamps!   I went with A Cosy Day In first as I wanted to do one of my favourite techniques of paper-piecing but using felt as well as paper as I thought felt would add a touch of realism to the comfy looking chair!


I stamped the whole image onto a square of grey felt from our sample packs using a Avery Elle's Dye Ink and just ran a hot iron over it with a piece of kitchen paper in between to set the ink.  Now to do the paper piecing.  I stamped the image onto white card twice so I could have the "girl layer" and "cat layer" separate.   I stamped just the cushion onto a patterned paper from the Hello Gorgeous pad from My Minds Eye - a good tip to make your image and background sing is to use the same paper in your image as your background as long as you have some plain colour to separate the two.

I coloured the image with our new Zig Clean Color Markers from Kuretake - I used the big set which is a bit of an investment, but we do also have the 24 set if you want to try them.  You can colour with them just as pens but they also work like watercolour markers and are really easy to use with the great brush tip they have.

To layer it all up I die cut a couple of circles of white card using the Lawn Fawn stitched dies and stamped the whole image onto the large one to make piecing it back together easy.   To finish the chair I used some tiny flat backed pearls to "stud" the chair where the circles are on the image.


NEWS FROM THE STORE:
  • We will have the latest release from Neat and Tangled in store tomorrow.
  • The new release from Avery Elle goes on sale on the 26th May (Thursday) and we will be live as soon as they are!
  • We are waiting on the new release and restocks from Altenew to ship.
  • We have an order pending for the latest couple of releases from WaffleFlower - we should have that by the end of the month.
  • We are waiting for Hero Arts to hit the UK distributor.

That's all for today folks - happy crafting!

Tara