Monday 29 February 2016

Say What?!?!


Hello :)
Today, as you probably know, is the 29th Feb... Leap Years Day!!
It's also my little brothers birthday and this year, as you can see, is a nice round 
numbered birthday *wink*...
but that's okay because he's only had 10 real birthdays.. Lol


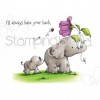
I decided to have a play around with no-line water-colouring and this fun stamp by Stamping Bella.
This is Nacho but I decided to try and make him a caricature of my brothers little terrier x...
I love that facial expression :)  


I've used Avery Elle's Count On It Stamps and dies to add the reminder sentiment at the 
bottom of the frame... to make the numbers nice and glossy I embossed them a couple
 of times with chunky clear embossing powder. 


Hehehe....Not sure if the wording inside the card will make
 him feel better about his birthday or not ??
I've used Jessie's ABC's and Clark's ABC's for the lettering...

Hope he likes it :)


Thanks for stopping by
 and Happy Birthday to all the Leap Year babies out there too :)

Jenny x

Sunday 28 February 2016

You're a Legend!

Sometimes it can be hard to decide what to play with after a new release, particularly this month when we've had almost 400 new items in stock!   However, there was one Lawn Fawn set which spoke to me as soon as I saw it in pre-view at CHA as I have always wanting to go Nessie hunting!  I reckon the only reason no-one has taken a decent photo of her is because they haven't asked her first....


I kept my card pretty simple as I wanted Nessie to shine so I stamped her onto some cardstock and coloured with copic markers in shades of green, pouncing over the top with a very pale yellow to give a reptilian look and adding some dark teal dots to the darker edges.

The loch was created by stamping the wave border line from the stamp set in blueberry onto vellum and dragging the paler blue yonder down away from the wave using a sponge.  I popped her in a port-hole style frame using the great new stitched circle frame dies from Lawn Fawn and finished with a sentiment on a banner given the same colouring treatment as Nessie for a cohesive look.

NEWS FROM THE STORE:

We will have the new MFT release in store on Wednesday morning.

We will have the long awaited release from Hero Arts in store next week too.

There are new releases in the pipeline from SugarPea Designs, Lil' Inker Designs, Winnie & Walter, Waffle Flower and Concord and 9th.  We'll be getting our orders in asap and hope to get some restocks too but we can only buy what they have and popular items are often hard to get - if you don't see it straight way it means we couldn't get it but we re-order popular items EVERY  time we do an order so they will come back eventually!

See you next week

Tara


Saturday 27 February 2016

Intense Colors on Kraft Paper with Chalk Pastels

Hello crafty friends! Today I have a project for you featuring Stamping Bella's "I'll always have your back" with Carbothello pencils on kraft paper. I am enjoying my chalk pastels very much, and they are just fantastic on kraft because they get quite opaque with each layer.


The chalk is very soft so the tip of the pencil doesn't stay sharp for very long. When you try to get into small areas, or try to add fine detail, this can be tricky. One thing to keep in mind is that with this medium, you can actually add lighter color on top of darker color. That means that you should blend from light to dark because otherwise you'll end up covering up the dark with the light. Of course you can go back with the lighter color to smooth out transitions, though.


Since the chalk pastels become quite opaque with each layer, be careful with stamped lines you color over. You won't be able to avoid coloring over some of them, and I used a fine tip pen to draw some lines back in. Also, you can erase some of the color with a clean eraser if you color outside of the lines. Just make sure to clean off the eraser once an area picks up too much color so  you won't smudge it around.


Another important aspect of this medium: you need to set it. I do it by spraying it with hair spray. If you spray it with water (as  you might to with Perfect Pearls), these Carbothello chalk pastels will start running. If you don't do anything, you will smudge them eventually by just brushing over them. It's great if you still work and want to blend colors, but it's very depressing when that happens to a finished piece.

So, I hope you liked today's project and got inspired! If you would actually like to see the coloring process, hop on over to my blog (link in the sidebar) and watch the video!

Friday 26 February 2016

Space Bear walk.

Hi everybody,

Jill here, and this week I've got a little galaxy action going on...


Using those brilliant Space Bears from Mama Elephant.


These Bears are so fun!  I mean, what's not to love about a bear in Space helmet?!  So I decided to take them on a little space walk...
I started by creating my galaxy background.  I purposely made it a little more pastel by using a lot of grey on top of my purple, blue and yellow ink, with only a teeny bit of black as I didn't want it to feel too imposing.  I added a load of white and shimmery splats and splodges and left to dry.  I stamped my bears onto watercolour card and twice each onto vellum to create their helmets.  I coloured my bears using my Zig Clean Colour Brush pens and fussy cut, cutting off their  helmets (ouch) on the card, but only cutting out the helmets on the vellum...you with me?  I then adhered my helmets back onto my bears using the almighty Stick-it.
I created a planet base by cutting an oval and water coloured it with a mix of Distress Ink.  I added a black frame using Mama Elephant's Index Card Creative Cuts and stamped my sentiments, from the same cool Space Bear set, onto light grey card, in black, clear heat embossed, and cut into little banners.


Then for the fun bit...building my scene.  I used some bright yellow twine for my space rope...ok ok, I know it's not called space rope...but it is today...and tied to each Bear's hand, keeping it in place by adding a dab of wet glue.  My bears are kept in place with foam pads, and I added a load of stars I made using stick-it covered in silver glitter, cut using Mama Elephant's Confetti die, to my background.


And there you have it...Space Bears on a Space walk...now there's a sentence I never thought I'd say haha.

As always, everything is linked below, and I shall see y'all next week.

Jillx

Space Bears Stamp  Index Card Creative Cuts Image 1  
Confetti Creative Cuts Die Image 1  Stick It - LARGE

Thursday 25 February 2016

Clever Masking- Creating A 'Planted' Feel


Hello there and happy Thursday! It's Lydia here with you today sharing with you a card I made with my favourite set from the new Lawn Fawn release.... Rooting For You.

I am just loving how cute these little veg people are! And that there is a little cheek stamp soyou can give them rosy cheeks is genius.


 To create the look like they are popping up out of the ground I firstly added a strip of masking tape to my card blank, I did this so I could stamp the veg a little over the tape so this part would not be visible when I removed the tape. To stamp the veg I used lots of awesome inks from the store, the new MFT inks are amazing at this solid stamping.

So once I had stamped all of the solid and detail images that go to make the images up I then removed the piece of masking tape, and moved it up so it was on the same line but this time covering the stamped veg. I then blended some brown ink over the tape to get and impression of dirt. To finish I added a sentiment from the set.

Thank you so much for stopping by!
Hugs Lydia x

Rooting For You

Wednesday 24 February 2016

Love moo


Hello.
I have a simple card today using the awesome hogs and kisses stamp set from avery elle.


My daughter absolutely loves anything with cows so i chose this image with her in mind.
I stamped the image and did some colouring with prisma color pencils.
I then fussy cut the image although i have the dies lol.
I used some lawn fawn patterned paper washi tape and sequins to finish the card.

Hogs & Kisses


Thanks for looking.

Tuesday 23 February 2016

Unicorn Merry-go-round!


Hi! Fancy a spin? 
There's something incredibly nostalgic about fairs and I love seeing those ornately beautiful Carousels. That's where I got the inspiration for this card..plus I wanted to combine two fabulous Mama Elephant sets.


and mixing it up with 'New Family'


So I started out with the whole idea of adding the New Family animals on the back of the horses. I needed the unicorns to look more like carousel horses so I masked off the manes as below and used the moon in the set to act as a saddle.

The 'pole' things- were created using the little dashes and star and stamping opposite ways. Once you start with a theme and work out what you actually need to complete the picture, you can find similar shapes if you look hard enough!
It's also a useful example of 'suggestion'. I was trying to work out how to add the top and bottom and make it look realistically like 'flying Jennies' (another name for the Merry Go Round) but once I'd connected the riders and horses and poles, it was enough. The imagery is strong enough to suggest the scene- plus it's less work for me too!!

Hope you're day is a fun one, and you don't feel like you're going round in circles!
See you next week,

Keren xx

Monday 22 February 2016

Fintastic News!!

Hello there :)

With the arrival of all the Lawn Fawn goodness at the end of last week, I wanted to share a new home card I made using Lawn Fawns Fintastic Friends stamp set....


This was one of those ideas that popped into my head and I couldn't wait to get it made ;) .... I'm also happy to say it turned out exactly as I had imagined (which isn't always the case).

As you can see from the pictures, this little goldfish is quite happy swimming about in his bowl shaped home....


..... but the hole in the front allows him to magically move to a large tank when you open the card :)


Ta-Dahhhhh!!

The sentiment has been made using Smitty's ABC's and the word Fintastic 
which is from the fish stamp set.


  • To make the card I started by stamping the bowl and accessories on the card front and then die cut the hole before colouring, remember to open the card out flat before you colour ;)
  • Then I stamped the fish through the hole onto the inside of the card so I knew it would be in the correct place. 
  • All I needed to do then was add the large tank around the fish on the inside of the card and colour that too :)
  • I kept my colouring simple so I could keep the blues the same from front to inside and I carefully ran the blue marker around the inside edge of the hole to cover any white halo :)

To help balance the image and sentiment on the front of the card I used a strip of washi tape over the fold of the card... a patterned paper strip would work just as well :)


Thanks for stopping by :)
Jenny x


Sunday 21 February 2016

Baskets and Bouquets (and a bit of Tim Holtz)

I'll be trundling back down the M1 to the NEC as you read this, ready to walk the floor of the CHSI Trade Show (our mini version of CHA without quite so many exciting stalls!) hoping to find some new gems to bring to the store in the coming year.   I did manage a couple of quick makes though using some of new goodies we got this week from Reverse Confetti.   I just loved the versatility of their new Flower Wrap and Basket dies and could see them becoming favourite staples in my stash.

Firstly I whipped up a little get well card using the Flower Wrap - as you can't always take flowers to hospital anymore, what could be better than a mini bouquet on the card!


I chose to make my flower wrap 3D by just bringing the two edges together rather than folding one over the other (a little washi tape holds it together on the inside).  I cut it from a sheet from the rather lush gold foiled papers in the On Trend 2 pad from My Minds Eye.

I added some greenery around the edges with Foilage 2 from Paper Smooches but any leaf die would do the trick here. My bunch of flowers is a selection of roses and buds from my old wedding crafting days just fixed inside with a blob of pinflair gel before mounting onto a base card with a greeting stamped from Get Well Wishes by MFT.   The little tag around the bouquet comes from the same die set and is a cute accent.

For my second card I wanted to use the basket and for some reason by first thoughts were Mariah Carey's rider when she asked for a basket of white puppies!  (I know my brain is a bit weird!)   Anyhow, I thought rather than just puppies I would like to receive a basket of baby animals so this is what I came up with!


I die cut the basket from kraft and the inner bit and frill from the sorbet pack of papers from MFT.  I stamped the baby animals from Mama Elephant's New Family set onto white card and coloured with copics before fussy cutting.  They were then popped into the basket before finishing the card with a grassy hill and a sentiment made up with Milo's ABCs.   If I'd just done bunnies I could see this being a great take on Easter cards - those baby animals have uses way beyond new baby cards ;-)


 NEWS FROM THE STORE

It was a HUGE week for deliveries - we received 11 boxes of stock on Tuesday alone!

We had the new release from Mama Elephant and Lawn Fawn - all currently available in store.

Also hiding in there is the new release from Avery Elle which is released on the 23rd February so will be live in store then.

We also have a restock order from Concord and 9th coming along with their latest release which should be in store next week.

Yesterday I spent the day crafting with a certain Mr Tim Holtz - it was lots of fun, even if a little out of my comfort zone.   We made a collage using the new distress crayons - they rock folks - so I will be looking at adding "some" of the Distress Range to the store when I go back to the Trade Fair today.   More will follow when we move but space is really tight for now so we'll see what we can  manage to squeeze in.


Right that's all from me this week
Catch you on the flip side.
Tara