Showing posts with label Mama Elephant Bella letters. Show all posts

Monday, 21 May 2018

A Brewtiful Day

Hello and happy Monday to you... anyone fancy a brew??
Well you're in luck as I have a card for a 'tea lovin' friend today and just to change it up a bit, I've used the Neat and Tangled Maze die to add an interactive element....


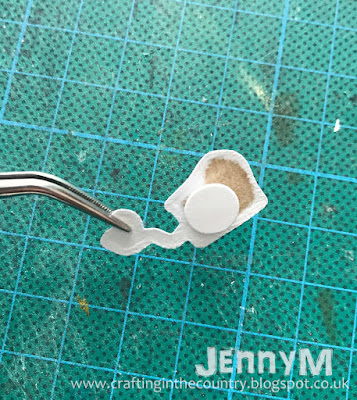
The Avery Elle Tea Time stamp set has a nice sized tea bag stamp that can be guided through the maze into the cup at the bottom. I used the matching die to cut it out and then used a small circle die to cut three discs to stack and adhere to the back of the teabag and a larger circle on top of those to hold it in the maze pathway...


I die cut the maze into a square of white card and stamped the tea cup at the base of the maze ensuring the channel went into the cup. I also had to stamp the same image onto the base card so the image looked complete on the finished card...


The tea bag sits down nicely in the cup and then all you need to do is stamp, colour and cut out another cup body to layer over the teabag.... remember to give it enough dimension so the teabag fits inside and keep the adhesive around the edge too :)


The sentiment is stamped using Mama Elephants Bella Letters and a Lil inkers set.

It actually works quite well and you can decide on the start position for the teabag depending on how challenging you want the puzzle to be 😉


Thanks for stopping by :)
Jenny x

Monday, 19 February 2018

Pop Up Herd!

Hello hello, Jenny here and I'm down on the farm today with a pop up herd!!!

Yes the new Inside Pop Fence die from Mama Elephant just gave me the idea to fill it with the animals from MFT's The Whole Herd stamp set...


I followed the video tutorial from Mama Elephants You Tube channel to assemble the fence and grassy strips then adhered it to a green card base. I found that you need to place the fence slightly lower than centre on a card that has a shorter folded edge so the fence doesn't protrude outside the card when folded.


I stamped, coloured and die cut the animals and added them to the grassy strips so they were sightly staggered. To make the rest of the green space look like a grassy meadow, I used the dies in the set to cut a few white flowers and adhered them to the card base.


I wasn't sure how to do the front... I'm not used to making a card were the inside is the star of the show!!
With the Scalloped frames I cut a panel of card and set about inking a sky and grassy field ( I used the negative pieces from the grass die cuts to make a mask for spiky grass)


The fence panel is from the pop up die and I just trimmed a piece off and added grass and shading, then made it a perch for the chicken. I used Mama Elephants Bella Letters to create my 'punny' sentiment which follows on to the inside of the card with a sentiment from the animal stamp set.

Having a look through my stash and I came across a few stamp sets that would work with this pop up fence... how about gnomes or hedgehogs, a vegetable or flower garden or even a baby onsie on a washing line??!! It's such a fun surprise inside the card and quite easy to assemble too :)


Thanks for stopping By :)
Jenny x

Monday, 24 April 2017

Baby Popcorn

Hello, I hope you all had a good weekend :)

I have a baby shower gift package to show you today..... it's a bit different and focuses on a play on words to give it that fun element :) I was trying to find an alternative use for the Popcorn Treat Box from Sugar Pea Designs and then the phrase "ready to pop" sparked this idea...


I started by running the die through twice to make the box and then stamped the stripes using the solid stripe in Mama Elephants Basic Borders set. I chose to use a traditional pink ink as the gifts are for our niece who is expecting a baby girl very soon, very exciting as it is the first baby of that generation for our family. I used the dies in the set to cut an oval in pink card and then made a second slightly smaller oval by tracing around the inside of the same die on white card and cutting it out with scissors :)


The phrase is made up using dies from the Popcorn set and Mama Elephants Bella Letters. I have added a die cut nappy pin to provide that extra 'New Baby' touch :)

It's quite a small box but the perfect size for a couple of bibs and a Giftcard.... another option would be the Waffleflower Template Petal Holder die which has a slightly larger base but shorter in height.

To give the gift the extra creative finishing touch I used Lawn Fawns Little Bundle stamp set to decorate a sheet of tissue paper, it is only subtle but I think it sets the small presents off nicely.


Thank you for visiting and I hope this might inspire you to think outside the Popcorn Box!

Jenny x

Monday, 29 August 2016

Computer says.......?


Hello there :)
I hope you're enjoying the Bank Holiday Weekend?

My card today is an idea I've had in my head for a while... I think I first saw this design, with a different message, printed onto a T-shirt and thought it would make a fun interactive card.


It's a very simple pull tab card which makes the task bar fill with colour....


I used a computer from Blogging Buddies embossed in white on grey card, I cut the screen portion out so I could cut a slit in the card panel below. To cut the slit I used a small die from Blueprints 16 but you can easily use a ruler and knife instead. After making the task bar I masked of the screen area over it and inked through the Concentric Circle stencil to create a colourful background.
I added the images with foam squares and stamped out my message with Bella Letters from Mama Elephant.

This is how I assembled the pull tab on the back of the panel...


I inked a portion of the pull tab and trimmed it to a long 'T' shape.... this prevents the tab from being pulled out completely.


Apologies this picture is a little blurry but you can still see how the foam tape makes a channel for the tab and the end piece of foam stopping the tab from pushing out beyond the panel. I stacked three lengths of card together and adhered them to the back of the tab so it was the same height as the foam tape. Below you can see how the tab sits when pulled fully out :)


and just in case you wondered what the loading message was, here's the inside...


I hope the photos helped... this is the same method I used for the Interactive Smoothie card I made a few months back.... that was a Bank Holiday Monday project too!!! 


Thanks for stopping by :)
Jenny x