Showing posts with label My Favorite Things Merry Everything. Show all posts

Wednesday, 23 November 2016

Quick and fun Christmas cards with matching envelopes


Hi everyone, Esther here with a completely different style of card to last week! This week I want to show you a really quick and easy design for batch making Christmas cards with fun matching envelopes. This is great for producing large quantities of cards that still look like some time has gone into them.


So what do you need? Just a few supplies:


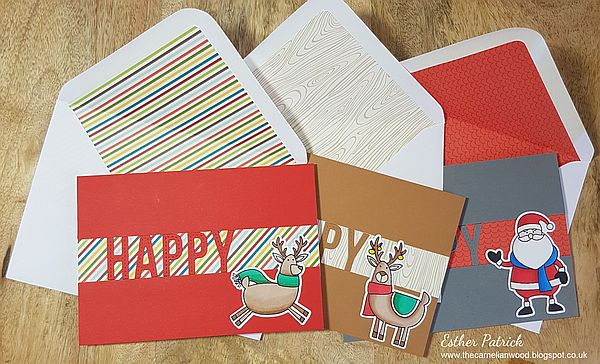
Cut some card bases to the size you want. I cut my card stock to 8" high by 5.6" wide so that the folded cards were 4" high. 

Cut some 1.5" strips of different papers from your paper pad and glue them to the middles of the card bases.

Cut two strips per card of coloured card at 1.5" high by 5.6" wide and glue them to the tops and bottoms of the card bases. You should have a gap of 1" in the middles where your paper shows.

Cut the letters H, A, P, P, Y multiple times from your coloured card using the My Favorite Things Stitched Alphabet Dienamic. Glue them into the gaps, positioning the word slightly to the left of centre. If you're not confident about the fit, just stick your top strip of coloured card, then the letters, then the bottom strip of coloured card. You can always trim a bit off the bottoms if you need to.

Stamp and colour some images from your stamp set, then die cut or fussy cut them out and glue one image per card at the bottom right corner.


Now take matching sheets of paper from your paper pad and one at a time use a corner rounder (or neat cutting) to round off one corner.


Hold that rounded corner at the top inside of your envelope so it lines up along its sides with the glue strips on the envelope flap. Just before the paper overlaps the sides of the envelope, make a small pencil mark, and join the two marks. Make sure your joining line is below the open portion of the envelope body. I've used a thick black pen so you can see the lines.


Cut out the shape, and add two strips of glue tape or other glue of your choice to the back.


Insert the paper into the envelop, aligning its edges with the envelope so it's centred and level.


Finally, re-score the fold line for the envelop flap.


I promise in real life this is so quick to do, and having a matching envelope creates such a fun, personalised effect! It really makes your batch Christmas cards look like they took a lot more time than they did, and will put a smile on the recipients' faces!


That's it for this week - hope you like them! See you next week, and thanks for stopping by.


Wednesday, 19 October 2016

Clean and Simple (CAS) Christmas Santa


Hi everyone, I'm back with a Clean and Simple (CAS) card for Christmas! This sort of design is so useful because you can mix it up really easily to use other products if you don't have exactly the same ones and it will still look really crisp and CAS!


I cut a slightly over-sized panel of heavyweight card stock with my guillotine. Using the My Favorite Things Chevron Grid Stencil I spread a layer of white embossing paste in a small, uneven area at the top right. This one from Finnabair for Prima would work well and can be coloured with your favourite inks or sprays.

The panel was then set aside to dry naturally. If you heat set the embossing paste, you can get really interesting bubbles and texture, but I wanted a smooth look.

While the panel dried, I stamped the Santa and a present from My Favorite Things Merry Everything stamp set onto watercolour card and coloured them in using Zig Clean Color Real Brush Pens. When they were dry, I die cut them using the co-ordinating My Favorite Things Merry Everything Dienamics

By now, the embossing paste on the panel was dry so I die cut it down to the right size using the largest of the Lawn Fawn Large Stitched Rectangle Stackables

I added a twist of silver metallic thread over the embossing, then positioned Santa and his prezzie on top with foam pads which also holds the thread in place.

Finally, I stamped and white heat embossed a sentiment from the same stamp set, glued it down and added an offset strip of silver glitter card. The whole thing was then mounted on a heavyweight card stock base.


So how can you adapt this design to other supplies?
  • Use a different stencil.
  • Use ink through the stencil instead of embossing paste.
  • Use a stamp instead of a stencil, and either leave it 'as is' or heat emboss. (Tip: if you use a large background stamp, ink it lightly and then press down unevenly in just one small area of your card panel using your fingers instead of an acrylic block or stamp press. This gives a small area of coverage and beautifully uneven, faded edges).
  • Instead of thread, use a small die cut circle over the background embossing. Glitter card would look fantastic.
  • Use a different stamp set! This layout could easily become an autumn card (try Lawn Fawn Jump for Joy), a birthday card (try My Favorite Things Beary Special Birthday) or a wedding/anniversary card (try Altenew Vintage Roses for a pretty, formal look or Wild Hibiscus for a loose, sketched feel).
I hope this gives you some ideas for using this layout with different supplies and for different occasions. Thanks for stopping by!

If you want to Pin this card, here's a Pinterest-ready graphic you can use.