Showing posts with label Lawn Fawn Perfectly Plaid. Show all posts

Tuesday, 17 October 2017

Hooray for Balloons

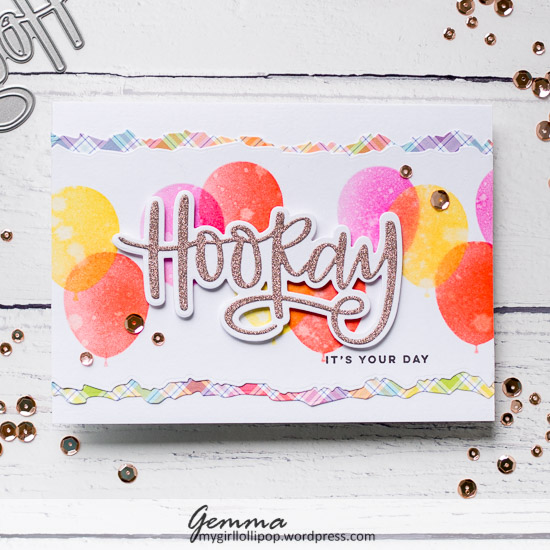
I love big sentiments on cards and the Neat & Tangled Hooray is so fun! That font is gorgeous and works so well as a focal point.


For my card this week, I teamed it with the balloon duo stencils, also from Neat & Tangled. These stencils are really clever.

I began by using the stencils to add balloons across a piece of white card. By using both of the stencils, you get the lovely effect of balloons layering over each other.


I cut down the white panel with the Lil’Inker Deco Edge Border dies. Another new favourite of mine, these allow you to get a ripped edge effect with more control than just tearing the paper.

I used these dies again on a piece of patterned paper, and layered it behind the white panel, before adding them to a white card base.


Next, I die cut the Hooray word die from glitter paper. 8 did cut the shadows from white card, which allows the word to stand out from the background.

To finish, I added a stamped sentiment underneath and a sprinkling of sequins.


I loved the finished card so much, I just had to make some more in different colours. Do you have a favourite?


Thanks for joining me today,
Gemma

Lil'Inker Deco Edges
N&T Balloon Duo Stencil

N&T Hooray

W&W Sentimental Birthday

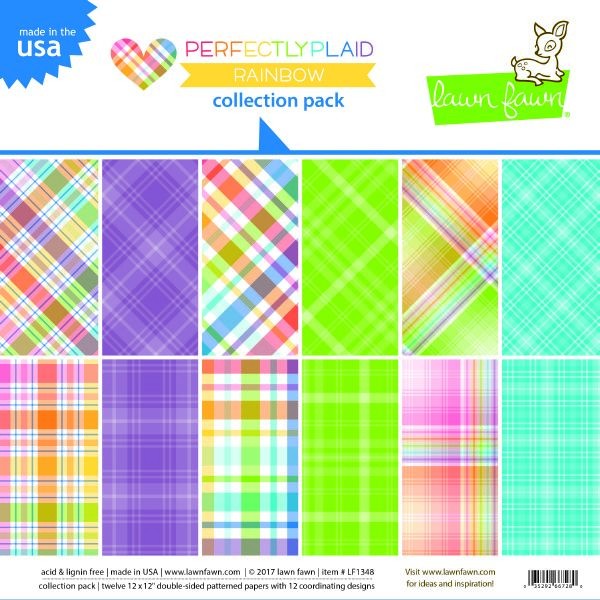
Lawn Fawn Perfectly Plaid Rainbow


Monday, 7 August 2017

Sleeping Beauty Box Pop-Up Card

Today I'm sharing the box pop-up card I've made for my niece's 4th birthday. I was inspired by one of her favourite Disney princesses, Sleeping Beauty.


I first stamped, coloured and cut out lots of images from the Lawn Fawn Fairy Friends stamp set. As Lawn Fawn don't have a fairytale set (hint hint, Lawn Fawn!), I chose one of the princesses from the MFT Once Upon a Time stamp set. I also added some butterflies and the bird from that set too.

I used a piece of 12x12 paper I had in my craft stash to make the box, but the Echo Park 6x6 perfect princess paper pad would be great for this. Remember, the box die will fit on 6x6 paper, but you'll need to cut it out twice to make the box so you'll need two pieces.


I added three tabs to the box, cut from Lawn Fawn green perfectly plaid paper, with a grassy edge attached to each one. I also added a blue watercolour paper stitched rectangle to the back panel, along with a grassy border.

I adhered the fairies and butterflies on acetate strips so they pop up and appear to fly when the box opens. I tried to fill the box out more this time, with lots of flowers in each layer. 


As the fairy house is meant to be in the forest, I added a green hillside and trees to each side panel to bring the scene out more.

The panel at the front has a heat embossed greeting from the Lawn Fawn Fairy Friends stamp set.


I had fun making this box card and am looking forward to seeing my niece's reaction when she opens it to see Sleeping Beauty and the three fairies inside.

Thanks for joining me today,
Gemma

Lawn Fawn Scalloped Box Card Pop Up

MFT Trees in Forest

MFT Watercolour Wash Paper

Lawn Fawn Perfectly Plaid Paper
MFT Grassy Hills dienamic
Lawn Fawn Fairy Friends
MFT Once Upon A Time


Tuesday, 4 July 2017

Shake those Jelly Beans!

Happy Tuesday!

Today I'm sharing some jelly bean birthday cards. I just love their funny faces!
 

I used the companion shaker die set with the Lawn Fawn How You Bean? stamp set to make some shaker cards. I've been making multiples of my cards recently as, once everything is out on the table, it doesn't take much more time to make another card or two.


To start, I stamped loads of the jelly beans and coloured them in with alcohol markers, in a rainbow of different colours. I also stamped some of the jars, lids, and labels. I stamped a face on each jelly bean too.

I used the shaker die set to cut out the jars, plus a layer of foam tape and backing panel for each. I adhered a group of jelly beans to each of the back panels, then added some loose jelly beans before sealing the shakers.
 

I chose some coloured card bases and die cut a rounded stitched frame rectangle for each. From some Lawn Fawn patterned papers, I die cut panels to go at the bottom edge, using scalloped and basic edge die cuts. I also ran these through my die cutting machine with the rounded frame so they would line up properly on the card panel.


Once these were adhered down, I added the shaker jar, some extra jelly beans falling down and the lid, leaving plenty of room for a sentiment.

Not wanting to cover those pretty papers too much, I decided vellum banners would be perfect. I stamped three banner from the Lawn Fawn Bannertastic stamp set with Versamark ink, then heat embossed them in white. I added some heat embossed sentiments, then die cut them with the coordinating dies. 


Vellum can be tricky to attach to a card, but some strong liquid glue strategically added behind the heat embossed areas works well.
 

I hope you like these fun shaker cards and the cheeky jelly beans!

Thanks for joining me today. As always, links to products used are below. 

Gemma

Lawn Fawn Perfectly Plaid Paper Pack


MFT Rounded Rectangle Frames
Lawn Fawn Bannertastic


MFT Stitched Scallop Edges
MFT Stitched Basic Edges

Hero Arts White Embossing Powder


Sunday, 1 May 2016

A Classic Vintage!

I have just one card to share this week and I hope it all schedules as we are away celebrating with the recipient on this BIG birthday!


I made an exploding box card which I think is a great card for a special birthday as it gives you lots of opportunities to have things jumping out like a jack-in-a-box.

I started with a A4 sheet of white card and scored it at 4, 14, 18 and 28cms across the landscape edge and at 12cm across the portrait.  This gives you the "box shape" plus a 2ish cm tab to stick it together with.  You then simply cut down to your 12 cm score line and fold one of the 10cm flaps and both of the 4cm ones to create the drop down flaps.   I covered the flaps with papers from Lawn Fawns' Perfectly Plaid paper pad   The main focus and sentiment come from Neat and Tangled's For the Record stamp set which was coloured with alcohol markers and fussy cut before being popped up on one of the centre struts of the box card.   This was emphasised by making some paper records using circle dies with an embossing mat to create the "rings" in the vinyl and using the same dies to cut a coloured centre before hand lettering the songs at the top of the charts in April 1967 as a personal touch.

The 50's were die cut from Lawn Fawn's Chili Pepper cardstock using MFT's Big Numbers Die-namics - these dies are the perfect size to make a bold statement for a special birthday!  To make them jump out of the box I added a couple of strips of thick acetate and overlapped them slightly.   The Happy Birthday die cut one the side panels is also by MFT and is currently out of stock but will be back with their new release this week.


NEWS FORM THE STORE:

  • The new release from My Favorite Things is in transit and should be live in store on Wednesday morning.
  • We have restocks of the lovely gold paint from Kuretake plus some water brushes to go with them which will be with us on Tuesday or Wednesday.   We have the normal gansai paints and more zig clean color pens and some NEW items on back order and they are due in May.
  • We are waiting on some more restocks from Altenew to ship and hope to have them this week at some point fingers crossed.
  • We have more of our felt sample packs on order and hope to have them in store this week.

Friday, 22 April 2016

Felty Fun!

Hi everybody,

Jill here, and this week, I'm playing with the newest addition to the store, by getting my fun on with some felt!


Tara has brought to us some gorgeous quality felt, in some beautiful shades, and it is just so much fun to play with!


One of my favourite techniques of all time is in-laid die-cutting, and I couldn't wait to see how it would look using felt, so thought I'd give it a blast.


I started by selecting the colours I wanted to work with, there's so many gorgeous shades to choose from, and at such an awesome price.  I wanted to test how well the felt cut intricate dies, with wee little fiddly bits, so opted for the Dainty Flowers die from Paper Smooches.  I cut the outline from grey, and opted for a bright teal and pink for my pretty flower petals, bright yellow for my flower centre, and a lush green for my leaves.  I didn't want to waste the tiniest scrap of my felt, so only cut tiny pieces over the small parts I needed.  I'm not gonna lie, it was a little fiddly, and took a little more patience than when using card and the pieces just pop out, but the texture and just the joy of using a different material made it well worth the little bit of extra time it took.


I used Stick-it on my most of my pieces as I thought it would help stabilise the material, but cut it without also and found the results pretty equal.  When cutting the felt, I made sure to run it back and forth through my machine a few times to flatten the fibres, and I definitely think that helps.
Once I had 'in-laid' all my gorgeous flowers back into my card panel, I cut Paper Smooches Awesome word die right across the front of my scene, exactly like I would with card, and cut the same die from black felt.  And here's where my daft head took over - I had added Stick-it to my piece of black felt, but accidentally cut the die from the wrong side, so the stick-it was on the front.  'Well I'm not wasting it', I thought, so in-laid it back in to my panel using a piece of clear tape across the back, and give it a gentle sprinkling of glitter to take advantage of the sticky front!


I used Mama Elephant's Index Card Creative Cuts to cut a grey mat, and used a piece of patterned paper from Lawn Fawn's Perfectly Plaid 6x6 pad as a back drop.  I added a couple of heart enamel dots to embellish, and there you have it!
It's a massive thumbs up from me for the felt, I absolutely love it!  So much fun to use, and so lovely to be able to add such fabulous texture to your card!
As always, everything I used is linked below so I hope you have time to pop along and take a look for yourself.

Thanks for stopping by, see you next week.

Jillx


Marvelous Monochromes Felt Pack  Princess Pinks Felt Pack  Tropical Teals Felt Pack  Yummy Yellows Felt Pack  Garden Greens Felt Pack
Dainty Flowers Dies Image 1Awesome Die

Perfectly Plaid 6x6 Paper Pad    Index Card Creative Cuts Image 1


Stick It - LARGE