Wednesday 28 February 2018

Bee Thankful, Just Bee-cause!

It's a bee-autiful day today, even if it's just below freezing! My project today features the cute MFT Meant to Bee stamp set.


I started out with some blending cardstock, stamping out multiples of everything but the sentiments in the set with some MFT Black Licorice Hybrid Ink and used my alcohol markers to colour them in. I then cut them out as I don't have the coordinating dies.

I wanted some colour in the background of my card to make the bright bees and hives stand out so I blended on some Distress Oxide Ink in Broken China onto a top-folding A6 card base. For added interest, I then layered some more ink using the Hero Arts Honeycomb stencil. Once dry, I layered on the die cuts directly to the card base.

I die cut the smallest banner from the Lawn Fawn Extra Sentiment Banners set and clear heat embossed one of the sentiments from the stamp set. Next, I die cut the Lawn Fawn Scripty Thanks from some black card stock. I layered the sentiments together underneath the hive and covered the 'thanks' with some Glossy Accents.


This makes for a bright, bold, happy thank you card that any beekeeper would be grateful to receive, I'm sure!

Thanks for reading, have a buzzing day!

Tallie


Tuesday 27 February 2018

Ninja Off the Edge Die Cutting

I was inspired by a recent video that I saw by Jennifer McGuire, where she used selective die cutting to create a fun top edge to a card.

I love to find additional ways to use coordinating dies, so I thought I'd try making my own version with the tiny ninjas.


My usual card base size is A6 so I began by cutting a piece of white card at A5 size (148 x 210 mm). Along the shortest edge, I drew a faint pencil line down the card at the mid point (105 mm) I positioned four dies so that the bottom edge of the dies were below the pencil line.

When running it through my die cutting machine, I placed the top cutting plate so it lined up with the pencil line. It then cuts only the portion of the dies above the pencil line.


Using a craft knife, I cut away the rest of the card above the line. I then erased the pencil marks.

I stamped the ninja images on the die cut shapes, then coloured them with alcohol markers. I masked the images, then blended on some distress oxide inks and flicked it with water droplets.

I cut down a landscape top folding A6 card base, so that once the die cut piece was added to the top, it still fits into a C6 envelope.


Before adding the top panel, I trimmed the panel down a little more so that I could add some black and white patterned paper to the bottom edge. Once I'd adhered the die cut piece to the card base, I added a birthday sentiment to finish the card. 


I recommend watching the video by Jennifer McGuire to see this technique in action. It's easy to do and is a great effect on a card. It’ll work with any stamps and coordinating dies too. I made a similar card with the MFT Monster Sized stamps and dies, and I'll definitely be making more cards like this as I love the technique.

Thanks for joining me today,
Gemma

Mama Elephant Tiny Ninjas Stamps
Mama Elephant Tiny Ninja Creative Cuts


Monday 26 February 2018

Modern Coffee

Hi there, Jenny here on a Monday morning and I'm on the coffee again!!!
Yes I'm drinking it and also re-visiting the Coffee Date stamp set from MFT. 
Last time my card was retro and.... erm... quite bright!! This design is still colourful but has more of an abstract/modern  
edge to it and I was totally inspired by this picture on Pinterest...


 Those solid shapes of colour have such an impact and I knew I wanted to try 
it with this set straight away.

I arranged the images in my stamp press and used Memento ink to stamp them, that way I knew 
the black wouldn't smudge when I added the colour on top. I used strips of masking tape to make
 the random shapes and daubed on distress inks.
I had left the stamps mounted in the stamp press so I returned the panel of card to the exact same position 
and re-stamped the images in black Versafine ink to give a deeper black line.


The Mama Elephant Occasional Labels has a great choice of sentiments and they were perfectly sized to fit 
the space left. I stamped them on a scrap of white card and trimmed around them with a craft knife
 and ruler.... that way they look more like Dymo labels.


Thanks for stopping By :)
Jenny x

Sunday 25 February 2018

For the Love of Topiary

You know the saying, you wait ages for a topiary set to come along and then 3 come out at once (or is that buses...)  Well I was very excited to see all of them as I adore topiary - the first thing I bought for our new house was a bay pyramid to put my the porch now we have one!  However the stamped versions are much easier to take care of than the real stuff (I gave up on topiary balls years ago as I could never get them right)  So this weekend I have been playing with all 3 sets as they are very different.

I started off with the layered designs from Hero Arts - they are really fun as each "topiary element" is made up of 3 different stamps so you can ink each up in a different ink to get a multi-shaded design really easily.


The heart shaped one on the right is the Layered Topiary Stamp and Cut set and you get the matching dies included with the stamp set and its a really easy set to line up the layers on as the shape is very obvious.  The triple ball on the left uses the Layered Topiary stamp which is a bit trickier and I'll share some tips below to make it easier once you've done a test stamp ;-)   I like the matching dies for this as you get the individual balls AND the triple stack as one shape as I've used here so you get much more variety from your dies which is rare.

Now to line them up, I had a couple of attempts that looked frankly awful so I had a look at the packet to see if there were any clues and there are indeed.  The back has a line up guide for the two largest balls.


What I did was stamp each ball on some scrap paper using very different colours for each layer, following the orientation on the stamping guide.  Once I'd got a "perfect" one, I lined each stamp up over its layer (hence why its easier to test with say red, yellow and blue rather than 3 shades of green) and then I drew a little arrow at "12 o'clock" on each one - now when I stamp them again all I need do is make sure my little arrow points to 12 when I stamp each layer and we're good to go every time.

If you'd rather not do individual layers, then the Sugar Pea Design set - Topiary Gardens is the way to go.  This one has lots more options in terms of topiary shapes and each is just one stamp.  I've made a couple of different cards with this set in very different styles.


For this first one, I stamped the pyramids, the smallest ball, the bow and one of the pots and used the matching dies to cut them out set about recreating my front door using the Lawn Fawn Shut the Front Door die to create the door (with a little pencil shading to emphasise the panels)  I just used the English Brick Wall Stencil and sponged a little grey ink to turn the card front into a house and finished with a sentiment from the stamp set.

Finally I wanted to have a go and creating a full on topiary garden and thought this set would lend itself to making a little water colour painting.


I used some smooth water colour paper and did a very subtle background wash using the Avery Elle Liquid Watercolours.  Once that was dry I used my zig markers to ink up my stamps and used the small ball to create a box ball hedge - using masking and perspective to get the sort of squares you get in very formal topiary gardens.  I used the same techniques to add the planters and hearts and used a little water to blend some of the stamping out to get a softer water colour feel.  I over stamped the hearts again in a darker shade to bring back some definition as they are the focal points.  Again I finished with another sentiment from the set.


 NEWS FROM THE STORE

We've got quite a lot of stock to load this week - we'll do our best but we are also really slammed with orders and I can't pack and load at the same time, so please don't expect miracles!  We will hopefully have the following in store by next weekend:
  • Waffle Flower
  • AlteNew
  • Flora and Fauna
  • and Stamping Bella.
That's about it for news this week.  Catch you next weekend and wrap up warm!

Tara


Saturday 24 February 2018

Hello Birthday Girl

Hey stampers, Anni here!

It's VERY cold right now over here in Germany! I can't wait to spring to begin but the weather forecast isn't very promising: -10 centigrade amd snow coming.
So I had to include some spring feeling into my card. For this Mama Elephant's Botanic Hello is perfect. Love all these flowers and the sentiment comes along!


I stamped the image with an embossing ink onto a piece of watercolour cardstock and heat embossed it in white because I knew I wanted to use my ZIG Clean Colour Real Brush Pens. You know I have this thing with flowers and watercolours. And the ZIGs are so easy to use.

I always colour one petal at a time, leave it to dry working on another petal and coming back to the former petal to add another layer. I start at the area I want to be the darkest and then work my way up to the lighter areas. The letters I lfet white. When the whole piece was dry I added some shadows with a coloured pencils.


After I finished the colouring I started the fussy cutting. And I really fussy cut everything, not only the outer edge but also the tiny spaces in between the flowers, leaves and letters. I wasn't that bad because I find that the embossing makes the fussy cutting easier.

Then I adhered the image to a matching cardbase with dimensional adhesive and added some gems.

Thanks for stopping by and have a crafty weekend.


Friday 23 February 2018

Sparkle, Paste, & Acetate.


Hi everybody,

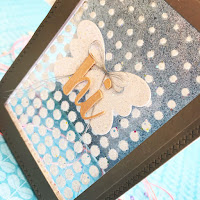
Jill here, and this week I’m experimenting with texture paste on acetate...


...& adding a ton of sparkle because who doesn’t love a bit of sparkle!


I started with a simple piece of acetate and a desire to make it sparkle! I used Altenew’s Halftone Stencil and spread a good layer of paste over-top, sprinkled with Lawn Fawn’s Chunky & Prisma Glitters, then set aside to dry.
I then covered a piece of white card in Stick-It and cut Lil Inker’s Stitched Butterflies from it, peeled back the Stick-It and, again, covered in Lawn Fawn’s Chunky & Prisma Glitters.
My ‘Hi’ is from My Favourite Things’ Hello There die set which I cut from card and heat embossed with Lawn Fawn’s Rose Gold embossing powder several times to create a nice substantial molten metal look element.
Once my acetate panel was dry I cut a frame from both my card blank and another piece of card, allowing me to sandwich the acetate in between creating a pretty sparkly acetate fronted card.
I built up my other elements and adhered in place, adding a silver bow to finish off.


I added a panel of silver sparkle card on the back of my card so the pretty went all the way through, and there you have it.
I love the way the texture paste has worked with the acetate and look forward to a little more experimentation!


As always, everything I used is linked below.


See you next week.


Jillx

Halftone Stencil Stitched Butterflies Die Image 1 Hello There Dienamics

Embossing Powder - Rose GoldGlitter - Chunky Glitter - Prisma

Thursday 22 February 2018

I Miss Hanging Around With You Monkey Card

Hi everyone, Taheerah here wishing you a happy Thursday!

I am absolutely terrible at sending out the cards that I make. There, I said it. I know I need to get better at it, but life always tends to get in the way! Anyway, I was missing someone and decided to create a card to let them know that.

Will they ever receive it? That's anybody's guess. *wry smile*

I have been wanting to ink up the SugarPea Designs Chunky Monkey stamp set for *ages* and was so glad of an opportunity to do so:


I just love that little cheeky monkey! Isn't he adorable?!


I started by stamping my little monkey, branch, and bananas using brown ink. I know we often reach straight for the black, but given there are so many brown tones in the colouring I think this just works better, don't you agree?


I coloured all my images with Copics before fussy cutting them out. I loved adding some fun additional details, like the spotting on the bananas!


I created a background on my car by blending a couple of green inks, a brown ink and a blue ink. I wanted to give the impression of a jungle in the distance, along with a hint of sky. I splattered on some water droplets and some shimmery mist for an extra touch then stamped my sentiment. I love the custom dimension that I get from using dimensional glue gel!


I'd love to hear what you think of this card. Is there someone you know who'd love to receive it? Thanks for stopping by!


Wednesday 21 February 2018

It's a Nutty Birthday!

Happy Wednesday! I'm back today with a bit of a nutty card. I love this set from Neat & Tangled and it's perfect for water colouring.


I started out by stamping the largest stamp from the Neat & Tangled My Favorite Nut stamp set on some watercolour cardstock with some Versafine Black Onyx ink. I then used my Zig Clean Color Real Brush Markers to colour them in, blending in the colour with some additional water and a paintbrush. Once dry, I cut this out with the coordinating dies.


For the card base, I lightly blended some Salty Ocean distress ink and splattered some additional splots over the blended ink. I popped the die cut up with some foam tape and adhered it to the centre of the card base. I wanted a simple sentiment to finish it off so I white heat embossed a 'HAPPY BIRTHDAY' from the MFT Essential Sentiments set onto a thin strip of black cardstock. A few sequins finish of the card nicely!


Tuesday 20 February 2018

Spring Bouquet

When I saw the new Spring Bouquet stamp set from Avery Elle, I couldn’t wait to colour the beautiful flowers.


One of my favourite ways to colour images at the moment is to use a mix of alcohol markers and coloured pencils, for a no line colouring look.

I began by stamping the large bouquet image with a very pale pink ink. I then used some light pink and green markers to add colour. I left some areas free of colour so they can be highlights on the image. 


By adding this layer of alcohol marker colour first, it covers a lot of the white card and adds a nice base layer on which to add the finer pencil details on top.
I used my coloured pencils to build layers of colour on top. I really love this process and find it relaxing. Though I am still learning, and every image is different, I recommend just having a go and seeing what you can do. 
To turn this into a card, I trimmed the panel down, added some gold sparkle twine, and used foam tape to add it to a kraft card base.

I then added some sequins and a banner sentiment, using a greeting from the same stamp set. 

Thanks for joining me today,
Gemma

Avery Elle Spring Bouquet
Lawn Fawn Gold Sparkle Twine
MFT Stitched Sentiment Strips