Showing posts with label lawn fawn. Show all posts

Monday, 12 December 2016

Quick & Simple Notepads


Hi there :)

I have a bunch of quick jotter pad gifts to share with you this week, they really 
are simple to make and would be ideal token gifts for friends, family and teachers.


These are slim, shop bought notebooks that have had their front 
covers removed, so I could replace them with my own decorated jacket :)
All you need to do is cut a strip of card the same width as your notebook and then
 measure and score two lines so you can wrap the cover over the top spine. 
You will need to allow an extra inch of card so you can attach the cover onto 
the back of your notebook....
 you could even adhere a magnetic strip for attaching to a fridge!!

I used Altenew's Garden grow for this cover and water coloured the images using
 Distress inks, the lettering is an old Hero stamp set in my stash.


This cover has been stamped using Altenew's water colour wonders 
and the Perfectly Penned alphabet by Concord & 9th (more stocks will be here this week)


These next two were such fun to create using Lawn Fawn Stamps... I went through my stash and pulled out all of the sets with images you'd find on a shopping list and arranged them on my MISTI so I could stamp one on Kraft and one on white


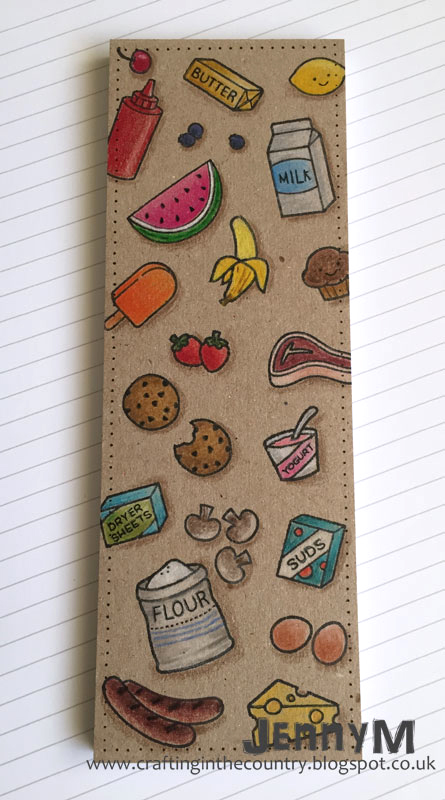
I used Polychrome pencils on the Kraft and Copics on the white then white heat embossed the Shop, Shop Shop wording with Mama Elephants Hollow letters on black card before I added shading with a white pencil


I used 10 different Lawn Fawn sets so here are the links minus the pictures...


I hope these have inspired you, as you can see the covers can be decorated 
in any style to suit the recipient and would be great makes for children to help with too :)

Thanks for stopping by :)
Jenny x


Wednesday, 21 September 2016

Hello Autumn


Hello.
As the weather starts to cool and the evenings get darker I was inspired to make an autumnal style card.


To start I stamped and heat embossed some of the leaf images in red and gold embossing powers.
I then die cut the card with the scalloped rectangles from Lawn fawn and distressed the edges.
 And then I splashed lots of the gold gansai tambi water colours on the panel before die cutting again with the stitched rectangles.
I then water coloured a panel with more gold , while that was drying i die cut the hello.
the gold panel was placed behind the hello and then I added some red twin from Lawn fawn before adhering with foam tape. 
I didn't want to added to much embellishment as the gold embossing powder has a sparkle to it.


In Bloom:  Renees Leaves

Thanks for looking.


Wednesday, 3 August 2016

Tickled pink


Hello.
I'm back from my blog break today, thanks Tara for filling in for me.
Today i have a card using the fun hogs and kisses stamp set from Avery Elle.


I wanted a clean and simple card but have used a bright colour to add a bit of impact.
To start I stamped the pig image onto my water colour card panel.
He was then coloured with Inktense pencils and a water brush.
Once it was dry I the water coloured the whole panel with distress ink.
For the main sentiment i i have die cut the scripty thanks from Lawn fawn in black so that it stands out.


Hogs & KissesScripty Thanks Image 1

Thanks for looking.

Wednesday, 22 June 2016

Sweet smiles


Hello.
I have this fun gumball shaker card today using Lawn Fawns sweet smile stamps and dies.


I die cut the gumball machine first then coloured with copics. 
Next I die cut a circle from the centre.
Then with the banner die cut panel i used the same circle die to make another hole and placed the gumball machine there.
I added a shaker pocket behind the hole so that the sequins look like sweets or gifts.
I used the sentiment from baked with love along with bannerific to finish the card,


Sweet Smiles Image 1Baked with LoveStitched Party Banners Lawn Cuts

Thanks for looking.

Tuesday, 31 May 2016

Reverse Whatsitsname!


Hey! Hope you're having a good day!
I was lucky enough to have a day in the beautiful Lake District. Being surrounded by gorgeous scenery and gardens made me think of this stamp set and I wanted to try a little reverse dimension.
I've used the Lawn Fawn 'Gleeful Gardens' set- which is just the cutest


 I wanted to start with the largest image at the top and then add the elements getting smaller behind it.This picture gives you an idea of what I mean.
To be honest, once I'd made it, I wished I'd just created two circular frames and added the elements after. Instead I just cut out around the images which was less precise. I added 3D foam behind each layer.
I've tried googling and asking what this technique is called. I thought it might be pyramage; but it isn't. Reverse decoupage is about the best I could come up with, so if any of you know, please enlighten me!

Sweet and simple from me this week. Do give this one a go- it's an easy way to make scenes without really trying!

See you next week!


Wednesday, 11 May 2016

Sending love


Hello.
I've been mixing and matching some Lawn Fawn for today's card.
Even though I've used three stamp sets and three dies I still kept the design fresh, clean and simple.


I started with a scalloped rectangle of  lawn fawn patterned paper and added it to my card base.
Then I thought about changing the way I used my scallop dies and decided to cut a die cut scallop frame so that I could make the scallops go inside another stitched frame.
I simply cut it into four, one cut at each corner and then turned them around to face inwards.
Then I cut four of the scripty love die and layered them up to get a thick like chipboard die cut and covered in wink of stella.


The fairy is coloured with Inktense pencils and a water brush and then fussy cut.
Her wings are also sparkly from some wink of stella.
 I snipped  around her arm so she could hold the envelope from gleeful gardens.
To finish the sentiment I have use part of the sentiment from the mini hedgehugs set.
To finish I added some sequins.


Fairy FriendsGleeful Gardens Image 1Hedgehugs Image 1

Scripty Love Lawn Cut Image 1Scalloped Rectangle Stackables Lawn Cuts Image 1Large Stitched Rectangle Lawn Cuts Image 1

Thanks for looking.


Wednesday, 20 April 2016

Unbelievable


Hello,
Today I have an unbelievable birthday card. 
Well its not lol but that is the fun sentiment from the Lovable legends stamp set from Lawn Fawn.


I stamped and masked the big foot on to kraft card.
Then coloured them using Prisma color pencils. 
Its not perfect colouring as I wanted a rougher look so have used little swirls to create different textures to the fur.
I used the icicle die cut for my grass and added a couple of layers. 
The sentiment from the set is combined with the a birdie told me stamps and dies.
I added a scalloped frame from some black polka dot paper also from Lawn Fawn.

Lovable LegendsA Birdie Told MeScalloped Rectangle Stackables Lawn Cuts Image 1

Lets Polka in the Meadow 6x6 Paper Pad

Thanks for looking.

Wednesday, 30 March 2016

Donut worry ....Be happy!


 Hello.
I have two cards today both using the super cute and excellent value mini "Donut worry"stamp set from Lawn Fawn.


The first card I have used Kraft card and stamped the donut image all over in black ink. 
Each one was then coloured with prisma co,or pencils and the I have added clear wink of stella over the top so that they really sparkle.
Initially I was planning on keeping this a one layer card but then decided to use the A birdie told me stamps and dies to make some speech bubbles for the sentiment.
I then added another donut on foam tape.


The next card uses just the mini set. 
I started the same way as the previous card but this time using water colour card and zig pens and inktense pencils to water colour the donuts.


I still had to add the wink of stella over each one it just looks so sparkly when you  move it in the light.
The sentiment is simply added on a stripe of white card and then I stamped coloured and cut another donut and added to the card on foam tape.
To finish I added some sequins.


Donut WorryDonut Worry Lawn Cuts

A Birdie Told MeA Birdie Told Me Dies

Thanks for looking.

Wednesday, 16 March 2016

Happy birthday to you


Hello.
I always find boy cards especially teenagers cards tricky to make.
My son will be 14 soon so I decided to give to a go using some Lawn Fawn stamps and dies.


I started with the happy birthday border die and cut it repeatedly from some lawn fawn paper.
Once they were all adhered to the card blank I added a die cut frame using the stitched rectangles.
To make it more suitable for a boy I used a robot from the beep boop stamp set and coloured it with prisma color pencils before die cutting it.
To finish the robot is holding a 1 and a 4 from quinns 123 dies.

Beep Boop Birthday Image 1 Happy Birthday Border Lawn Cuts Image 1

Quinn's 123 Dies Image 1

Thanks for looking.