Showing posts with label Lil Inker Deco Edges. Show all posts

Monday, 16 July 2018

Colour Blocking

Hello, Gemma here today, sharing a card featuring colour blocking, This is definitely one of my favourite looks. I’m teaming it with navy and rose gold, a favourite colour palette of mine.


I took a piece of Lawn Fawn Blue Jay card stock, and trimmed it down to create two panels. 

On one panel, I added some stencil detail with the Altenew Scallop Builder stencil and Hero Arts Unicorn White pigment ink. This ink looks more light blue on the blue jay card stock, so if you wanted bright white, you could use versamark ink and white embossing powder instead.


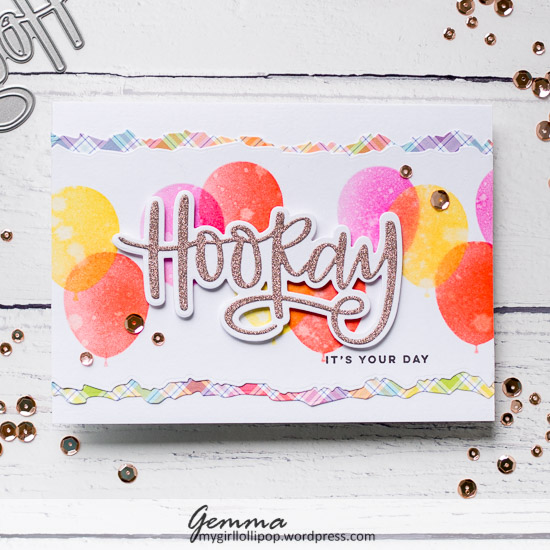
I used the Lil'Inker Designs Deco Edges to add a fun edge to both pieces of card, then layered some rose gold glitter paper behind each, die cut with the same deco edges.

I added both panels to a white card base, then added a stamped sentiment from Avery Elle below, using a dark blue ink to match the card stock. The set I used is out of stock but here are a couple of lovely sentiment sets that I think would work well with this design: Reverse Confetti Birthday Wishes or Hero Arts Hand Drawn Everyday Messages Set.


I finished with some enamel dots in complementary colours. Some tonic nuvo drops or sequins would look lovely too.

Thanks for joining me today,
Gemma

Altenew Scallop Builder

Hero Arts Unicorn White Ink

Lil'Inker Designs Deco Edges

Lawn Fawn Blue Jay Card


Tuesday, 21 November 2017

Belle of the Bauble

Today I have another card to share using the WPlus9 Holiday Trimmings stamp set. 


I was inspired by the cards I’d seen using this set, showing a row of baubles, but wanted to put my own spin on it. This card was simple to mass produce (I made 8 in one crafting session) so perfect for quickly making a batch of Christmas cards.

I did all the cards in stages, and started with the stamping. A stamp positioner is a big help for this part. Once I’d stamped all the baubles, I heat embossed in silver, the decorative elements. Then I added the sentiment in black ink.


Next, I cut down the stamped panels with the Lil’Inker Deco Edges. I did the same with some silver glitter card, layering behind the stamped panels before adhering to card bases. I kept the layers flat, so they’d go through the post easily.

Thanks for joining me today,
Gemma

WPlus9 Holiday Trimmings
Lil'Inker Designs Deco Edges
Hero Arts Silver Embossing Powder


Tuesday, 7 November 2017

18th Birthday with Texture Two

Today I’m sharing a card I made for an 18th birthday. I wanted to create a fun patterned background so chose the Flora and Fauna Texture Two stamp set.


I die cut a stitched rounded rectangle from white card, then stamped different patterns from the set with some MFT inks. To add a pop of metallic to the card, I heat embossed some patterns in gold.

To bring more of the colours from the stamping into the card, I used the Lil’Inker Designs deco edges to trim the white card panel, then added some more deco edges in gold glitter paper and blue card to the top and bottom of the panel. I then added this to a white card base.

For the balloon, I decided to only use the border of one of the C&9th Happy Balloons die set, as I wanted the background to show behind. I die cut it from the same blue card as the border.


I used another great C&9th die set to add an '18' to the balloon, in gold glitter paper. I also added the balloon string and tassel. To finish, I added a few sequins.

Thanks for joining me today,

Gemma

Flora & Fauna Texture Two
C&9th Happy Balloons
C&9th Double Cut Numbers


Tuesday, 17 October 2017

Hooray for Balloons

I love big sentiments on cards and the Neat & Tangled Hooray is so fun! That font is gorgeous and works so well as a focal point.


For my card this week, I teamed it with the balloon duo stencils, also from Neat & Tangled. These stencils are really clever.

I began by using the stencils to add balloons across a piece of white card. By using both of the stencils, you get the lovely effect of balloons layering over each other.


I cut down the white panel with the Lil’Inker Deco Edge Border dies. Another new favourite of mine, these allow you to get a ripped edge effect with more control than just tearing the paper.

I used these dies again on a piece of patterned paper, and layered it behind the white panel, before adding them to a white card base.


Next, I die cut the Hooray word die from glitter paper. 8 did cut the shadows from white card, which allows the word to stand out from the background.

To finish, I added a stamped sentiment underneath and a sprinkling of sequins.


I loved the finished card so much, I just had to make some more in different colours. Do you have a favourite?


Thanks for joining me today,
Gemma

Lil'Inker Deco Edges
N&T Balloon Duo Stencil

N&T Hooray

W&W Sentimental Birthday

Lawn Fawn Perfectly Plaid Rainbow