Showing posts with label Christmas. Show all posts

Thursday, 12 December 2019

Tidings Of Comfort & Joy

Hey!

Happy Thursday. I'm back today with a couple more Christmas cards to share with you. Serious panic mode has set in and I need to make as many as I can before the last posting dates. I do this every year and really should be more organised!

I decided to use the recently released WPlus9 Winter Greenery clear stamp set as I'd not got round to inking it up. 


The leaf stamps were what originally caught my eye with this set, along with the beautiful sentiments, so this is what I focused on for my two cards.


For this first card I decided to use traditional Christmas colours and added some sparkle embossing to add a little Christmas magic. 


As usual I used my 'go to' Altenew ink colours as they really do take the thinking out for layering stamps. The leaves in the set are really easy to layer too, with or without a stamping tool.

Lastly I saw a card by Jessica Frost-Ballas HERE and just had to use the non-traditional colour scheme she had used. AND I LOVE the result!


I am a total sucker and love of grey! I love the Winters night feel this card has and added some white gel pen snowflake dots for that little bit of Christmas magic! 


That's all from me today, I hope I have inspired you with your last minute Christmas card ideas!

Crafty Hugs 
Bev

Products Used:-

Altenew Tropical Forest


Thursday, 31 October 2019

Good Things Come In Small Packages!

Hey!

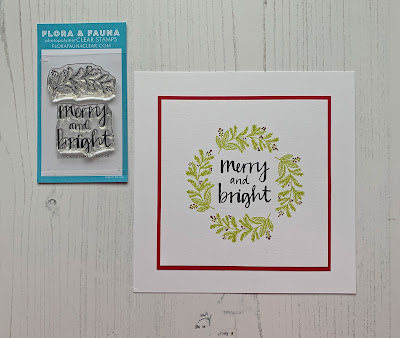
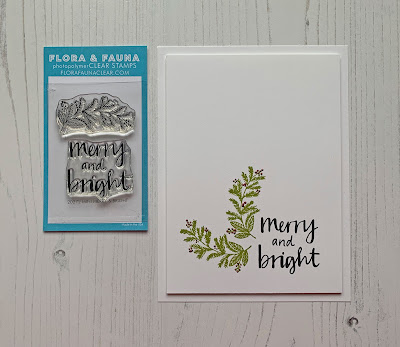
Today I wanted to share the fun and creativity I have had with one tiny stamp set from Flora and Fauna, the Mini Merry & Bright stamp.


This is my first purchase of Flora and Fauna products, so I wasn't sure how 'mini' the stamp set was, but gaging from the £3.95 price I knew it would be fairly small. This didn't put me off, it inspired me as to how creative I could get with these two stamps! 

First of all I wanted to use the foliage stamp to create a wreath, with the sentiment stamped inside.  This is really easy to do with a stamping tool and I also used a homemade wreath building template to guide me. There are lots of templates & guides on Google.


For this card I decided just to stamp the foliage four times to create a circular wreath. I was tempted stamp another four times to fill the gaps with a darker green ink, but I didn't want to loose the detail of the beautiful image.


Again I used a stamping tool to stamp the sentiment and I also added some very fine dots of coloured dimensional to the itty bitty berries in the stamped foliage image. I felt this added a lovely realistic finish without going over the top.

Next I went for another clean and simple design, using the foliage to accent the sentiment rather than frame it.


For this card I stamped the foliage in a slightly darker Altenew green, Moss. This is one of my favourite greens, especially for Christmas cards. Again I added some very fine dots of coloured dimensional to the itty bitty berries in the stamped foliage image. 


Lastly for today I stepped out of my comfort zone and used a coloured card base, along with a less clean and simple design.


For this card I again used the darker Moss shade of Altenew ink and randomly stamped the foliage image onto my green card base. I then added all the fine dots of coloured dimensional to the itty bitty berries in the stamped foliage image! This was quite time consuming, but the results are so pretty.


So you can gauge the size of the stamps a little, the sentiment on this card is stamped onto a 4.5 cm square piece of white card and embossed with gold embossing powder. I then adhered it to a 5 cm square piece of red card and adhered it to the card using foam adhesive. 

That's all from me this week, I hope I have inspired you to give these mini clear stamp sets a try! Have a lovely and safe Halloween if you celebrate and don't eat too many sweet treats ;)

Crafty Hugs 
Bev x

Products Used:


Friday, 11 October 2019

Festive Friday!

Hey!

It's Bev here (again). I'm stepping if for Tara this week as she gets some important accounting done and she promises to be back in a couple of weeks with a bumper issue of Found on Friday.

Did you see the NEW MFT Release this week? If you didn't you must have been hiding under a rock or you are avoiding Christmas OR you are so scared your bank balance will be wiped out in an instant that you daren't look!

Well, I looked and caved for more than I intended! Isn't that always the case?! My goodies arrived on Thursday (my selfie day) and I couldn't wait to ink up the new Christmas sELFies clear stamp set...


Now, I'm not big lover of cute, I've never been one of those types of girls. But this set is just my style of fun and cute. Plus I have a thing for polaroid photos!


This first card was pretty quick to make. I used colour pencils to colour the image and when I am excited about a new stamp, I opt for quick flat colouring with minimal fuss and shading. Which is exactly what I have done with this image.


Next, I had a fun layering design in my head in which I was able to use all of the sELFie images from the set.


This was so fun to make and the masking was super quick too, with the images being square. Again some quick simple, flat colouring and one of the sentiments from the set & I was done.


That's all I had time to make yesterday using this set, but I am sure I will be reaching for it again soon!

Now if you've had your eye on this set, you might want to snag one quickly HERE before the stock Tara ordered in of this one has gone, it's going FAST!

Thanks for stopping by & have a wonderful day!

Bev

Thursday, 10 October 2019

Dreaming Of A White Christmas!

Hey All & Happy Thursday!

With Christmas only 11 weeks away, I thought I had better make a start on my Christmas card stash. Yep, I am usually one of those leave it to the last minute and panic kind of Christmas card makers, but I am doing my best to not let that happen this year ;)

I am also one of those people who constantly dream of a white Christmas and I absolutely LOVE snow and snowflakes! 

So when I saw WPlus 9 Merriest Snowflake clear stamp set, it had to come and live with me and I've used it for a trio of cards to share with you today.


For my first card I kept things really CAS, but with a lot of sparkle! Christmas card making is the perfect time to dig out those sparkly embossing powders & metallic inks we all hoard ;) 


This stamp set contains a lovely large snowflake wreath image, which I stamped in silver metallic ink, heat embossed with some sparkly embossing powder and coloured with blue alcohol markers. I also added some clear dimensional to the centres of the snowflakes which make up the wreath. The sentiment is one of the smaller sentiments, stamped in VersaFine Onyx Black ink and adhered using foam adhesive. 


Next, I wanted to used the large snowflake wreath image as an all over background and I've been itching to give the Hero Hues Paradise premium card stock an outing. 


This is one of my favourite colours and it makes me happy to pair with snowflakes too! Again, I have stamped the image in silver metallic ink, heat embossed with some sparkly embossing powder. 


I then added the 'merriest wishes' sentiment, stamped in VersaFine Onyx Black ink and heat embossed with sparkly embossing powder. Some glossy white dimensional drops were added to the snowflake centres finished my design. 

Lastly I have a really quick CAS design...


I used a combination of the sentiments accented with the small star image, all stamped in VersaFine Onyx Black ink and heat embossed with sparkly embossing powder. 


I added some coordinating colour to the stars to match the Hero Hues Paradise premium card stock I have used as a mat layer. 

That's all from me today, I hope I have inspired you a little with your Christmas card making. Thanks for stopping by & see you again next week :)

Crafty Hugs
Bev 

Products Used...


Tuesday, 8 October 2019

Merry and Bright


Hello, it's Liz here today. The Christmas box has been moved to the front of the crafty cupboard and I've made a start! My card features two stamp sets both by Wplus9. The sentiment panel and flowers are from the Be Merry set and the reindeers are from the Santa's Reindeer set. I love the mix of modern fonts and the quirky way the reindeers have been drawn.

I have the matching dies for both of these stamp sets (you can find them here - Be Merry and Santa's Reindeer)so this card was super easy to make, just some quick colouring with my markers and job done. I didn't add any finishing touches or embellishments as I wanted to keep the look clean, modern and fresh, I hope I pulled it off!

Thanks for stopping by today, happy crafting!


Wednesday, 2 October 2019

Snow Friends One Layer Scene

Hello, Tallie here. Today I have a one layer winter scene featuring the Snow Friends stamp set from Mama Elephant's latest release. I've really been into creating one layer scenes recently so I wanted to keep the design simple so the colouring would stand out.


I started out by planning out my scene so I knew what order to stamp the elements in - 1) Bunny and Dog, and 2) Bear. I stamped the bunny and dog snowmen first with some MFT Extreme Black ink onto some blending cardstock, covering with some fussy-cut masks once dry. I could then stamp the larger bear snowman so it was in the background and again cover with a mask.

I wanted to create a circular focal point to the card so I used an MFT Stitched Inside & Out Circle die to create my own acetate stencil. I layered this over the stamped scene and blended on some Distress Oxide Inks in Faded Jeans, Peacock Feathers and Cracked Pistachio. This is my favourite winter sky combo!


After removing the masks, I added some colour to the scene using my alcohol markers. I stuck to more muted accent colours rather than bright reds, greens and purples.


I wanted to keep it simple so I chose one of the sentiments from the Mama Elephant Scripty Xmas stamp set, centring it just below the scene.

A few last accents with a white gel pen to make it into a snowy scene finished off the card.


Hopefully it's not too early to start inspiring you with my Christmas cards! :)

Thanks for reading, catch you next week.

Tallie


Wednesday, 19 December 2018

Meowy Christmas!

Hello, Tallie here, sharing one last Christmas card with you. This is probably my most favourite of those I made this year so I saved the best until last! I've said this already when I posted my last card featuring this set, but these Mama Elephant Oh Kitty Tree stamps are purrrrfect for practicing my colouring!

I started out by stamping the big kitty tree from Mama Elephant Oh Kitty Tree onto an A6 panel of blending cardstock. I used MFT Extreme Black ink and coloured in with my alcohol markers.


It took me a while as I wanted to make all the kitties unique. I ended up using about 30 different markers in total! I kept to traditional festive greens and reds for the accessories. I used a couple of blue-green markers and a colourless blender to give some colour to the background.

I stamped the sentiment from the set centred at the bottom of the kitty tree and used some gel pens to add some details - snow in the background and details to the accessories.

Thanks for tagging along with me for this year, I hope you've found some inspiration. I wish you and your families a very happy holiday season and I'll see you back in the New Year!


Tallie