

Hi there everyone and happy Thursday!
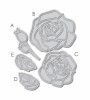
Today I'll be sharing with you how to get the look of a partial die-cut cover-plate with separate outline dies. I will be using Wplus9 'Outline Rose Die' but dies in the same style as these would work too.

I started by cutting the full leaf at the bottom, I placed the leaf in position then ran it through my Bigshot. I removed the leaf die and die-cut, leaving the rest in position and then cut the rose behind it. It does take a little time cutting the design bit by bit but it's worth it- you need to remember to work from the foreground to the background as the images you cut first will appear more forward as they will be most full.

As I cut the images I arranged them in place on my desk so I knew how the 'jigsaw' would fit together when putting it back together. When I was finished cutting the design I cut a piece of acetate and added the left half (the uncut piece) to it and then added the 'jigsaw' pieces into place.

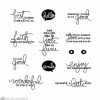
I stamped the sentiment from Mama Elephant 'Everyday Greetings' and layered this on some soft grey card before adhering to my card base and adding some clear sequins.
Thank you so much for stopping by and I hope you give this technique a try.
Hugs Lydia x
Absolutely amazing card, very clever design Lydia, I love it.
ReplyDeleteWhat a clever and very creative idea! And the card is just stunning!
ReplyDeleteAnni
Wow! Absolutely stunning. xx
ReplyDelete