Friday, 23 August 2019

Grungy Classic Vinyl Record Wall Art

Hi everyone, Taheerah here wishing you a happy Friday!

As you'll probably remember, I love the vinyl record trend and already had a stab at a masculine card with the Avery Elle For The Record stamp set (if you want to check out that post it's here). Today though I finally got a chance to break out the SugarPea Designs Greatest Hits stamp set as it is back in stock at long last!

I decided to go all-out and use a few different stamping techniques and ended up with something more like a roughly 8"x6" piece of art that I could hang on the wall:


Awesome, right?!


I stamped the record image over and over again using a variety of colours. But, look closer! You'll see that each of the records has a grungy/rustic/distressed look that I created with the help of a few household objects!


I used a face cloth, scrunched up wrapping paper, scrunched up tissue paper, a balled up piece of kitchen towel and various inks to create each record!


I used the items to dab colour away and/or to sponge additional colours on. No two look the same and the end result is awesome!


I stamped the labels with contrasting colours for each record, stamped the sentiment using Versafine Onyx Black ink (the big one is out of stock but you can still nab the cube!), and then came the fun part - lots and lots of splatter!


I'd love to hear what you think of this. Is there someone you know who'd love to receive it? Thanks for stopping by!


Thursday, 22 August 2019

Summer Goodie Bags

Hey stampers, Anni here!


You may have already noticed that Anna and I swapped post days. She covered last Saturday for me. But after today we will be back to our regular schedule.

From time to time I meet with some crafty friends and often we exchange little gifts. Of course (as crafters) the gift box is usually more intresting than the gift itself (most of the time some sweets or chocolate).

For our last get together I made these boxes using Lawn Fawn's Goodie Bag die.


I die cut all the pieces I needed for four goodie bags at once from white cardstock. As I wanted to create a beach scene I added some ink blending in turquoise for the sky and some beige for the beach. I added a lot of splatters of water and white and dark brown ink.


To decorate the gift boxes I stamped a lot of Mama Elephant's Beach Chickies in a very light ink. I coloured the chicks with coloured pencils in the no line technique. There are coordinating dies available.


When I put the images on the goodie bags the background was way to dominant. To tone it down I wanted to add a circle of vellum. My Favorite Things' Jumbo Peek-a-Boo Circle Window had just the rightsize.

And finally for the sentiment I went with one of my go to sentiment sets: Mama Elephant's Mini Messages.


Wednesday, 21 August 2019

Hey Honey - Happy Bee-day!

Hello, Tallie here. I love the Hey Honey set from Sugar Pea Designs so I made a handful of different Bee-Day cards. These simple but bright cards are sure to put a smile on a few beekeeper faces!


I started out by stamping the bear, hive and bees the Hey Honey set in some MFT Extreme Black Ink onto some blending cardstock. I coloured the bear and hives in with my alcohol markers. For the bees, the stamp set has two separate pieces - the body and the stripe detail. I stamped the body in some Lawn Fawn Carrot and Sunshine ink, and then stamped the body detail in black over the top. I cut all the pieces out with the coordinating dies.


For the background, I blended on some Faded Jeans, Mermaid Lagoon and Broken China Distress Oxide Ink to contrast with the die cut pieces. I die cut a piece of kraft cardstock with a Lawn Fawn Stitched Simple Wavy Border die and white heat embossed several different sentiments from the MFT Meant to Bee set.


I used some foam tape to pop up the kraft panel and then adhered the bear, hives and bees in a scene behind. A few dot details with a white gel pen finishes off this set!

Thanks for reading, catch you next week.

Tallie


Tuesday, 20 August 2019

To The Birthday Girl


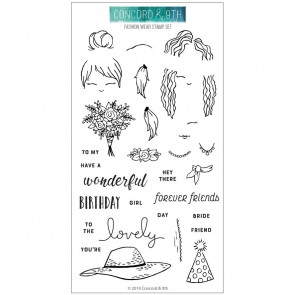
Hello, it's Liz here today. When I was little (I'm going to show my age now) I loved playing with those paper dress up dolls. The outfits had little foldover tags to attach them to the cardboard doll, hours of fun! Well this stamp set reminded me of those dolls. It's the Fashion Wear Stamp Set by Concord & 9th. You get two basic face stamps and then you can stamp different hairstyles and accessories. This means you can personalise for the recipient. There's loads of sentiments too!

For my card I used the largest die from the Wonky Stitches set by Avery Elle to cut a piece of watercolour card. I then stamped my girls using Versafine as I used watercolours to colour. The background patterned paper is from the Vintage Botanicals paper pad.

Thanks for stopping by today, happy crafting!


Monday, 19 August 2019

Golden Classic

I made this card a couple of weeks ago for a friend who is a music fan and 
seeing as the fab Greatest Hits stamps and dies are now
 back in stock I thought I'd share it with you.

I love the Classic reference in this sentiment so I thought I should 
pair it with a golden disc in a frame...


I've cut the record from gold mirri card and used one of the sentiments for the centre. 
To add some extra background detail, I cut the Musical Cover Plate in black card 
and then used a few of the notes in a random pattern behind the disc.

 The sentiment is embossed in gold... top tip... do this before you attach the mirri card 
disc as it doesn't like heatguns!! 😉 ( I learn't the hard way!)


The Rectangle frame is also cut in Gold Mirri card and the whole piece mounted 
onto a card base which has red ink blended around the edges... Gold Mirri card and 
red are probably the two worst colours/textures to photograph 
and I've put them both on the same card!! 🙄

Lets just say it looks better in real life!


Thanks for stopping by :)
Jenny x


Sunday, 18 August 2019

Sea Views

I've got a couple of cards to share today using one of the new larger sized Lovely Legs sets from Colorado Craft Company - the new 6x8 sets mean you either get one larger focal image (like the tree on the reflections set) as well as the fab sentiments or two images as here on the Man's Best Friend set.

I am really enjoying colouring these images at the moment so keep finding myself turning to their new releases every month.  My favourite colouring medium at the moment is pencils and they work really well on these detailed image.  My added trick with these ones is I have sealed them with Distress Glaze which stops the pencil coming off on your hands when you've finished.  I used both images in the set and did two different cards with them.


For this one, I had the pets looking out over a sunset so added some yellows, pinks and purples to the sky and a little bit reflected into the sea.  After die cutting with a circle die, I extended the lines on the pier to fill the bottom of the circle (just a few squiggles so not really drawing) and extended the sky at the top to give enough space for the sentiment from the same set.  Then to create an interesting frame for the finished card I used the same die set going up one die size at a time and cut 3 layers of card using colours from the sunset to draw the eye to it.


For this second card I used the image with the people in and made an anniversary card (sentiment is finished inside - it says ....each other.  Happy Anniversary!)   I went with a day-time view this time so stuck to blues in the sky and again I did a little extending of the image this time to the sides so the horizon and clouds were as wide as the pier.  I also added a scribble of hair to the lady so I could crop the image straight across the gentleman's shoulders and it didn't look like part was missing.   Sentiment was stamped with my favourite detail inks - Versafine Clair.


NEWS FROM THE STORE

It's going to be a BIG week in the store this week, as the much anticipated Christmas releases from two of are largest brands are both going to be live in store on Thursday!   Lawn Fawn and Avery Elle will be in store that morning so stand by your beds! 

Release day for those brands is always mega busy, so whilst we do try and combine your orders normally when you place them on the same day and we spot them, please note we CANNOT do that on busy releases as we just don't have the manpower, so PLEASE take your time, and ensure you have EVERYTHING you want in your basket before you checkout, or be prepared to pay postage on every order.

We will also have The Stamping Village Holiday Seals set live that day for those that have been asking about it.

We will also have the latest release from Newton's Nook later this week.

That's all this week - also we are expecting the new Hero Arts release at some point before the end of August the dates are yet to be confirmed as we have to wait for the UK distributor to get it and send ours out.

That's all for this week

Thanks

Tara


Saturday, 17 August 2019

Altenew Happy Bloom and watercolouring

Hello there, It's Anna here. 
 I'm covering for Anika today, and she is going to take over for me next Thursday. After that, we are sure to be posting on our regular days.
Today's card is full of florals from Altenew Happy Bloom stamp set, accompanied by Hello Friend script creative cuts from Mama Elephant.

 My first step was to stamp this huge floral arrangement twice on to watercolour paper and colour it with Zig markers. 
 I chose bright colours and scribbled with my marker where I wanted the shadows to appear the darkest. Then pulled it out with the water brush. ( You can also use a paintbrush ).


I decided to add a border around the edges. For this, I simply masked off the small area, using masking tape and coloured it with a dark marker. You can see the uneven edge here and there, but I like that it is imperfect. ( You can also use dark cardstock if you prefer more graphic look )

My next step was to die cut the Hello Friend sentiment die from Mama Elephant. I cut it three times from Lawn Fawn Kraft Cardstock and stacked together, using liquid glue for a dimensional look.
I also added a strip of vellum from Lawn Fawn to drawn attention to the greeting.
To finish off this card, I chose sequins and glossy accents over the die-cut.

That's all! This card was super fun to make.
Thank you for stopping by. 


I will be back soon with another card. 
 Anna