

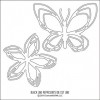
Since I wanted the colors on this butterfly to shine, I selected to go with some black card stock as a base here. I started out by adding some Stick It to a piece of paper and die cutting it with the butterfly die. The adhesive side would be on the bottom to attach the pieces to the card. I used the outline of the butterfly on another project and the negative pieces here: I used my Copic markers to create a gradient following the color wheel and kept my colors light so they would shine against the black.

To add my pieces to the card, I die cut the butterfly again from some sturdy card stock and used the outline as a placement help – I just laid it where I wanted the pieces to go and then puzzled them in. Since my butterfly didn't have a body, I grabbed a few pearls in different sizes and glued them where the body would go. Of course I needed a nice and bold sentiment, and I heat embossing the words from the Classy stamp set in white embossing powder.

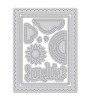
The black mat was cut using my all-time favorite Sunshine Layers dies by Wplus9, and the card base itself was covered with a piece of grey paper which I had run through my Stitched Mats dies to create the stitched border.
Thank you for stopping by today! I hope you got inspired!

So eye catching - it looks fab! Those colours... <3 Love the sentiment too!
ReplyDeleteThis is so pretty! A great way to use those inticate dies
ReplyDelete