
If you've seen my Christmas posts in years gone by then you will know that my weakness when it comes to Christmas products is Christmas Trees - I think I have pretty much every tree ever released by anyone! So I really didn't NEED anymore this year but............ (Yes, I have a problem - I need Christmas Trees Anonymous)
For this first one I used the fabulous Christmas Words Tree Die from Lil' Inkers - not an outright tree so I'm justified in adding this one to my stash! I love this die - it's such a statement piece so I just wanted it to be the focus of the card so I just had a simple border on a square white card and then went full on glitter mode (well it is Christmas)
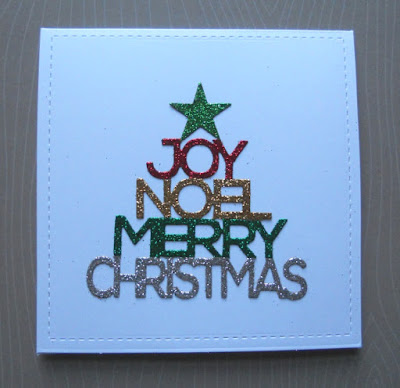
To add extra impact though I wanted different coloured glitter for each word so I just die cut the die 5 times from two shades of green glitter card, red, gold and silver and then simply trimmed them apart with scissors (its really very easy) and the bonus is you then get 5 cards at once.

I should have put stick-it on the back before die cutting but I forgot so just used a glue pen but stick-it would make this quick enough to knock out a batch of 20 in about an hour in a production line so a really good last minute bulk make if you need one.
Next I think is my favourite tree from this year - the fabulous Trim The Tree die from Concord and 9th.

As with all Concord and 9th products - there is just the hint of "clever engineering" about it so what looks like a simple die can actually do so much. You get the large tree shape which here I have used to make a tree shaped card by die cutting with the top of the tree over the fold line and then I've cut another full tree from a single sheet of green to lay over the top so the tree is complete at the top from the front. This will stand up so as well as being a mini card I thought these would make brilliant place cards for the Christmas table. The clever part of this die is the 5 dotted lines they've provided as you can place them however you like to make some interesting swag lines to decorate your tree - you could then add bows die cut from the die as I have here or use enamel dots. I've topped it with a gold star using the star die in the same set.
My final card today is a little more left field! I saw this cover on a magazine we get at home and really loved the "drawn in flour" tree and wanted to try and replicated it on a card.

So I decided to have a play with the new green embossing powder from Altenew and see if I could make a card version. I just sprinkled it onto a dark green card base without any versamark ink and then used a rubber on the end of a pencil to draw my tree shape and then embossed it from UNDERNEATH the card (well I did on my second attempt after the heat gun blew all the powder away on the first attempt lol!) and got a similar effect (although not quite the mag shot!)

I added a few glittery enamel dots, a star from the trim the tree die, and then embossed a sentiment and a pot using the new razzleberry pink embossing powder. It would be quite a fun technique to try with any "little fingers" around the house - if you do the embossing they could do the drawing.


NEWS FROM THE STORE
Catch you next week
Tara
For this first one I used the fabulous Christmas Words Tree Die from Lil' Inkers - not an outright tree so I'm justified in adding this one to my stash! I love this die - it's such a statement piece so I just wanted it to be the focus of the card so I just had a simple border on a square white card and then went full on glitter mode (well it is Christmas)

To add extra impact though I wanted different coloured glitter for each word so I just die cut the die 5 times from two shades of green glitter card, red, gold and silver and then simply trimmed them apart with scissors (its really very easy) and the bonus is you then get 5 cards at once.

I should have put stick-it on the back before die cutting but I forgot so just used a glue pen but stick-it would make this quick enough to knock out a batch of 20 in about an hour in a production line so a really good last minute bulk make if you need one.
Next I think is my favourite tree from this year - the fabulous Trim The Tree die from Concord and 9th.

As with all Concord and 9th products - there is just the hint of "clever engineering" about it so what looks like a simple die can actually do so much. You get the large tree shape which here I have used to make a tree shaped card by die cutting with the top of the tree over the fold line and then I've cut another full tree from a single sheet of green to lay over the top so the tree is complete at the top from the front. This will stand up so as well as being a mini card I thought these would make brilliant place cards for the Christmas table. The clever part of this die is the 5 dotted lines they've provided as you can place them however you like to make some interesting swag lines to decorate your tree - you could then add bows die cut from the die as I have here or use enamel dots. I've topped it with a gold star using the star die in the same set.
My final card today is a little more left field! I saw this cover on a magazine we get at home and really loved the "drawn in flour" tree and wanted to try and replicated it on a card.
So I decided to have a play with the new green embossing powder from Altenew and see if I could make a card version. I just sprinkled it onto a dark green card base without any versamark ink and then used a rubber on the end of a pencil to draw my tree shape and then embossed it from UNDERNEATH the card (well I did on my second attempt after the heat gun blew all the powder away on the first attempt lol!) and got a similar effect (although not quite the mag shot!)

I added a few glittery enamel dots, a star from the trim the tree die, and then embossed a sentiment and a pot using the new razzleberry pink embossing powder. It would be quite a fun technique to try with any "little fingers" around the house - if you do the embossing they could do the drawing.


NEWS FROM THE STORE
- We are still waiting for our delivery of the November Hero Arts kit add-ons - we don't have an eta (we never get one from Hero Arts) but hopefully it will be soon.
- We hope that a restock from Concord and 9th will ship early this week so fingers crossed we'll have the dahlias back by the end of the week.
- We have a lot of "move planning" to do this week so other than that, it will be a quieter week for releases - there are a few smaller releases we've missed but we will get them after our move - something just had to give as I really do need a tiny bit of sleep each day!
Catch you next week
Tara
What a fabulous trio of trees, Tara! The one that caught my eye especially ... and prompted me to come and tell you how brilliant it is ... is the 'drawn in flour' one. It's so clever and creative ... and I love how it gives the tree a 'halo' of colour around it! Thanks for the great idea! Anita :)
ReplyDelete