
I've got a little Christmas decoration project to share today in an east meets west vibe as I've created a Christmas lantern based on a Japanese Shoji Screen.

It may look complex but it actually only took an hour to make and is pretty simple. You just need thick card in your chosen colour (I went blue as it will be used in my dining room this Christmas), a rectangle die, a sheet of vellum, stamp of your choice, embossing powder in your choice of colour and strong glue. If you want to light it, you will also need some battery operated lights that do not get hot - DO NOT USE A CANDLE WITH A REAL FLAME. I used a small set of leds wired on copper (£10 for 8 sets on Amazon)

I forgot to take step by step photos as I went, but I have drawn up some plans for you instead so you have the exact measurements of mine if you want to replicate it, but you can scale it up or down to suit your stamp or die cut design.
I started with 2 sheets of A4 navy card and scored along the longest side at 10cm and 20cm and then trimmed at 20.5cm to give me a small folded edge to glue my two pieces together. I then turned the card and scored at 13.5cm along the height, leaving the remaining card stock to fold in to form the bottom of the lantern. (trim off the extra 0.5cm from that edge as it will get in the way. To create the holes for the vellum panels I used the 5th largest die in the Hero Arts Rectangle Infinity set.
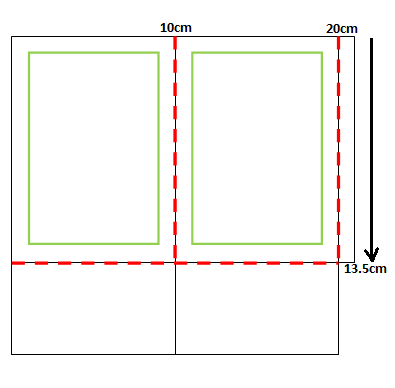
To create the legs I used another sheet of navy card trimmed to the same width (20.5cm) but this time with 2 5cm deep strips scored at 10cm and 20cm and at 1cm down to create a folded area to glue to the underneath of the base - this creates your feet and adds that oriental feel to the shape. I used the dies to ensure I got the gaps the same as the panels - just line them up and let them hang over the edge as in the image below.
 Put those aside and create your panels - either use a die 2 sizes larger than your holes or trim 4 pieces of vellum to size so it covers the panels but stays inside the frame.

Dust each vellum sheet with an embossing powder tool as vellum will hold every bit of loose powder without it. Stamp your chosen image - I used the gorgeous sparkly tree from AlteNew's Starry Night Stamp set, topping it with a star from the same set and embossing it with Silver Sparkle powder from Hero Arts. I added a few dots of teal glitter glue to some of the elements just to make it fit my decor better but it really doesn't need it - here's the silver version.

If you didn't want to go down the embossing route - you could add a delicate die cut like the Captivating Mandala or a Christmas sentiment like Li'l Inker Designs Peace on Earth.
Once your panels are decorated - glue them behind your frame - using a strong wet glue like Lawn Fawn's Glue Tube makes it easier to align the panels as you have a little wiggle-time with wet glue. That glue was also my choice to glue all the elements together as it really is very strong. Add glue to the narrow tabs and glue to two panels of the lantern together and then glue the base so the folded in tabs hold.


Turn the lantern upside down and use more glue to adhere the legs to the underneath of the base and glue the narrow tabs to hold the legs together.
Add lights and celebrate your achievements with a small sherry (well it is nearly Christmas!)


NEWS FROM THE STORE
It's going to be another busy week.
We were inundated with orders on our day off and over the following couple of days thanks to the freepost code we gave out in our newsletter - if you missed it then make sure you sign up for our newsletter here so you don't miss future offers. https://sevenhillscrafts.co.uk/community-links/newsletter.html So it will be Tuesday before we catch up on packing orders.
Otherwise we expect the follow items to be added to store this week:
Catch you later
Tara

It may look complex but it actually only took an hour to make and is pretty simple. You just need thick card in your chosen colour (I went blue as it will be used in my dining room this Christmas), a rectangle die, a sheet of vellum, stamp of your choice, embossing powder in your choice of colour and strong glue. If you want to light it, you will also need some battery operated lights that do not get hot - DO NOT USE A CANDLE WITH A REAL FLAME. I used a small set of leds wired on copper (£10 for 8 sets on Amazon)

I forgot to take step by step photos as I went, but I have drawn up some plans for you instead so you have the exact measurements of mine if you want to replicate it, but you can scale it up or down to suit your stamp or die cut design.
I started with 2 sheets of A4 navy card and scored along the longest side at 10cm and 20cm and then trimmed at 20.5cm to give me a small folded edge to glue my two pieces together. I then turned the card and scored at 13.5cm along the height, leaving the remaining card stock to fold in to form the bottom of the lantern. (trim off the extra 0.5cm from that edge as it will get in the way. To create the holes for the vellum panels I used the 5th largest die in the Hero Arts Rectangle Infinity set.

To create the legs I used another sheet of navy card trimmed to the same width (20.5cm) but this time with 2 5cm deep strips scored at 10cm and 20cm and at 1cm down to create a folded area to glue to the underneath of the base - this creates your feet and adds that oriental feel to the shape. I used the dies to ensure I got the gaps the same as the panels - just line them up and let them hang over the edge as in the image below.


Dust each vellum sheet with an embossing powder tool as vellum will hold every bit of loose powder without it. Stamp your chosen image - I used the gorgeous sparkly tree from AlteNew's Starry Night Stamp set, topping it with a star from the same set and embossing it with Silver Sparkle powder from Hero Arts. I added a few dots of teal glitter glue to some of the elements just to make it fit my decor better but it really doesn't need it - here's the silver version.

If you didn't want to go down the embossing route - you could add a delicate die cut like the Captivating Mandala or a Christmas sentiment like Li'l Inker Designs Peace on Earth.
Once your panels are decorated - glue them behind your frame - using a strong wet glue like Lawn Fawn's Glue Tube makes it easier to align the panels as you have a little wiggle-time with wet glue. That glue was also my choice to glue all the elements together as it really is very strong. Add glue to the narrow tabs and glue to two panels of the lantern together and then glue the base so the folded in tabs hold.


Turn the lantern upside down and use more glue to adhere the legs to the underneath of the base and glue the narrow tabs to hold the legs together.
Add lights and celebrate your achievements with a small sherry (well it is nearly Christmas!)


NEWS FROM THE STORE
It's going to be another busy week.
We were inundated with orders on our day off and over the following couple of days thanks to the freepost code we gave out in our newsletter - if you missed it then make sure you sign up for our newsletter here so you don't miss future offers. https://sevenhillscrafts.co.uk/community-links/newsletter.html So it will be Tuesday before we catch up on packing orders.
Otherwise we expect the follow items to be added to store this week:
- Reverse Confetti's latest release
- Neat and Tangled's latest release
- Ranger Alcohol inks and some other Tim Holtz bits and pieces
- Mama Elephant's latest release will be live in store on the 15th
- Concord and 9th as soon as we get it after it ships (we hope that will be Monday so we should have it by the end of the week customs willin)
Catch you later
Tara
What a great idea to make a pretty lantern and I also like the small sherry reward idea too! Thanks for the store update - so many lovely things arriving.
ReplyDelete