
I have a couple of cards to share today and a little "how to" on extending the length of die cuts in case its a technique you haven't tried - it's a great way to make your stash do more for its money.
 Firstly, I couldn't resist playing with the new Hillside Cover Die from Mama Elephant - this die is a little different as it only cuts a few lines - the rest of the stitched lines just give great embossing detail. This means that your "hills" stay in the frame which makes it really easy to use and you can "insert" characters into the hills. However I saw ocean waves not hills so I added whales!

I masked off the edge of the frame with post-it tape and used 3 shades of MFT blue ink to create an ombre ocean in the middle before emphasising the wave edges with a white pencil and some sponged on white ink foam. I stamped the whales from Whale Wishes also by Mama Elephant onto white card and cut them out and tucked them into the waves. The spray and sentiment from the set were stamped directly onto the waves. A little co-ordinating paper finishes the card.
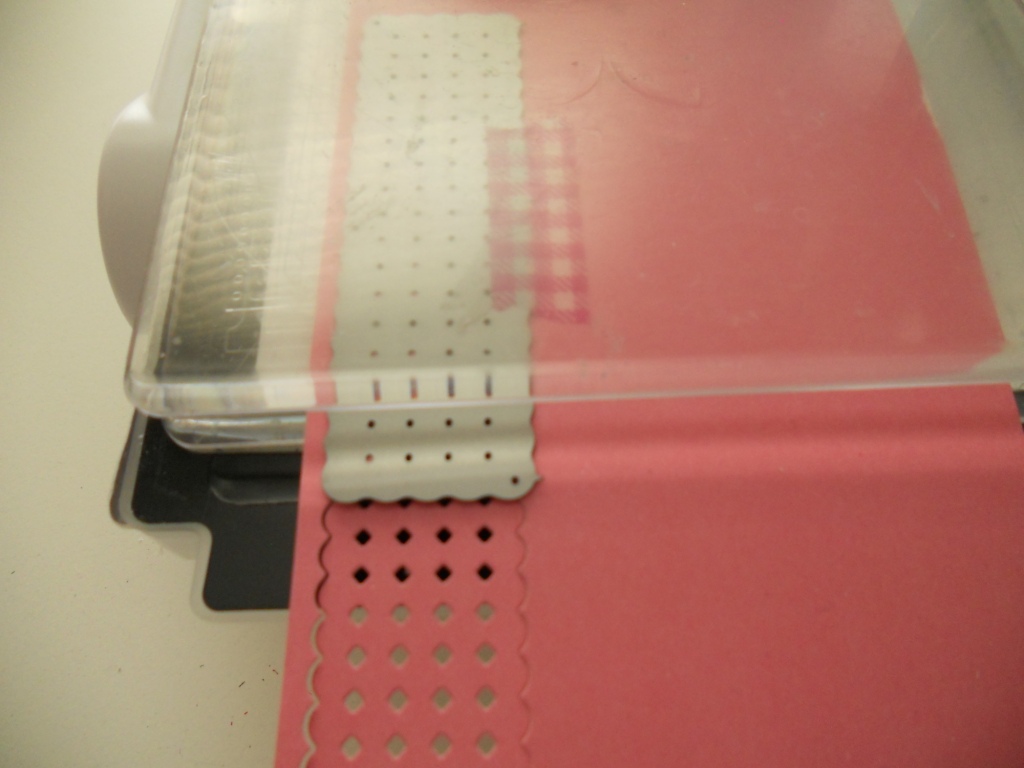
My second card uses another new die - this time The Double Panel Circle die from Reverse Confetti and I just love it - its a very clever 2 part die but it doesn't look like much until you see it in use! I decided to lengthen it too so it covered more of my card. If you don't know how to do this, its very easy - so I have a couple of how to photos and steps.

First - line up the bottom of the die with the edge of the cardstock furthest away from the rollers and hang the opposite edge out beyond the cutting plates as in the photo above.
Remove the die from the machine and repeat the process in the opposite direction. Line the die up so it overlaps the area already cut (very easy with this die as the bumpy edges are great locators) and then leave the edge furthest away from the rollers hanging beyond the cutting plates so you don't cut off the length you previously cut. (Use a little washi tape to make sure the die doesn't move)

I repeated the same process using grey with the top layer of the die and used that as a decorative base for my card.

The other elements from the card all come from Mama Elephant's Butterfly Kisses. I stamped the flower and butterflies onto some olive green card stock and coloured them with Polychromos pencils. I love this technique it gives such a different look to colouring on white - you can get the same results on kraft. The butterflies were stamped onto the base image before adding the card versions on top so I didn't have to fussy cut their fiddly legs!


NEWS FROM THE STORE


I masked off the edge of the frame with post-it tape and used 3 shades of MFT blue ink to create an ombre ocean in the middle before emphasising the wave edges with a white pencil and some sponged on white ink foam. I stamped the whales from Whale Wishes also by Mama Elephant onto white card and cut them out and tucked them into the waves. The spray and sentiment from the set were stamped directly onto the waves. A little co-ordinating paper finishes the card.
My second card uses another new die - this time The Double Panel Circle die from Reverse Confetti and I just love it - its a very clever 2 part die but it doesn't look like much until you see it in use! I decided to lengthen it too so it covered more of my card. If you don't know how to do this, its very easy - so I have a couple of how to photos and steps.

First - line up the bottom of the die with the edge of the cardstock furthest away from the rollers and hang the opposite edge out beyond the cutting plates as in the photo above.
Remove the die from the machine and repeat the process in the opposite direction. Line the die up so it overlaps the area already cut (very easy with this die as the bumpy edges are great locators) and then leave the edge furthest away from the rollers hanging beyond the cutting plates so you don't cut off the length you previously cut. (Use a little washi tape to make sure the die doesn't move)
I repeated the same process using grey with the top layer of the die and used that as a decorative base for my card.

The other elements from the card all come from Mama Elephant's Butterfly Kisses. I stamped the flower and butterflies onto some olive green card stock and coloured them with Polychromos pencils. I love this technique it gives such a different look to colouring on white - you can get the same results on kraft. The butterflies were stamped onto the base image before adding the card versions on top so I didn't have to fussy cut their fiddly legs!


NEWS FROM THE STORE
- We just had new releases from Concord and 9th (plus restocks on Sophisticated Script) and SugarPea Designs this weekend.
- We've been struggling with our UK distributor for Art Impressions and Thermoweb but are now happy to report we have found a better one so hope to have some new items and restocks from those brands by the end of this week.
- Our felt should be in store later this week too.
- We also have a brand new brand coming - watch this space for news very soon!
Two beautiful cards and now I need those butterfly kisses stamps. Your lovely store is bankrupting me!
ReplyDelete